Charmed by the buttery smoothness of iOS 7, I switched to iPhone from Android around 7 years ago. What I seemingly lost in the customization department back then, I gained in the privacy aspect along with of course the clutter-free experience. Since then I have explored every iteration of iOS with a keen interest in changes related to security and privacy. As I’m all geared up to share the tips to improve security and privacy in iOS 14, I feel more pumped up than ever before – due largely to the setting where rivals like Google and Facebook seem to have upped the ante. If enhancing iOS 14 privacy is on your radar, you have landed at the right blog to get started!
Tips to Improve Security and Privacy on iPhone and iPad in 2021
From stopping usual suspects like Twitter and TikTok from snooping into your clipboard without your approval to blocking networking operators from tracking you across apps/websites to forcing apps to ask for permission for tracking in the plain language, iOS 14 has put privacy at the forefront.
So, if you don’t mind spending a few minutes to get a good hang of each new feature, you will be able to get much better control over several pivotal things like a camera, microphone, location data, and even the clipboard that has often been found to be misused by apps that have a habit of putting privacy at the backburner. Now that you have got a fair amount of idea about what this guide has got for you, it’s time to learn various ways and means through which you can bolster iOS 14 privacy on your iPhone or iPad.
1. Stop Apps from Tracking You Across Apps and Websites
In what could be a massive crackdown on Google and Android as their business model heavily relies on the advertisement, Apple has rolled out a privacy-centric feature that enables users to disable tracking. Besides, it also forces iOS apps to explicitly ask for permission to track users across apps and websites.
Despite the huge backlash from the ad industry led by Facebook, the iPhone maker seems unmoved, so you can expect it to remain an integral part of iOS privacy from now onwards. Call it Apple’s latest brutal attack on the ad industry or the vehement desire to make apps embrace a crystal clear approach to track a user’s activity, the Cupertino based company’s intent is loud and clear.
![]()
For those uninitiated, ad tracking (aka post-testing or ad effectiveness tracking) is the process of keeping a tab on how much of an impact an advertising channel has garnered. To be more precise, it’s all about tracking the effectiveness of ad campaigns and plays a vital role in finding out how much the ad spend translates to increased sales.
With iOS 14, apps have no other option but to ask for permission to track. Once you have allowed them to track your activity, they will collect certain data like profile information such as age, gender, and location detail to deliver personalized ads to you. From a privacy perspective, the ability to turn off tracking or make apps come clean on track seems to be a well-timed feature given the ever-growing concern about privacy. Therefore, I guess most of you would appreciate it.
To turn off tracking on your iPhone, open the Settings app -> Privacy -> Tracking. Now, turn off the switch right next to “Allow Apps to Request to Track”.
2. Keep a Tab on the Green and Orange Dots
Whenever an app needs to use your iPhone camera or microphone, it asks for your permission in plain language. While this expected behavior is fine, there have been several instances where social media apps like Instagram and Facebook have been caught red-handed blatantly abusing this functionality. In other words, they have been found using your camera and microphone even if you have disallowed them.
No longer! With iOS 14, Apple has rolled a security feature that makes it incredibly straightforward to find out which app is currently using camera/microphone on your iPhone.
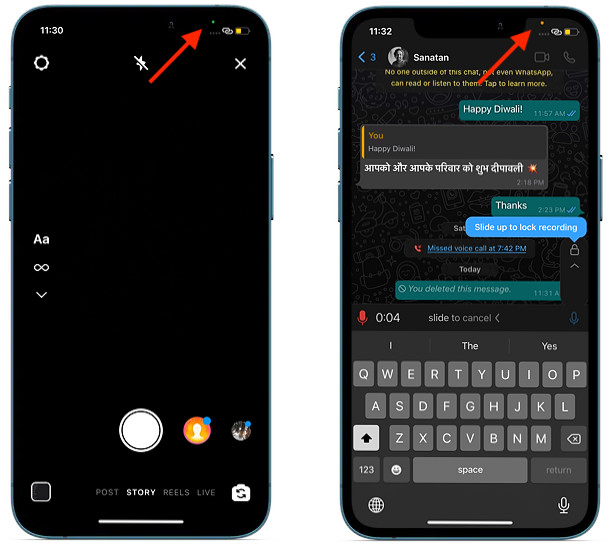
- Green Dot: If the green dot appears in the status bar (just above the WiFi and cellular signal bars), it means an app is currently using the camera.
- Orange Dot: If you see Orange in the status bar, it means an app is currently using the microphone.
When you close the app using the camera/microphone and then access the Control Center on your iPhone, the camera/microphone icon will appear along with the name of the app which is using the feature.
3. Restrict Apps from Having Access to Your Local Network
Some apps that deal with Bluetooth or WiFi-based devices have a valid reason to access the local network (aka home network). However, there are certain resource-hogging apps like Facebook and TikTok that badly want to access it, even though there is very little clarity about what it does with the local network.
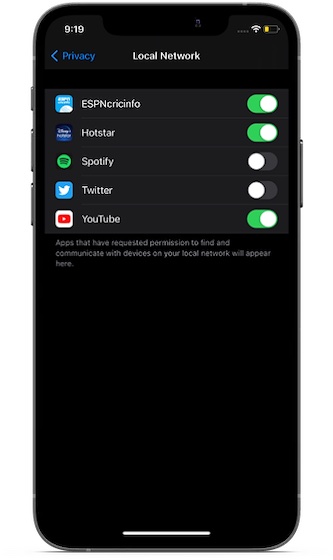
Fortunately, you can manage third-party access to your local network in iOS 14 or later. To get it done, launch the Settings app on your iOS device and choose Privacy. Now, find Local Network and tap on it. Now, you should see the list of all the apps that have access to your local network. Next, turn on/off the switch right next to each app to control its access.
4. Prevent Network Operators from Tracking Your iPhone and iPad Across Networks
To communicate with a Wi-Fi network, a device needs to use a unique network address known as MAC (Media Access Control) to identify itself to the network. And if the device is found to use the same Wi-Fi MAC address across all networks, it becomes quite easier for the network operators to relate that address to the device’s network activity and location. Furthermore, it also opens the gateway for user tracking or profiling of personal information.
To prevent network operators from tracking your iPhone and iPad across networks, iOS 14 (also iPadOS 14, and watchOS 7) now lets you use a different MAC address for each Wi-Fi network. Notably, this unique MAC address works as your device’s private Wi-Fi address that blocks network operators from profiling your personal info.
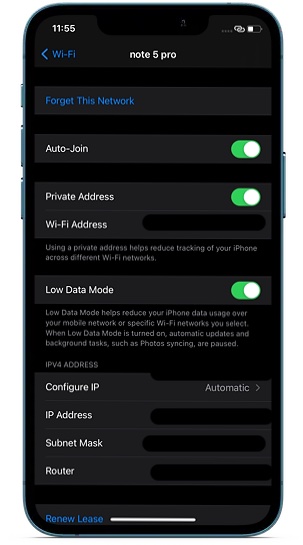
To use this privacy feature, open the Settings app on your iPhone or iPad, and tap on Wi-Fi. Next, tap on the “info” button right next to the Wi-Fi network which you want to use. After that, turn on the switch next to Private Address.
Note:
- If you want to enable the Private Address on your Apple Watch, launch the Settings app -> Wi-Fi -> the network in question. Now, toggle the switch for Private Address to the ON position.
5. Prevent Apps from Having Access to Your Precise Location
Ever wished to stop an app from having access to your precise location even though you felt it was unnecessary? If yes, you would be glad to know that Apple has finally introduced a way to block apps from getting access to your approximate location.
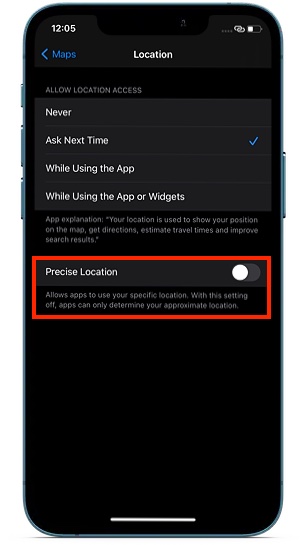
To get it done, launch the Settings app on your iPhone -> find the app to which you don’t want to have access to your precise location and tap on it. Then, tap on Location. After that, turn off the switch right next to Precise Location.
When you are using ride-sharing or navigation apps during travel, it becomes essential (more often than not) to allow access to your approximate location. However, many a time it seems unnecessary to let apps know your exact location. So, whether you want to safeguard the privacy of your whereabouts or simply don’t want apps to find out your approximate location, this feature could be worth having at your disposal.
6. Manage Third-Party Access to Your Photos App
Gone are the times where you had to let third-party apps like WhatsApp access your entire photo library even though you wanted to share just a handful of photos and videos. From now onwards, you can choose to allow third-party apps to access only specific photos. What’s more, you can even edit the already shared photos to block access to the images you no longer want to expose – both per-app basis or as a whole.
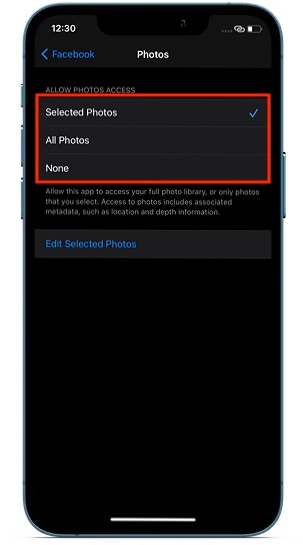
If you want to manage third-party access to the Photos app individually, open the Settings app on your iPhone and select the app in question. Now, tap on Photos. Then, you have multiple options to choose from: Selected Photos, All Photos, and None.
Go with the Selected Photos option if you want to allow the app to access only a few selected images. If you ever wish to allow/disallow the selected photos, return to this same setting and then tap on the Edit Selected Photos option and then allow or disallow access to the images as per your needs.
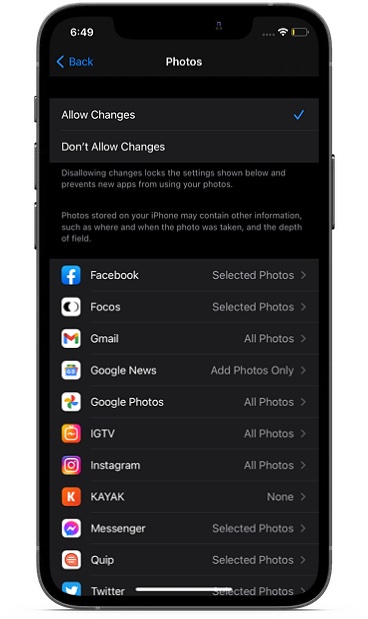
If you want to control third-party access to your Photos app right from one spot with better control, launch Settings app -> Screen Time -> Content & Privacy Restrictions. Make sure the toggle for Content & Privacy Restrictions is turned on. Now, tap on Photos. On this screen, you should see the list of all the photos which have access to your photo library. Next, select each app and then fine-tune its setting.
Do note that you also have the option to completely disallow new apps from using the Photos app. To do it, make sure to select Don’t Allow Changes.
7. Hide the Hidden Album
What’s the point in hiding something if you can’t keep it out of sight? Finally, iOS has offered a better way to keep the hidden album away from the prying eyes. So, if you no longer want anyone to easily discover your private photos, you should make the most of this all-new feature.
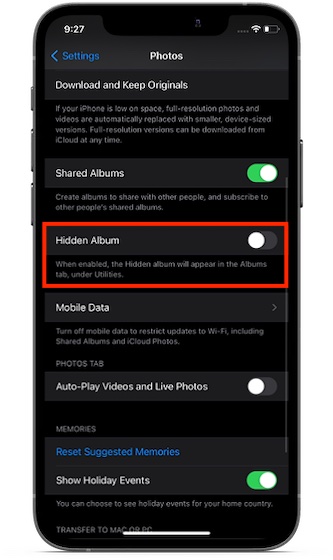
To keep your hidden album out of sight, head over to the Settings app -> Photos app. Now, turn off the switch right next to Hidden Album. That’s pretty much it! From now onwards, the hidden album will no longer appear in the Photos app. If you ever want to make it appear again, simply return to this same setting and then turn on the switch for Hidden Album.
8. Check Safari Privacy Report
Safari has doubled down on privacy with the introduction of iOS 14. And guess what, the Apple web browser seems to have become more aggressive in terms of keeping a tab on trackers. The browser not only keeps an eye on data trackers but also prevents them from following you across websites.
Some websites let data collection companies known as trackers to track your browsing activity. As a result, they can closely follow your activity and create a profile for advertisers. Safari uses the intelligent tracking prevention technique powered by on-device machine learning to identify trackers and also blocks them from having access to the identifying information. The stock web browser works in tandem with the DuckDuckGo to identify data trackers.
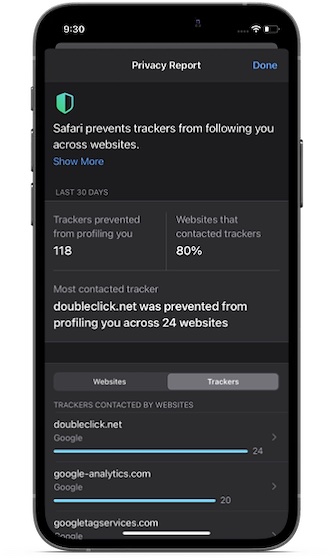
To check the Safari privacy report, open the web browser, and then tap on the text button at the top left corner of the screen. After that, choose the Privacy Report. Now, you should see the detailed privacy report compiled by the browser. Check out the number of trackers prevented by the browser and the percentage of websites that contacted trackers.
Not just that, Safari will also let you know the most contacted tracker and across how many websites it was stopped from profiling you.
9. Password Monitoring and Compromised Password Alerts
Another notable security and privacy feature that Safari has got is the ability to monitor passwords saved in iCloud Keychain (built-in password manager). Moreover, the browser also alerts you about the weak passwords that have been either compromised or likely to be compromised. Thanks to the direct links to websites, it allows you to change your passwords with ease.
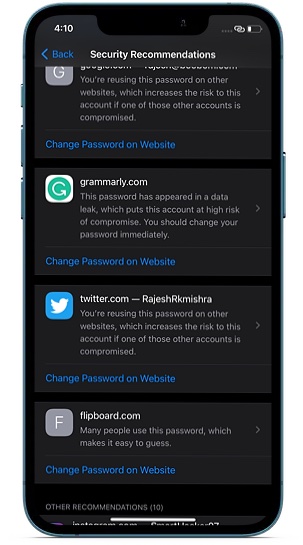
Using cryptographic techniques, Safari tracks down derivations of the passwords against a compiled list of breached passwords, which Apple claims to be a highly secure and private way. You can check the potential problems under the “Security Recommendations” heading in the Passwords section inside the Settings app.
10. App Store Privacy Reports
With iOS 14, Apple has forced each app to clearly mention its stance on privacy. Thus, apps have now included a privacy section revealing how they manage privacy or for that matter how they handle the personal information of users.
For instance, developers now have to explain what data (i.e contacts, browsing history, location, purchases, identifiers, financial info) is collected and linked to your accounts, devices, or identity. Besides, they must also come clean on what data is used to track you across apps and websites.
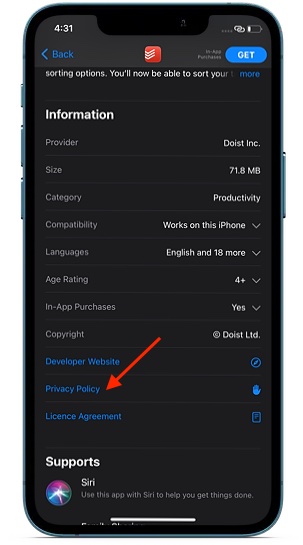 So, before downloading any app on your iPhone, you check its privacy policy to find out how it uses your personal information. Once you have found an app you wish to download, navigate to the app information section, and tap on Privacy Policy. Now, you should see the detailed info related to how the app manages privacy.
11. Manage Widgets Access to Your Location Data
Another notable privacy feature that you must keep in mind is the ability to control widgets’ access to your location data. For a change, you can now let both the app and its accompanying widget access your location at once or allow just the app to use your location. Considering how power-hungry location services, it’s always better to take control of it if you want to improve the battery life of your device.
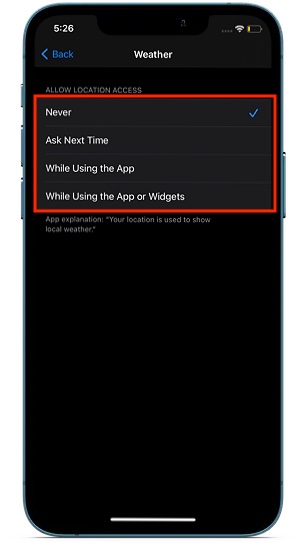
To control widgets’ access to your location data, navigate to Settings app -> Privacy -> Location Services -> App. Now, you should see multiple options to choose from: Never, Ask Next Time, While Using the App or Widgets or While Using the App. Select the preferred option and you are good to go.
12. Keep an Eye on Clipboard Access
So many apps like Twitter and TikTok have been found reading clipboard even without taking permission from users. Worse, they could access the clipboard even when it was unnecessary. With iOS 14, Apple has sorted out this long-existing privacy abuse with clarity.
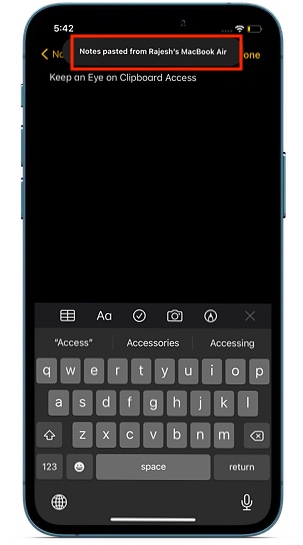
From now onwards, whenever an app has access to the clipboard, you should see a tiny banner at the top center, letting you know that the clipboard has been copied. So, make sure to keep an eye on the banner if you don’t want an app to break your set rule.
13. Transfer Existing Web Accounts to Sign in with Apple
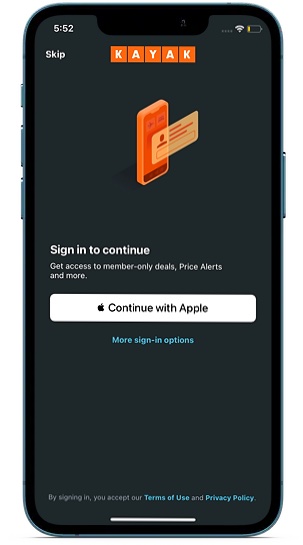
If you want to keep your personal information private, always make sure to sign in with Apple. But what if you have already signed in using other services like Facebook or Google? Bother not, you can now transfer your existing web accounts to Sign in with Apple. To convert your login to the Sign in with Apple, simply select it at the sign-in screen and you are good to go.
14. On-Device Dictation
Dictation has long been one of the most loved iOS features. And with iOS 14, it’s become more efficient in terms of letting you enter text using voice. By ensuring all the process is done offline, Apple has not only further enhanced the usability of dictation but also made sure it keeps the privacy of the user intact. Do note that the dictation used in the search still relies on a server-based process.
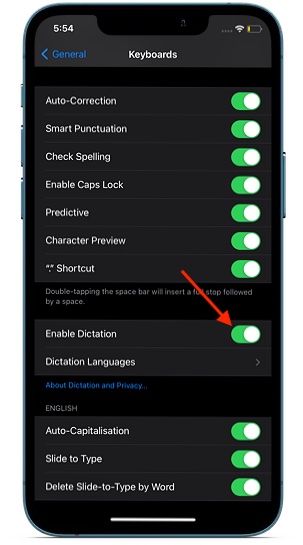
To activate dictation on your iPhone, head over to Settings app -> General -> Keyboard -> Enable Dictation. From now onwards, you can tap on the microphone icon to enter text using your voice.
15. Contacts Autofill
Putting users’ privacy on the forefront, Apple has added a smart autofill feature that prevents you from sharing contacts with third-party apps. Whenever you start typing someone’s name, iOS 14 automatically fills in information like their email addresses, addresses, phone numbers, etc. stored in the Contacts app.
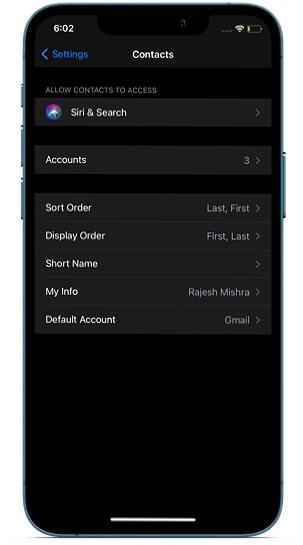
Even better, the entire autofill process is done on-device, thereby stopping the contact info from being shared with third-party developers. So, while filling in the contact info, make sure to take advantage of this feature to get your work done faster while still keeping the privacy intact.
16. Remove Contact Suggestions in Share Sheet
While I find the contact suggestions quite helpful as it makes sharing more convenient, some people may not want them to appear in the share sheet. Especially those who wish to prevent some personal contacts from popping up in the sharing sheet.
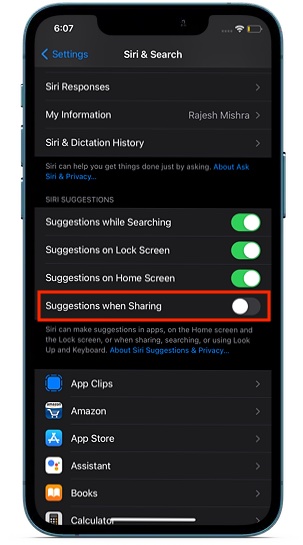
If that’s you, navigate to Settings app -> Siri & Search. Now, turn off the toggle for Suggestions when Sharing. Going forward, Siri won’t suggest contacts in the sharing sheet. Later if you ever happen to change your mind, simply come back to this setting and then turn on this toggle.
Enhance Security and Privacy in iOS 14 on iPhone
Without undermining the predecessors like iOS 12 or 13, I would like to say that iOS 14 seems to be more robust from a security and privacy perspective. While it may not be perfect as yet, it’s got most bases covered to be a complete operating system for iPhone.
Now that you have got a range of privacy and security features vying for attention, fine-tune each one of them to safeguard your experience. But before diving straight into the settings, make sure to spill some beans about iOS 14 privacy and what makes it stand out. Also, don’t forget to pin-point the loopholes that you want Apple to get rid of sooner than later.


