
Windows 10 is the platform of choice for PC gamers for a reason. Not only is Windows 10 compatible with almost all major PC games from the last couple of decades, but you can also tweak a number of built-in settings and third-party software to get the best possible performance for playing your favorite MMORPG or battle royale games. So today, we will discuss the best ways to optimize the performance of your Windows 10 computer for gaming.
Optimize Your Windows 10 PC for Gaming (Updated 2022)
In this article, we will discuss different software solutions to optimize the gaming performance of your Windows 10 PC, along with a few hardware upgrades that will offer the best results. So read on to know more about how you can extract the best out of your computer while playing games like Fortnite, Assassin’s Creed Valhalla, GTA V (with mods), Ark: Survival Evolved, Red Dead Redemption 2, Call of Duty, Destiny 2, Apex Legends, Rainbow Six Quarantine, and more.
Software Solutions to Improve Gaming Performance in Windows 10
To improve gaming performance on your Windows 10 machine, you can carry out several tweaks and changes. Most of them are software-based, which means you don’t even need to spend any extra money to get them done. Here are our recommendations:
1. Enable Game Mode in Windows 10
Perhaps the easiest and most obvious way to tweak performance on your PC is to enable the ‘Game Mode‘ in Windows 10. The feature stops background activities like Windows updates and app notifications to help boost FPS in your games.
The Game Mode is ‘On’ by default, but it doesn’t hurt to do a quick check. To do that, go to Settings (Windows key + I) > Gaming > Game Mode (left sidebar). You’ll now see a ‘Game Mode’ toggle in the right pane. Switch it on if it isn’t already.


2. Lower Your Game’s Resolution and Graphics Settings
If your PC is a super-high-end beast, you probably don’t need much tweaking anyways. But if you are like the rest of us and have to make do with something less than top-tier, you may need to make some sacrifices in the graphics department for smoother gameplay. Lowering your game’s graphics settings can improve FPS by easing the load on the GPU. It won’t have to support as many pixels with each frame.
Most dedicated gaming PCs of relatively recent vintage can handle 1080p@60FPS in most games. However, some might struggle to support 4K or even 2K resolutions, while your typical office laptop might even struggle with 1080p gaming. So make sure you try out a few options to find the optimal balance between graphics quality and higher FPS.
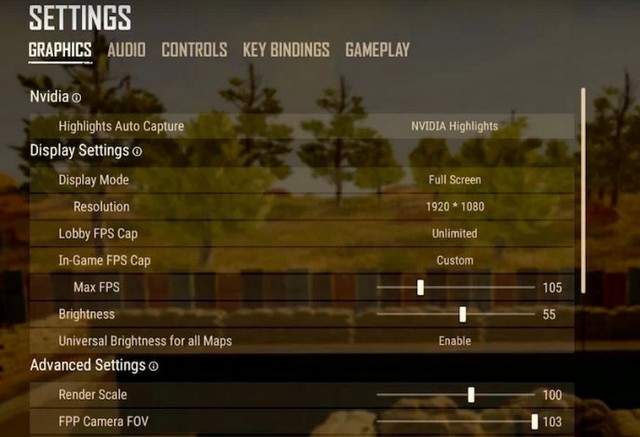
Some games will have simple settings like ultra, high, medium, and low, while others have sliders, numerical settings, etc. Here’s a quick look at some of the options in PUBG.

3. Update Graphics Drivers to Optimize Windows 10 PC for Gaming
Another classic piece of troubleshooting advice is updating the GPU to the latest drivers can greatly enhance gaming performance. The chart below from Nvidia shows how drivers can help improve FPS in games by as much as 23% in some cases. The same holds for AMD Radeon drivers as well. If you’re new to PC gaming, follow our detailed guide on how to update drivers on your Windows 10 PC.


4. Disable SuperFetch (SysMain)
SysMain (formerly SuperFetch) is a built-in Windows feature that improves startup times for apps and Windows itself. However, games do not generally benefit from it. Indeed, background activity often increases when it is enabled, but turning it off can improve gaming performance on your Windows 10 PC. Check out our detailed guide on reducing CPU and memory usage to learn how you can turn off SysMain (SuperFetch) on your computer.


Note: Disabling SysMain (Superfetch) is redundant if you’re using an SSD, but some HDD users might benefit from it.
5. Disable Prefetch
To disable Prefetch, you will need to dig around in the Windows registry. So search for ‘regedit’ in the Windows search bar and open the registry editor. Then, navigate to the following key using the left pane: HKEY_LOCAL_MACHINE \ SYSTEM \ CurrentControlSet \ Control \ Session Manager \ Memory Management \ PrefetchParameters. Now double-click on EnablePrefetcher in the right pane and change the DWORD (32-bit) Value to “0” (without quotes).


6. Enable Focus Assist
Notification pop-ups and the accompanying chimes can interrupt games, and this is where the Focus Assist feature comes in handy. Focus Assist in Windows 10 lets you specify how and when you receive notifications. So to prevent annoying messages and pop-ups when you’re gaming, open Settings (can also use the shortcut Windows key +I) -> System -> Focus Assist. Now select ‘Alarms Only’ or ‘Priority Only’ to hide all unnecessary pop-ups.

7. Switch Off Background Services
You can also prevent apps, including some Windows 10 services, from running in the background to optimize your PC for gaming. Services running in the background often take up additional system resources, thereby hampering foreground activities, including gaming.
To disable background services, go to Settings -> Privacy -> Background Apps. Now switch off the ‘Let apps run in the background’ toggle in the right pane to prevent apps from using resources in the background. You can also keep the main toggle on and switch off individual apps if you want some apps to run in the background.

8. Uninstall Redundant Programs and Bloatware
Windows tends to get slower with each installed program. One way to speed up your Windows 10 computer and reduce lag is to uninstall programs you no longer use. It improves your PC’s speed as well as power efficiency.
To uninstall programs, go to Control Panel -> Programs and Features. Now select the app or program you want to uninstall and hit the ‘Uninstall’ button at the top. Confirm your choice to remove the app from your PC.


Note: You can also uninstall apps from Settings -> Apps -> Apps and Features. Just scroll down once you reach Apps and Features, click on the program you want to uninstall, and hit the ‘Uninstall’ button.
9. Optimize Power Settings
Some power settings can throttle the CPU irrespective of whether you are using a laptop or a desktop. So selecting a performance-oriented power plan can optimize your Windows 10 PC for gaming.
To do that, right-click on the battery symbol on the notification tray and select Power Options. On desktops, you can open the power settings menu from Control Panel -> Power Options. Now click on ‘Show additional plans’ and enable a high-performance plan.


Note: If you don’t see the ‘Show additional plans’ option, click on ‘Create a power plan’ in the left sidebar and then select ‘High Performance’. You can always tweak the options to your requirement.
If you’re using a laptop, you can also tweak your power settings directly from the battery icon on the system tray. To do that, click on the icon and drag the slider over to the ‘Best performance’ option.


10. Disable Mouse Acceleration
Mouse acceleration (Microsoft calls it Pointer Precision) helps you while working with text editors and navigating between GUI elements in Windows and other programs. However, it can adversely impact how your mouse performs in games. Disabling this can help optimize gaming in Windows 10. To do that, go to Control Panel -> Mouse -> Pointer Options. Now de-select the ‘Enhance Pointer Precision’ checkbox. Click Apply or OK, and you are done.


11. Tweak Your Nvidia Control Panel or Radeon Control Center
Graphics drivers from Nvidia and AMD come with their own control panels that let you tweak the graphics settings. For demo purposes, we are using the Nvidia Control Panel, but you can also tweak the corresponding options in the AMD software for similar results.
To access the Nvidia control panel, right-click on an open space on your desktop and select Nvidia Control Panel. Now click on ‘Manage 3D Settings‘ on the left sidebar to change the following settings to optimize your Windows 10 PC for gaming:
- Maximum Pre-Rendered Frames: This setting controls the number of frames that the processor prepares before transferring them to the graphics card. Increasing this value generally results in smoother gameplay. However, you may notice some lag if you use your mouse and keyboard for gaming. To eliminate lag, set this to “1“.


- Threaded Optimization: This option enables multi-threaded optimization for modern multi-core processors, and hence, should always be ‘On‘.

- Vertical Sync: We have already discussed VSync and its importance in gaming in great detail, so check that out if you want to know more. For now, it would suffice to say that keeping it ‘On’ is generally a good idea to prevent screen-tearing and other annoying graphics glitches. However, disabling it allows games to run more smoothly in some cases. Disable VSync only if your monitor has a higher frame rate than your gameplay.

12. Disable Steam Auto-updates
Steam automatically updates all your games, thereby eating up valuable resources, including processing power, memory, and internet bandwidth. To prevent Steam from updating games in the background while you are playing, go to Steam -> Settings -> Downloads. Make sure that ‘Allow downloads during gameplay‘ is unchecked. This setting is ‘Off’ by default, so make sure that it stays that way.


13. Tweak Visual Effects Settings in Windows 10
GUI animations can be a hindrance to the performance of your PC, thereby preventing you from getting the highest FPS in demanding games. By default, Windows 10 appearance settings are tuned towards aesthetics, but turning them off will help improve performance.
You can disable all these UI animations and shadows to optimize Windows 10 for gaming performance. To do it, go to System Properties -> Advanced tab -> Performance Settings -> Visual Effects. Now select the ‘Adjust for best performance’ option, and hit Apply or OK.


14. Disable Nagle’s Algorithm
Nagle’s algorithm improves internet connection by reducing the number of packets that need to be sent over the network. It is helpful for slower connections but can contribute to latency issues when playing online games.
With modern internet connections often running into hundreds of Megabits per second, it’s for the best that you disable it to reduce latency. That should better optimize your Windows 10 computer for gaming. To do it, go to Windows PowerShell -> enter ‘ipconfig‘ (without quotes) -> and note your IPv4 address.


Now open Windows Registry Editor (regedit) and navigate to the following folder: HKEY_LOCAL_MACHINE\SYSTEM\CurrentControlSet\Services\Tcpip\Parameters\Interfaces. You will see several sub-folders here. Click through each to find the ‘DhcpIPAddress‘ value in the right pane that matches your IP address.

Once you find the correct folder with your IP address as the DhcpIPAddress value, right-click and create a new DWORD (32-bit) Value in the same folder. Then, name it ‘TcpAckFrequency‘ (without quotes). Give it a value of ‘1’. Repeat the process for a second entry named ‘TCPNoDelay‘ with a value of ‘1’. Restart your PC, and Nagle’s algorithm will be disabled for good. Any time you want to reverse the decision, delete the two keys you just created.

15. Defrag Your Hard Drive (HDD-only)
Another easy way to improve access time for Windows apps is to defrag your hard drive. Windows 10 offers a built-in defragment option, and you can access it by searching for ‘Defrag’ in the Windows Search Box. You can also download and install Piriform’s Defraggler (Free) for more power-user options. Do remember that de-fragmentation is only suitable for mechanical HDDs. You should never defrag SSDs because that reduces their lifespan.


16. Install/ Update DirectX 12
DirectX is a key element of the gaming experience on Windows 10. DirectX 12 is the latest version of the API tool, and it offers support for multiple GPU and CPU cores, better frame rates, lower power consumption, and enhanced graphical effects.
Windows updates generally keep the DirectX version updated, but make sure you check it manually by hopping over to the DirectX diagnostic tool. To do that, open the Run dialog box (Windows key + R), type in ‘dxdiag’ (without quotes), and hit Enter. You can now check your DirectX version.


17. Turn Off Accessibility Key Combinations
Nothing is more annoying than accidentally opening up warning windows while playing your favorite game. ‘Sticky keys’ can be a helpful accessibility feature, but it can also be a huge pain while gaming. That’s why we recommend turning off accessibility key combinations when gaming.
To do that, go to Settings -> Ease of Access -> Keyboard (left sidebar). Now move over to the right pane and make sure that the toggles for the following settings are turned ‘Off’: ‘Use Sticky Keys’, ‘Use Toggle Keys’, and ‘Use Filter Keys’. Finally, scroll down to the bottom and uncheck the two following options:
- Show a warning message when turning on Sticky Keys, Toggle Keys, or Filter Keys from the keyboard
- Make a sound when turning Sticky Keys, Toggle Keys, or Filter Keys on or off from the keyboard

18. Select the Correct GPU as Default for Gaming
In multi-GPU computers running Windows 10, you can manually specify which graphics card a Windows app/ game should use as default to enhance performance. So setting the high-end dedicated graphics card as the default for your games will optimize gaming performance on your Windows 10 PC. We have already discussed the subject in great detail, so check out our dedicated article on how to set default GPU for games and apps in Windows 10.


19. Overclock Your GPU Using MSI Afterburner
MSI Afterburner (Free) is one of the most popular free software to tune GPU settings. It is reliable, works on graphics cards from all brands (including non-MSI), and lets you monitor your hardware in real-time.
It not only lets you overclock your graphics card by increasing its clock frequency and voltage but also offers a fan speed control for the right balance between performance and temperature. MSI Afterburner’s OS Scanner feature helps automatically find the highest stable overclock settings for your card, giving you a smooth experience with higher FPS in even the most demanding games. For more details, check out our detailed guide on how to overclock your GPU using MSI Afterburner.

20. Keep Your PC Cool to Prevent Thermal Throttling
One of the biggest reasons for frame drops and laggy-ness in games is overheating. And one of the biggest causes of excess heating in PCs is a build-up of dust and cobwebs on the fans and other components inside your case. It can inhibit airflow, which is essential for the efficient cooling of any semiconductor chip, including the CPU, GPU, and RAM in your PC.
To prevent your PC from hanging or slowing down frequently, you will need to maintain its optimal thermal range. For that, you need to take several steps, like cleaning your case (or cabinet) regularly with canned air, a cloth, and ethyl alcohol. Check out our dedicated article on how to maintain optimal CPU temperature to know more on the subject.


Hardware Upgrades to Improve Gaming Performance in Windows 10
Alongside the software tweaks and fixes mentioned above, you can also make a few changes to your PC components and network equipment. Here are some of the key changes we recommend:
21. Ensure Optimum Broadband Speed and Latency
A slow internet connection with high latency can cause lag and slower response times in games. While a fast, low-latency broadband connection won’t increase your FPS, it will help reduce lag, thereby improving response times and increasing gaming performance.
So check the quality of your broadband connection, and if it isn’t fast enough or has high ping times to the server of your favorite game, dump it for something better. You can test your internet speed on Ookla, Fast.com, Google, and many other sites and apps. You can also employ a Wi-Fi mesh network or upgrade to Wi-Fi 6/6E routers to ensure optimum speeds.


22. Upgrade Your Graphics Card
One of the best ways to upgrade your gaming experience is to upgrade your graphics card. While they can be expensive, having faster GPUs can improve your FPS count significantly, resulting in much smoother gameplay. If your power supply (PSU) permits, you can also add a second unit of your existing GPU (in SLI or Crossfire) to create a multi-GPU setup for enhanced gaming performance.

23. Upgrade to an SSD
With SSD prices hitting all-time lows, there’s no good reason not to ditch mechanical hard drives for good. That’s especially true if you are a gamer, given the massive performance gains offered by solid-state drives in terms of read/ write speeds. They not only deliver faster Windows 10 boot times and lightning-fast access to programs, but they also improve your overall gaming performance significantly. Check out the best budget gaming SSDs you can buy in 2022.


24. Add More RAM
Whether you are upgrading your existing computer or building a new one from the ground up, RAM is one of the essential components that could make or break your rig. With modern games getting more RAM-hungry than ever, adding more RAM can significantly optimize your Windows 10 gaming rig.
As of March 2021, you can easily get a 16GB 3200MHz DDR4 RAM kit without any fancy lighting for under $100. However, fancy modules with RGB and tighter timings can cost significantly more. Check out the best RAM for gaming at all price points.

25. Reinstall Windows or Get a New PC!
This is the nuclear option, the last resort. If nothing else works, chances are, your PC is too old to run modern games with high hardware requirements. So a complete overhaul may be to get the best gaming performance out of your Windows 10 computer. It may cost you a pretty penny but will offer you the best experience.
If you’re unsure about dropping a large chunk of change on shiny new hardware, reinstall Windows 10 to see if that helps optimize your PC for gaming. Sometimes, years of abuse and neglect can mess up Windows installations beyond repair, and a reinstallation may fix that. This way, you can get better performance without spending a penny.

Get the Best Out of Your Windows 10 Gaming Rig with These Simple Fixes
Despite increased support for macOS and Linux from game developers, Windows 10 is the go-to choice for most PC gamers worldwide. However, the OS still has a few issues that you need to iron out before it offers you optimal gaming performance. So use this in-depth guide to optimize your Windows 10 computer for the best gaming performance. Once you have done that, check out the best tips and tricks to speed up Windows 10, the best ways to improve battery life of your Windows 10 laptop, and the best mechanical keyboards for gaming.

