If you’re a gamer, the most important component in your desktop PC is the graphics card. The GPU provides all the graphical horsepower that you need to play the latest and greatest games on your computer. And the performance of each game depends on how powerful your graphics card is. That being said, some people are not happy with their GPU’s stock performance and want to squeeze out every last bit of performance possible. This is where GPU overclocking steps into the picture.
If you have bought one of the newest graphics cards such as the AMD RX 7900 XTX or the Nvidia RTX 4090, you must be eager to reach the maximum performance potential of your thousand-dollar GPU. However, overclocking is not only daunting but also risky if not done correctly and can potentially damage your GPU. That’s why we are stepping in to guide you through the step-by-step process to overclock your GPU and get better gaming performance.
Things to Remember Before Overclocking GPU
- GPU Overclocking Can Possibly Void Your Warranty
If you cause damage to your GPU because of an unsuitable overclock, or perform BIOS mods to extend voltage limits, the warranty could get void. While GPU overclocking doesn’t directly void the warranty, it is important not to go overboard with unrealistic overclocks. For clarity, make sure to do your research regarding the GPU brand’s warranty policy before you consider overclocking.
- Optimize Airflow in Your PC Case
Take your time to optimize the airflow of your PC case. Add more fans if possible, and ensure there is a decent inflow and outflow for effective heat dissipation. Your graphics card wants fresh air and needs to dissipate all the heat it outputs. The cooler your GPU is, the better temperature overhead you will have for the overclock.

- Install Required Software & Update GPU Drivers
Firstly, update your GPU drivers, and ensure that Nvidia GeForce Experience also installs along with the driver if you have an Nvidia GPU. Windows Update tends to miss out on a few things, so download the driver from your manufacturer’s website manually:
- Download Nvidia Graphics Card Drivers
- Download AMD Graphics Card Drivers
- Download Intel Arc Graphics Card Drivers
Then, click on the links below to download all the other monitoring and GPU stress-testing software, and install them. We will use these in the guide at a later stage.
- HWiNFO – Performance Monitoring Tool
- 3DMark Time Spy: GPU Benchmarking and stress-testing software
- Brand-provided GPU control hub/ overclocking tool (if any). You can get this on your GPU brand’s website, for us it was the Asus GPU Tweak III.
- MSI Afterburner: Download this software if you wish to manually overclock your graphics card.
- Enough Overhead in Power Supply
Calculates the total power draw for your desktop PC using a calculator like this one, which asks you to input the components of your PC. Compare this number to your power supply’s rating and make a call: is your power supply good enough to handle an overclocked graphics card? You should stay below 70-75% of the total wattage rating, even after overclocking.
Also, avoid using PCI-e power adapters. If your PSU comes with 8-pin to dual 8-pin cables, we recommend leaving one especially if you are using a high TDP (=>200W) graphics card for optimal distribution between the cables. While all cables run off the same rail, not every PSU is capable of outputting 300W of power through 2x 8-pins without any chance of issues. And overclocking the graphics card increases the power consumption significantly.
Basic GPU Overclocking Guide (Recommended For Most Users)
This basic overclocking guide is highly recommended for most users. We will show you the default overclocking features that are present in the software provided by your GPU brand. These are safe, and don’t go overboard with overclocking your GPU, but give you a measurable jump in performance. So, let’s learn how to overclock your Nvidia, AMD, or Intel Arc GPU.
How to Overclock GPU with Brand-Provided Software
1. First, let’s look at how to overclock with the brand-provided software. In our case, this was ASUS GPU Tweak III. So, launch the brand-provided software utility for your graphics card and find the overclocking options to enable that profile. For us, all we had to do was select OC Mode and the overclock was applied.
Note: If you don’t have this kind of utility available for your GPU, you can skip ahead to the next sections where we help you to enable overclocking options provided by Nvidia, AMD, and Intel themselves.
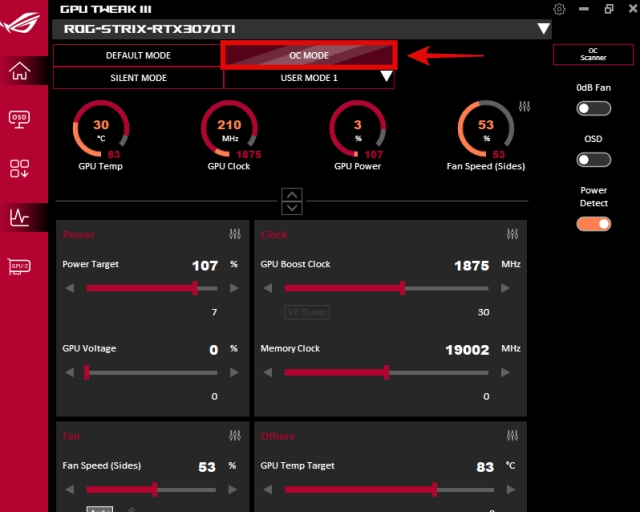
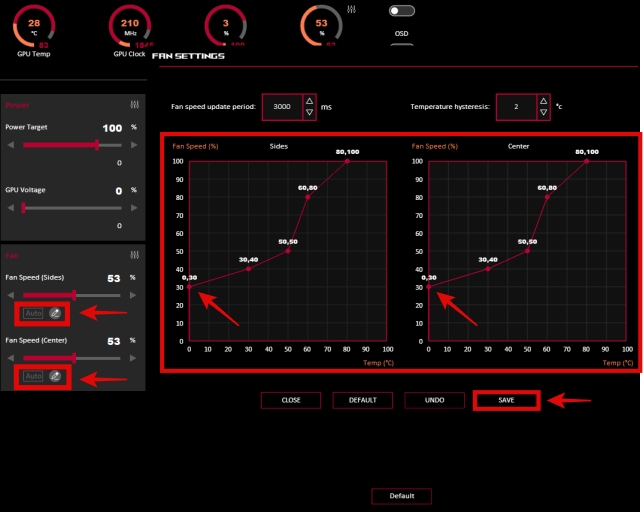
2. After enabling OC mode, the power target increased from 100% to 107%, and the GPU’s boost clock also increased. We recommend you set your own custom fan curve here as well. To do that, press the “Edit” button next to the fan speeds, but this option could be different depending on your GPU. After setting the fan curve in place, you have to save so that the settings apply. Here is an example of a somewhat aggressive fan curve that we set for our GPU:
3. You have now successfully overclocked your GPU using the brand-provided software! But wait, something is left for you to do. Go to the stress-testing, monitoring, and benchmarking section of this guide below to assess the GPU’s stability. Also, using that section, you have to compare benchmarks if the overclock provided any benefit. You must do those steps before finalizing the overclock.
Note: Hopefully, this overclock helps achieve performance gains. But if it wasn’t satisfactory enough, you can also enable overclocking features in GeForce Experience, Radeon Settings, and Intel Arc Control based on your GPU brand. We will show you the steps to enable those next, but you can definitely compare both overclocking features to see which one performs better.
How to Overclock Your Nvidia GPU
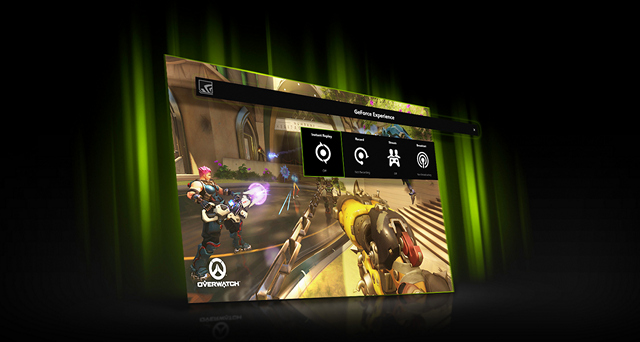
You must have Nvidia GeForce Experience installed, which is included in the driver as long as you go with the express installation. But if you didn’t, you can download the app here.
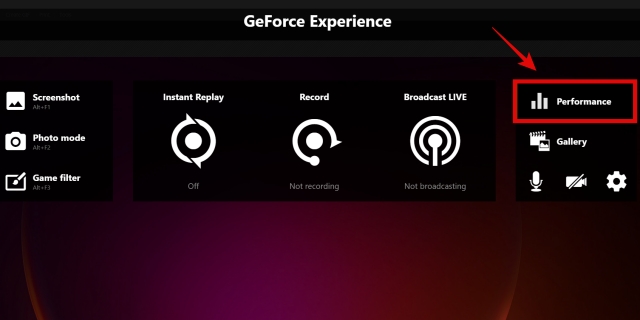
1. Launch Nvidia GeForce Experience. Then, press “Control + Z” on your keyboard. You will notice the overlay come up on your screen. Here, click on the “Performance” option.
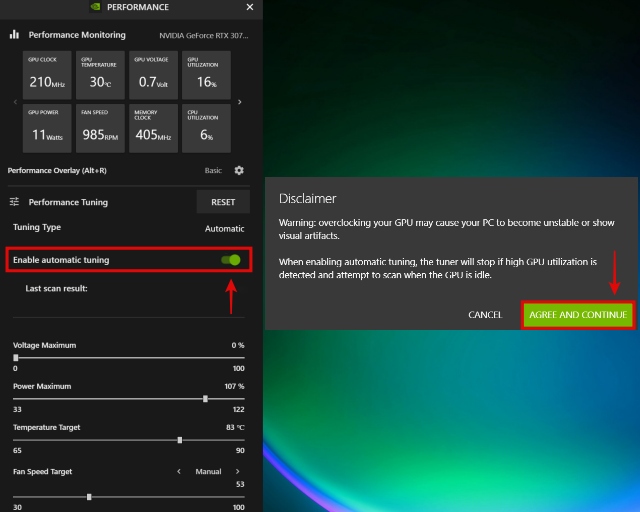
2. In the performance section, you will see a feature called “Enable automatic tuning” here. Turn it on to enable the auto-overclocking feature for your graphics card by Nvidia. Read the disclaimer, and then click on “Agree and Continue.” The process will take some time because the software will be optimizing your GPU and doing a basic stress test to adjust the settings for your PC.
Note: Before enabling this, remove any existing OC profiles set in the brand-provided overclocking software. We noticed our previous OC Profile was already applied under the Performance section of GeForce Experience, and it’s not recommended to stack both together.
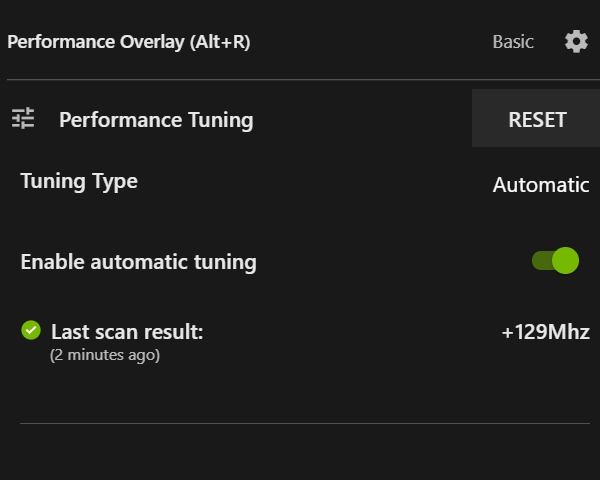
3. Congratulations! You have successfully overclocked your Nvidia GPU through the GeForce Experience Automatic Tuning feature. After about twenty minutes, our RTX 3070 Ti was automatically overclocked by +129MHz as you can see below. But, something is left for you to do. Before you finalize the overclock, go to the stress testing section to verify the stability. There, we will also show you how to benchmark the GPU and access whether the overclock resulted in performance gains.
How to Overclock Your AMD GPU
Before we proceed further, do remember to download the AMD Radeon drivers and software from the link in the prerequisites section. Then, follow the steps below:
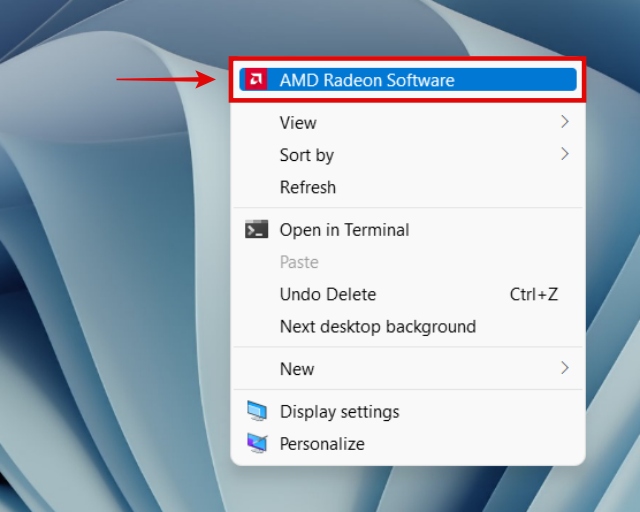
1. Right-click on the desktop, and click on AMD Radeon Software. For Windows 11, it will show up after you click on Show More Options.
2. Inside the AMD Radeon Software, move to the Performance section. Under this, click on the “Tuning” tab.

3. Here, you will find two options. You can’t use both of them together, but you can test which one is better using the benchmarking section of the guide. Here’s how to enable the overclocking features present in AMD Radeon Settings:
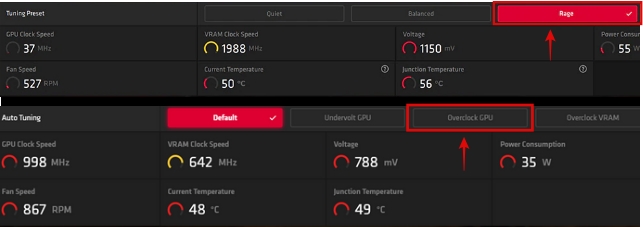
- AMD Rage Mode: Click on Preset in Tuning Control, and you will gain access to the various presets called Quiet, Balanced, and Rage. To enable the GPU overclocking feature, click on Rage under the tuning control presets. This will overclock your graphics card, mostly by increasing the power limit slightly. It also increases the fan speeds to accommodate the higher temperatures.
- AMD Auto Tuning Overclock GPU: Click on Automatic in Tuning Control, and you will gain access to various options. Click on Overclock GPU to turn the feature on. It will run a test while analyzing your system to accordingly set a stable overclock in place.
After enabling any of these features, there will be a disclaimer. After reading it, click on Proceed. The overclocking process will start and complete automatically.
4. There, you have successfully overclocked your AMD graphics card with the in-built features present in Radeon Settings. But, you do need to test for stability which we help you in the stress-testing section. As we said before, you’ll also be benchmarking your graphics card to test the improvements of your overclock.
How to Overclock Your Intel Arc GPU
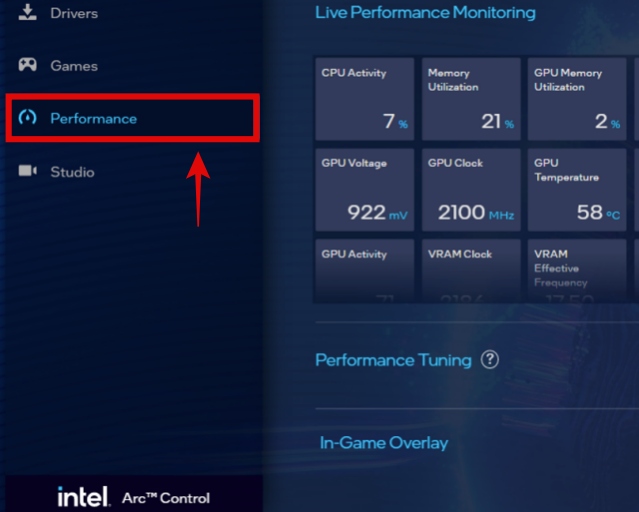
1. Right-click on the desktop and click on Intel Arc Control. For Windows 11, the option shows up after clicking “Show More Options.” You can also press Alt + I together to launch the Arc Overlay. When it opens, click on Performance.
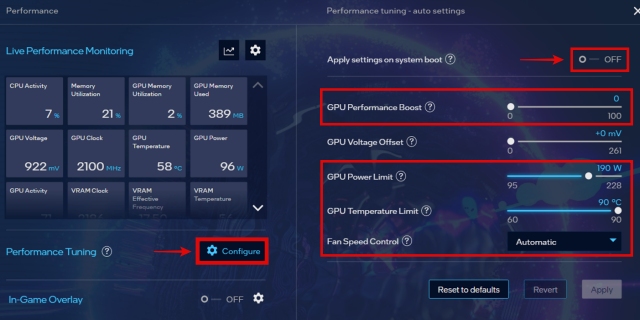
2. Then, click on “Configure,” which is next to Performance Tuning. On the right side, you will be seeing tons of overclocking options. The native Intel Arc Control does not have a one-click automatic OC feature, or a profile to set as an easy way to overclock your GPU. But don’t worry, as we will guide you on how to use these options safely.
- Make sure that the “Apply Settings on system boot” option is turned on.
- Use the GPU Power Limit Slider to increase the allowed power limit of your graphics card. Set this according to the overhead available on your power supply. Most people can comfortably max out the power limit, but you need to ensure that your power supply can handle it fine.
- Max out the GPU temperature limit to 90 degrees C, or a setting to your preference. This will allow your graphics card to run at hotter temperatures and thus, higher boost clocks.
- You should only increase the GPU Performance Boost slider in increments of +10, and verify stability at every increment with the stress-testing section, before increasing it further.
- We recommend that most people don’t touch the voltage offset, as that is more of an advanced overclocking option for users who want to push the GPU further.
3. Well, you have successfully overclocked your Intel Arc Graphics Card. As always, remember to ensure the stability of your overclock settings before finalizing them, with the stress-testing section of our guide. You must also benchmark to access the benefits of your OC Profile, to make any necessary adjustments.
Advanced GPU Overclocking Guide for Experienced Users
This advanced OC section is suited for experienced PC Builders, who want manually fine-tune their settings instead of using generalized features for overclocking the GPU. Not everyone should do this because you can easily get most of the benefits of overclocking by enabling the features mentioned in the basic overclocking section itself.
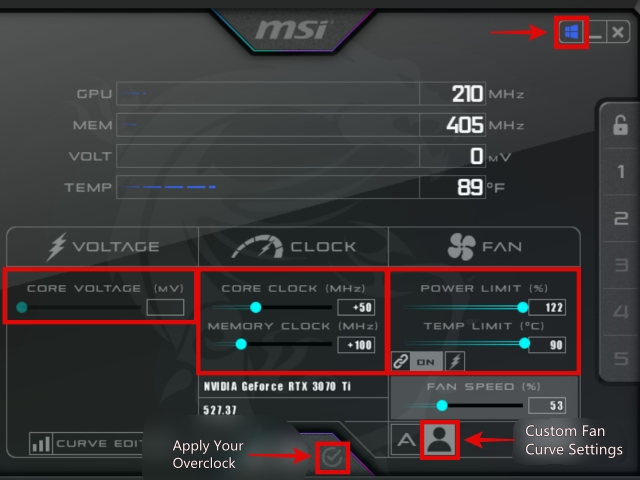
1. So, you want to manually overclock your graphics card. Let’s get into it! Launch MSI Afterburner through its desktop shortcut or by searching for it in Windows Search. Now, we’ll explain to you the various options, so that you can start overclocking your GPU.
- GPU Core Clock: This slider is used to modify your core clock – only increase this with 50MHz increments.
- GPU Memory Clock: This slider is for modifying the VRAM’s clock speed – you can increase this by 100MHz at the start but after that stick to increasing it by 50MHz increments.
- Core Voltage: The voltage of your graphics card can be controlled with this. Never go overboard with this, and stick to increasing it in very small increments (+1 to +5 at most). On some GPUs, you get to control the core voltage as a percentage (%), and on others, you control the mV (millivolts).
- The higher you want to push the GPU’s core & memory clock speeds, the higher your voltage will need to be adjusted. But go too high and you will have catastrophic effects, so be very careful with this setting.
You can click the User Define button which is under fan speed, to manually set your fan curve as well. When done with the settings, make sure you click the Windows button at the top right, which ensures the overclock and fan curve will be applied when your system starts up. Then, click on the Apply button to set the OC settings in place.
After every incremental increase, go to the stress-testing section of our guide to verify the stability of your OC settings. This is a mandatory step and before you increase the core clock & memory clock sliders further, ensure that your GPU is stable and the HWiNFO readings are desirable (under expected limits).
2. This is what the final manual OC settings of our RTX 3070 Ti look like. We prefer to leave the voltage setting as it is and increased the core & memory clocks of the GPU as high as they could go on the default voltage. In the end, we were able to increase the core clock by +200MHz, and the memory clock by +300 MHz. We also maxed out the power limit & temperature limits and set an aggressive fan curve in place.
A ton of stress testing was done before we arrived at this setting. Going above 300MHz on the core or 450MHz on the memory had stability issues, or resulted in the operating system crashing. Hence, this was our final ‘safe’ OC setting. We’ll look at the benchmarking results later, in the last section of the guide.

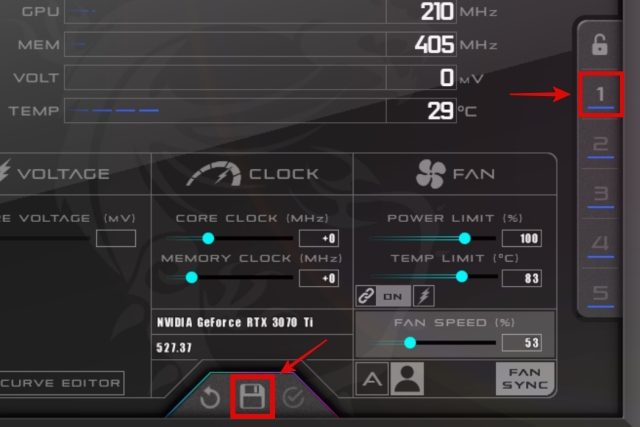
3. When done, ensure that you save your OC profile by clicking on the Save button in the center and then clicking on one of the numbers at the right, in which your profile will be stored.
4. You have now learned to overclock your graphics card manually using MSI Afterburner. As mentioned before, remember to stress-test to confirm the stability of your GPU overclock. But also, don’t forget to benchmark the graphics card and judge whether the overclock is worth keeping.
GPU Benchmarking, Monitoring, and Stress Testing
So, you’ve applied the GPU overclock successfully, using the beginner or advanced section. Well, in either case, it is very important for you to benchmark scores, monitor temperature sensors, and stress-test the graphics card for stability. Even though the basic guide only enables the native OC features provided to you, we consider doing this section as a mandatory step in overclocking.
Why? After overclocking, the GPU’s temperature will rise and the power consumption will increase. You must monitor the stability at this time in a stress test, which will push your video card to its limits. Monitoring the GPU Core & VRAM Temperatures at this time will verify the stability of your overclock. Also, benchmarking and comparing the stock numbers to overclocked results will help you decide if the overclocking is worth the disadvantages it comes with. Which are: an increase in temperature, power consumption, and higher noise levels.
Stress-Testing to Verify the Stability of Your GPU Overclock
1. In order to stress-test, let’s get the monitoring tools running first. You must have HWiNFO downloaded already, which we asked you to do in the ‘Things to Remember’ section. So, launch the HWiNFO64.exe file, after extracting the downloaded ZIP. Check Sensors only, and then click on Start. Next, scroll down until you find the data from various sensors of your GPU.
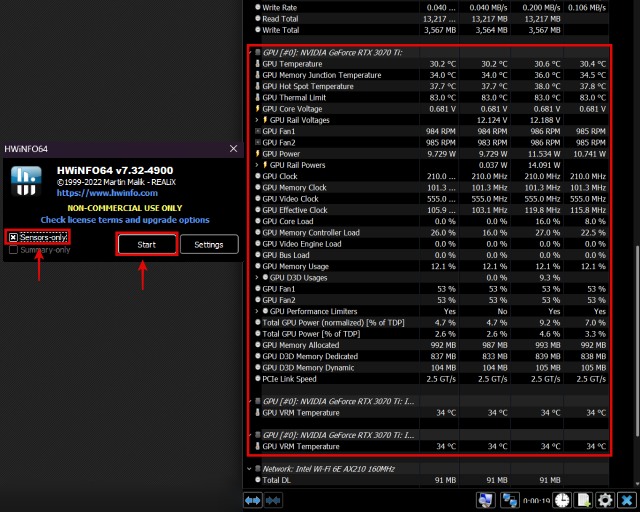
2. We will now explain to you what sensors you need to closely observe, when the stress-test is running. There is a big reason why we had you download HWiNFO, instead of any other system monitoring utility. It shows you the VRAM temperature, which is not talked about often but is quite necessary to monitor if you are overclocking a modern graphics card with GDDR6 or GDDR6X VRAM.
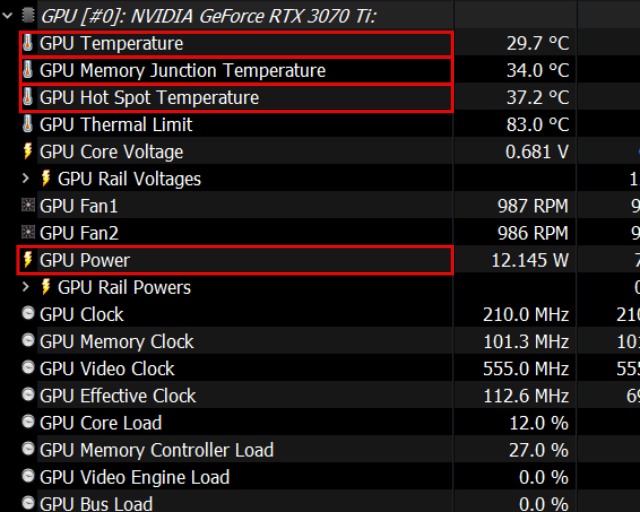
- GPU Temperature: This is the temperature of your GPU chip itself. We recommend this to be under 85-degrees, because other parts (VRAM & Hotspot Temperature) usually get much much hotter proportionally.
- GPU Memory Junction Temperature: This represents the temperature of your VRAM. Ever since GPU manufacturers introduced faster VRAM, such as the GDDR6X VRAM on RTX 3080 cards, this has become a very important sensor to monitor to ensure your VRAM is not running at undesirable temperatures.
- You must have heard of 95-degree being the ceiling for most cases, but you’d be surprised to know how many CPUs & GPUs run at 100-degree or even 105-degree on certain parts.
- For example, the i9-13900K doesn’t run all its cores at 100 degrees Celcius, but a few are allowed to do so, which allows the chip to reach boost frequencies. The max thermal limit for that chip is 100 degrees Celcius. Another example would be laptop chips, like the Ryzen 5 5600H with a maximum operating temperature of 105 degrees Celcius.
- So what should your GPU’s VRAM temperature be? Micron’s site says 105-degree C is the maximum operating temperature. Throttling tends to begin at 110-degree C, but undoubtedly anything above the 100-degree C range and your GPU cooler will have to flex its muscles.
- Ideally, we think that 100 degrees Celcius is OK, but only during extended loads. If it creeps up above 105 degrees Celcius though, it should be concerning for you.
- GPU Hotspot Temperature: This indicates the hottest reported temperature by the GPU, as the name indicates, from the ‘hotspot’. The Memory Junction temperature is separate and could be higher than the Hotspot. But, if you don’t have a VRAM temperature sensor on your GPU, the hotspot temperature will report the overall hottest point on the graphics card.
- GPU Power: This reports the power consumption of your graphics card. It should stay within the power supply’s overhead, and if it jumps by a major amount (say, 100W) you should definitely calculate your system’s total power consumption so you can verify if its under the 80% max load that we suggested for most people’s power supplies.
- While the system may run fine even at a significantly higher GPU power limit set by the overclock, it doesn’t mean you should run it like that. If you don’t have enough overhead, we recommend you lower the overclock or restore the settings back to stock, to be on the safer side.
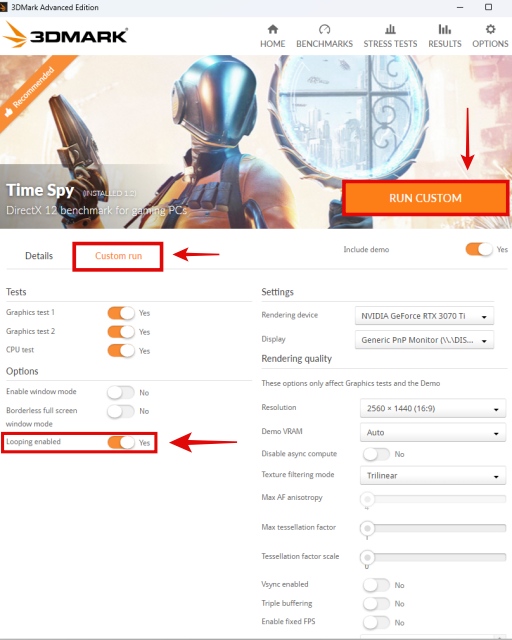
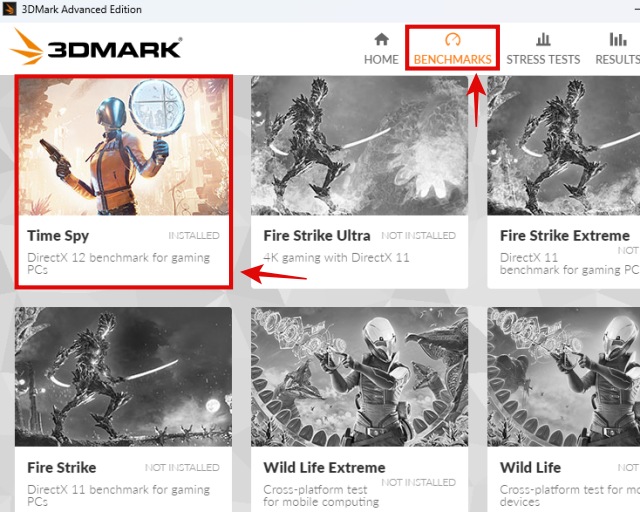
3. Now, launch the 3DMark software with its desktop shortcut or by searching for it in Windows Search. Don’t launch the benchmark directly – we have to set some custom settings first. So, click on Benchmarks, then click on 3DMark Time Spy to access the settings before you begin the test.

4. Next, click on Custom Run. Set the option of Looping enabled to On, and then click on Run Custom. This will begin the stress-test, and it won’t give you any benchmarking scores but constantly loop the test until you stop it.
5. You must keep the stress-test running for 30 minutes to verify stability of the current overclock settings. While it’s going on, press Alt+Tab to switch to the HWiNFO Sensors application. Here, you have to keep an eye on the various stats which we had asked you to observe – ensuring that the GPU’s hotspot, VRAM, and core temperatures are not too high. If things are stable, but at an undesirable temperature, increasing you fan speeds can help.
When 3DMark Time Spy has been running for 30 minutes, and you have verified that the various GPU temperature sensors are in check, it means your system has passed the stability test and you can keep the overclock settings. You can close the application after completing the stress-test.
However, if the PC shuts off, stops responding, or shows any visual artifacts while the stress-test is going on, it means that your PC is not stable with that overclock setting. In that case, you’ll have to revert back to stock settings, or lower the overclock to a more stable setting which can pass this 30-minute 3DMark Time Spy GPU Stress test.
6. Great, you’ve completed the stress-test section. By this point, you will have optimized your settings to adjust for the overclock, such as modifying the fan curve to be more aggressive, or decreasing the power/temperature limit of your GPU. Well, although your overclock has been confirmed to be stable, something is left for you to do – benchmarking the GPU & deciding if the overclock is worth it.
Benchmark Your Graphics Card to See Overclocking Benefits
You must benchmark your GPU to access the benefits of your overclock settings! This way, you can measure how much the performance has increased. Maybe the jump was significant, or maybe it was quite minor. In any case, you should know the performance level of your graphics card at stock settings, and compare it against the numbers you get when the GPU is overclocked.
For benchmarking, you can use the same 3DMark software we used for stress-testing. But this time, you have to run a normal benchmark and get scores for the stock performance, and for when your overclock is active. Along with this, test an intensive game of your choice to see if the FPS improved. We will be playing Cyberpunk 2077 on our graphics card and testing the GPU with various different OC features. The benchmarking results will be demonstrated at the end of this section.
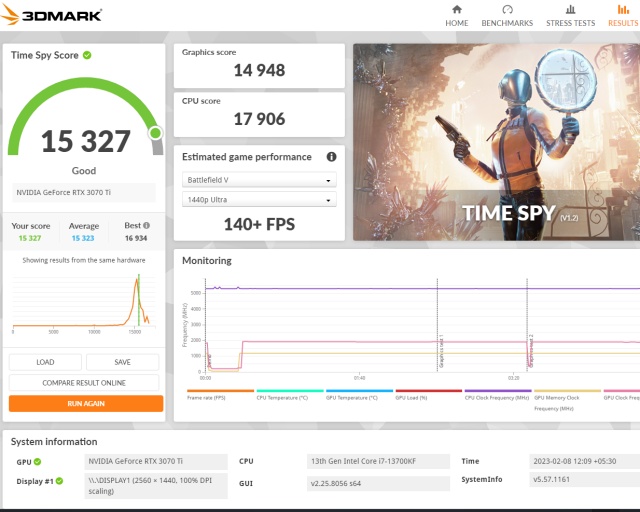
1. Open the 3DMark Software, navigate to Benchmarks, and click on Time Spy. This will start the benchmark.
2. When the testing completes, you will get your scores. Record this number somewhere, and repeat the benchmarking process till you have gathered enough data for your graphics card’s stock performance, and have also tested the various overclocking methods you can enable.
3. Now, play an intensive game of your choice and do the same step – gather data for your GPU’s stock & overclocked performance. We will be using Cyberpunk 2077 at maxed out settings with RT on High, to push the graphics card and see if the OC provided any in-game benefits.

4. After completing the benchmarks, compare the data to judge which setting is worth to keep your GPU at. Overclocking your graphics card comes with a few cons, such as higher temperatures & louder fan speeds. If your overclock was not as beneficial as you expected, but the jump in temperature & noise level is too much, maybe you would like to consider reverting back to stock settings. But if the performance jump was worth it for you, keep the OC profile active.
Here’s what the benchmark results were for various modes that we could set our GPU at. We have shown & compared results for the stock performance, overclocked with GeForce Experience Auto Tuning, turning on brand-provided ASUS GPU Tweak III OC feature, and also a manual overclock using MSI Afterburner.


5. Congratulations! You have completed the entire overclocking process, including benchmarking & stress-testing your graphics card. We hope you were able to overclock the GPU successfully. After a long day of running tests on your hardware, it must feel great to squeeze out some extra performance.
Frequently Asked Questions
Yes, as long as you have remaining overhead from your computer’s power supply, and your temperatures are in good standing. You can safely enable overclocking features without major issues as long as you have ensured these two things. However, no matter how well it works afterwards, it is important to stress-test to confirm stability and ensure that it is safe to overclock your GPU.
No, as long as the overclock is nothing too aggressive. But if you are running at excessive voltages, high temperatures, and at an overall unoptimized profile for your GPU which causes it to overheat regularly, the lifespan could be lower.
Disadvantages of overclocking GPU include higher temperatures and louder fan speeds. However, if the overclock is too much for the GPU to handle, it can also cause issues like system crashes, BSODs, games & applications failing to work overtime. These are natural failsafes that the GPU is designed with, to protect itself.
Yes, overclocking can boost your FPS. However, it also depends whether the game is more CPU dependent or GPU dependent. Those factors play a major role in the final performance results of your overclock. So, benchmark the GPU accordingly to see if overclocking has boosted your FPS in the games that you like to play.
Yes, overclocking a GPU is worth it, as long as your PC setup is capable for it. You can maximize your GPU’s potential by overclocking it. But to do it, your PSU should adequately support the higher power consumption of an overclocked GPU. The airflow of your PC case needs to be good enough for effective heat transfer of your components too.
This is a huge maybe – there are certain gaming laptops with big heatsinks that can support overclocking, especially if the stock temperatures are low enough to make you think about overclocking.


