Whether you’re using Google Search at work or at home, SafeSearch can help you filter out sexually explicit content from your results. It is switched-on by default for children when they’re signed-in to Google, but turned off for adult users. Today, we will show you how to enable Google SafeSearch for everyone on computers and smartphones. We will not only tell you how to enable or disable Google SafeSearch on Windows, Mac, Linux, Android and iOS, but also how to lock it for any device on your network.
How to Enable or Disable Google SafeSearch
Google SafeSearch is an important feature for computers at school and at work, but can sometimes be an irritant otherwise. So in this article, we will show you how to enable or disable Google SafeSearch on any desktop or mobile platform. We will learn about what is Google SafeSearch and how to turn it on or off on the web through your browser and in mobile apps on Android and iOS. So without further ado, let’s learn more about Google SafeSearch and check out how to enable or disable Google SafeSearch right now.
What is Google SafeSearch?
SafeSearch was designed by Google as an automated filter for sexually explicit content that can be awkward if they show up unexpectedly. It is also designed to keep children safe from potentially harmful content at school and at home. Applicable to Google Search and Google Image Search, SafeSearch helps filter out explicit content in Google’s search results for all your queries across images, videos and websites.
The SafeSearch setting is ‘On’ by default for signed-in users under the age of 13 or the applicable age in each country. It can be managed with Google’s Family Link app, but for kids’ accounts, it can only be turned off by parents. If you’re the network administrator for a school, work, or home network, you can force all devices on that network to use SafeSearch at all times by mapping Google domains to forcesafesearch.google.com.
Meanwhile, general users won’t have to go through hoops to enable or disable Google SafeSearch. It’s relatively easy to do on most platforms, including desktops and mobiles. However, do note that SafeSearch only works on Google’s search results. It won’t prevent users from finding explicit content through other search engines or by navigating directly to explicit sites. For that, you’ll either have to block inappropriate sites by changing your DNS servers or by using the host file on client desktops, which we will explain later in this article.
Either way, here’s how you can enable or disable Google SafeSearch on all your computers and smartphones:
Turn Google SafeSearch On or Off Via Web Browser
You can turn on SafeSearch with or without logging in to your Google account. However, when you’re not signed-in, your settings will be lost once you clear your browsing history. On a private or incognito tab, it will be lost the moment you close the tab/window. The process is identical on Windows, Mac and Linux.
- Navigate to the Google homepage for your region. Now in the bottom-right corner, click on ‘Settings’ > ‘Search Settings’ as seen below.
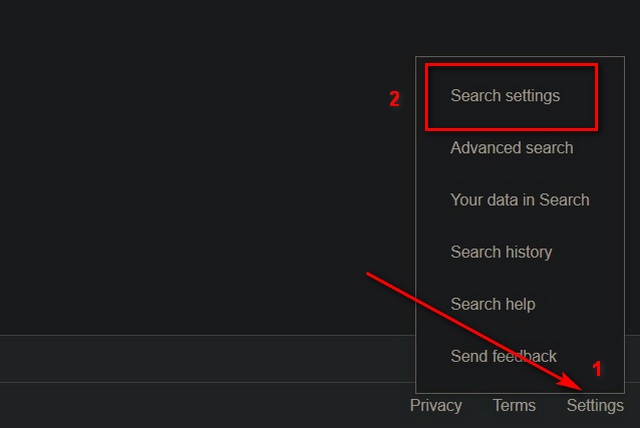
Note: You can also go directly to google.com/preferences to set your SafeSearch preference.
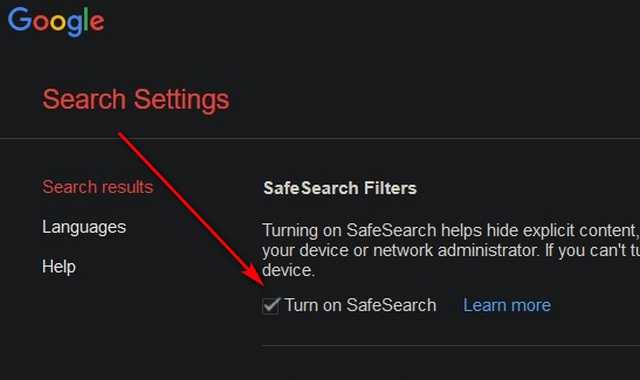
- In the Google Preferences page, enable or disable the option that says ‘Turn on SafeSearch’. Remember to click on ‘Save’ at the bottom of the page to save your preference.
Lock Google SafeSearch Using Hosts File on Windows, Mac and Linux
Desktop operating systems, like Windows, Mac and Linux, have a ‘hosts’ file that maps hostnames to IP addresses. You can use it to force Google to ‘lock’ SafeSearch on that device, thereby making it always use the feature on all browsers all the time. The setting will apply to all general search, image search, and video search results on Google. Only users with administrative privileges on the device can undo this change. Here’s how you can lock SafeSearch on your computer using the hosts file:
Note: You need Admin privileges to be able to make changes to the hosts file.
Windows
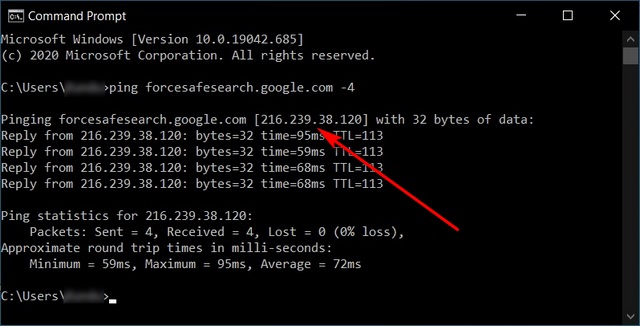
- Open Command Prompt or Windows PowerShell (search ‘cmd’ or ‘powershell’ and click on ‘Run as Administrator’). Now enter the command
ping forcesafesearch.google.com -4and hit Enter. This will return the IPV4 address of the Google search domain. Note the IP address. In this case, it is: 216.239.38.120.
- Now we’ll have to open the ‘hosts’ file. For that, copy+paste
C:\Windows\System32\drivers\etc\hostsin the PowerShell console in Admin mode . Hit Enter.
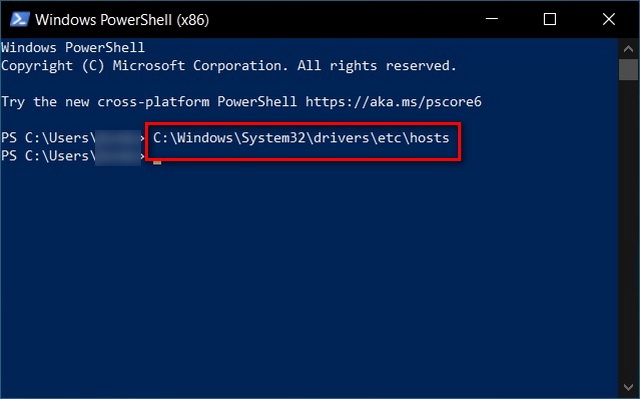
Note: In most Windows installations, the hosts file is located at: C:\Windows\System32\drivers\etc\hosts. If Windows is installed in a different location on your PC, you can find the hosts file by executing the following command in Command Prompt: cd /d %systemroot%\system32\drivers\etc.
- You will be asked to choose a program to open the file. Select ‘Notepad’ and hit ‘OK’.
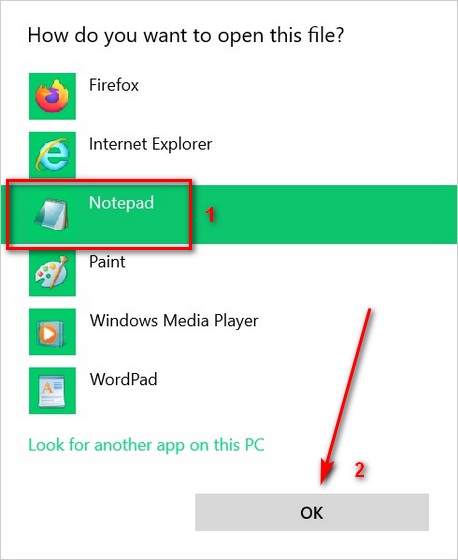
- In Notepad, create the following entry at the end of hosts file with the IP address you obtained:
216.239.38.120 www.google.com #forcesafesearch. Save your entry (on the top-left, go to File > Save).
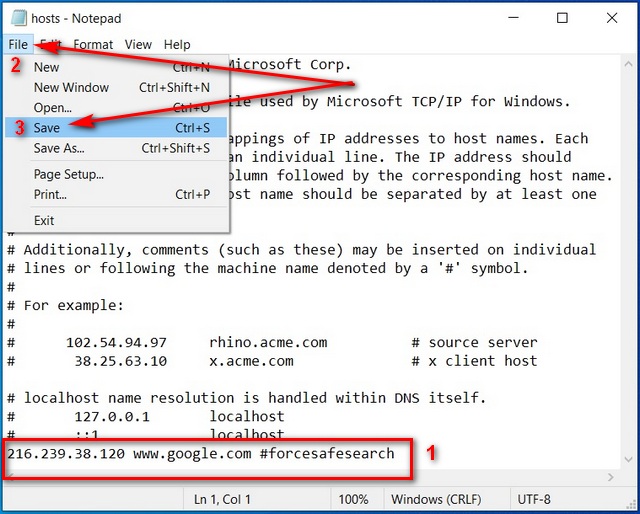
To confirm SafeSearch is on, go to Google and check that it is working and can’t be turned off. If the hosts file is correctly configured, no matter how often you turn off SafeSearch and try to save your setting, it will disregard your changes and automatically turn back on again. To disable it in the future, just delete the entry or put a “#” in front it to make sure that it isn’t executed.
On Mac and Linux
The process to lock Google SafeSearch is fairly similar on all desktop platforms, but with a slight difference. Here’s how you do it on Mac and Linux:
- Open Terminal and execute the following Terminal command:
ping forcesafesearch.google.com. Note down the IPV4 address. It will look something like: 216.239.38.120.
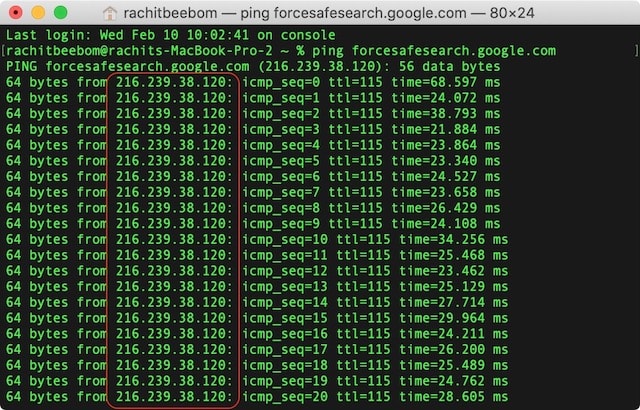
- Now enter the command
sudo nano /private/etc/hostson Mac orsudo nano /etc/hostson Linux and hit enter. Enter your admin password when you see the prompt.
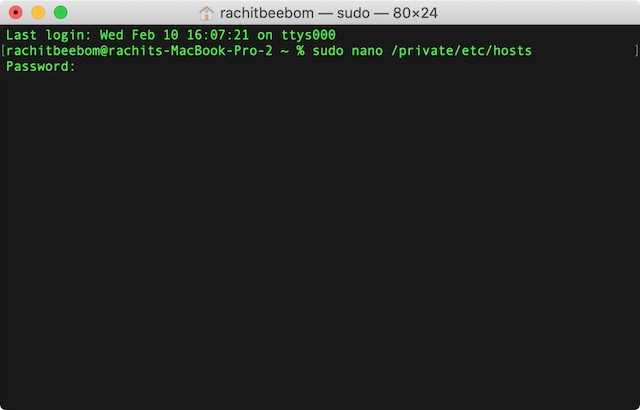
- Create an entry at the end of hosts file with the IP address you obtained. In my case, it would be
216.239.38.120 www.google.com #forcesafesearch. Now save the edited host file.
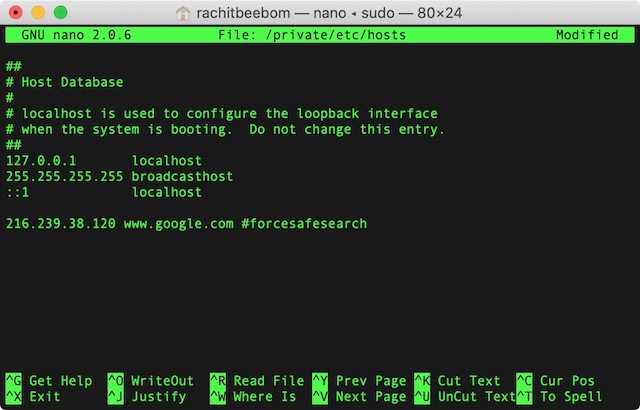
Finally, go over to Google to check that the setting is working and cannot be tampered with.
Enable or Disable Google SafeSearch on Android
- Open the Google app on your iPhone or Android device. Now tap on ‘More’ (three dots) at the bottom right and select ‘Settings’ on the next page.
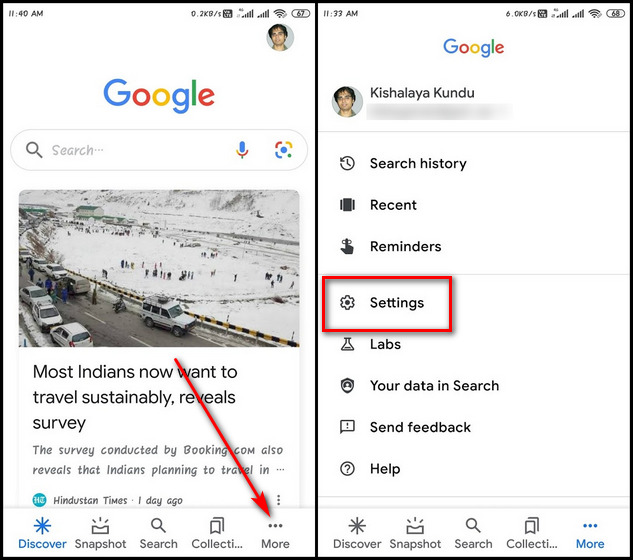
- On the Settings page, tap on ‘General’. On the next page, scroll down if you have to and switch SafeSearch on or off using the toggle.
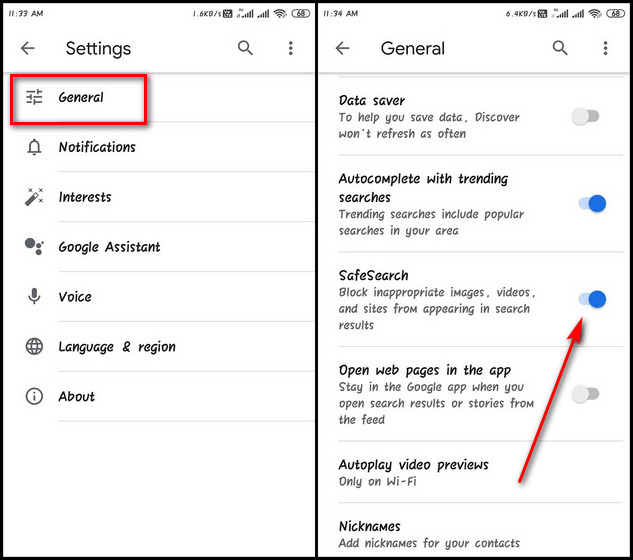
That’s it. You’ve now successfully turned on Google SafeSearch in your Android phone.
Enable or Disable Google SafeSearch on iOS
- Open the Google app on your iPhone or iPad. Now tap on your profile picture > Settings.
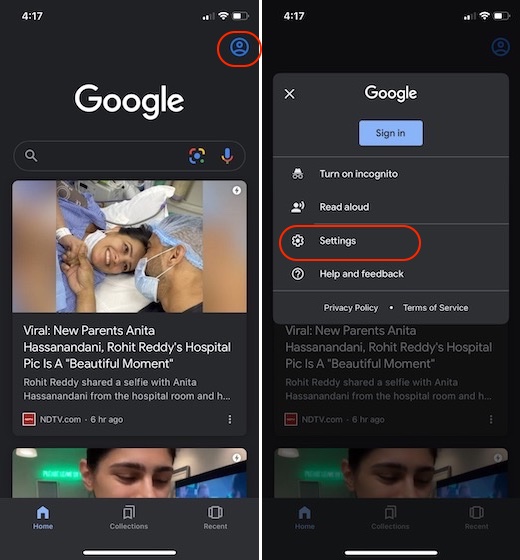
- Next, select General > Search settings.
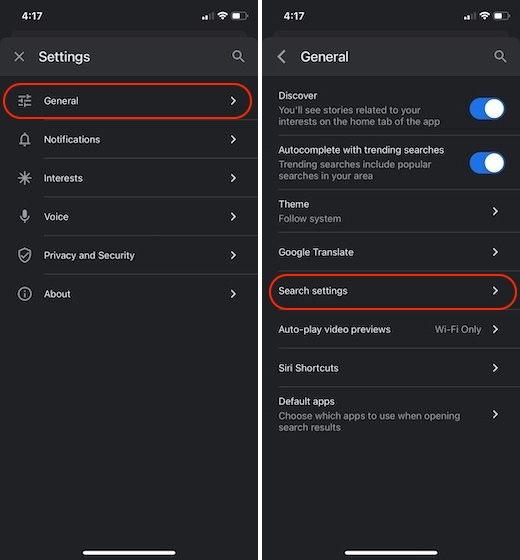
- On the Search settings page, find the ‘SafeSearch filters’ section. You can now choose to hide or show explicit result using the appropriate option.
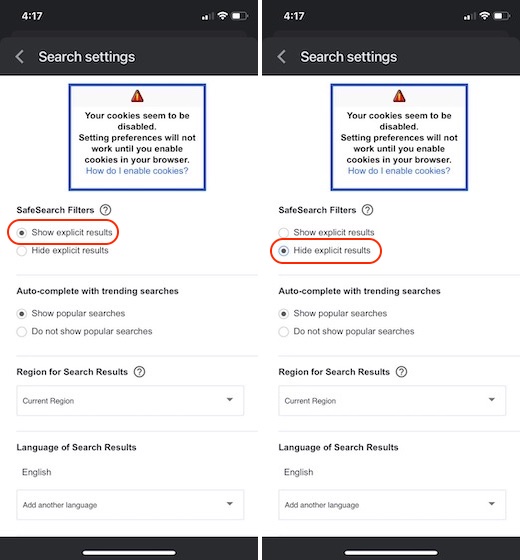
That’s it. You’ve now successfully turned on Google SafeSearch on your iPhone or iPad.
Make Internet Safer for Children with Google SafeSearch
Google SafeSearch is an important feature that can not only keep children safe online, but also save you the blushes by preventing inappropriate results from popping-up for completely innocent searches. However, it can also prevent important content from appearing in search results because of algorithmic quirks and automatic filtering. Now that you know how to turn it on or off across all platforms, go ahead and do it on your computer or mobile. Once you do, remember to let us know why you felt the need to change Google SafeSearch setting on your devices.


