- Reverse image search on Android can be done using the Google Lens app or with Circle to Search feature on some phones.
- On iPhones, you can download the Google app and tap on Google Lens to search with an image.
- If you're on a PC, you can go to google.com, and click on the Camera/Lens icon from the search bar to get started.
We have all searched for images online, but there are often times when we spot an object in front of us but have no idea about what it could be. Reverse image search also extends to use cases like finding a product on e-commerce websites, searching for text in the images, finding similar products or images, confirming authenticity, and many more. Thanks to the recent developments in the AI space and search features, you can effortlessly reverse image search on Android, iPhone, and PC.
Reverse Image Search on Android
There are multiple ways to reverse search images on Android, and the easiest means to do so are using Google Lens and Circle to Search. Here’s how you can do it:
Using Google Lens
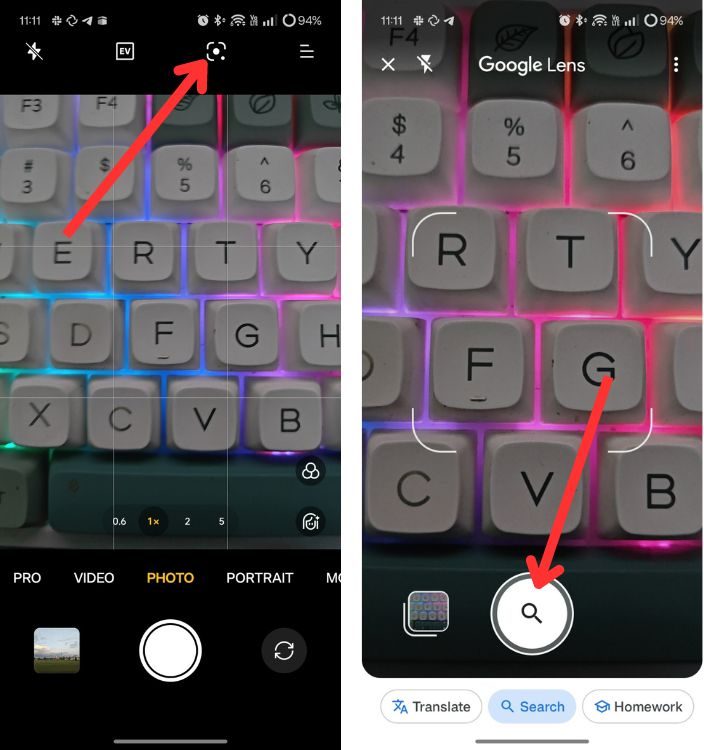
Google Lens is built into the camera apps of almost all Android phones. If you don’t find it in the camera UI, you will see it in Google Photos, if it’s your go-to app for viewing images. A few built-in gallery apps like OnePlus’ Photos app also have a Google Lens icon. Here’s how to use it:
- Launch the Camera app on your Android device.
- Now, tap on the Lens icon at the top.
- When the Google Lens screen appears, tap on the Search button at the bottom to capture an image from your camera and search it.
- In the Google Lens app, you can also tap the photo stack at the bottom left to access and search for photos from your gallery
- If you don’t see the Google Lens screen, capture a picture using the Camera app.
- Then, tap on the photo thumbnail from the bottom left to open the image in Google Photos or your phone’s default gallery app.
- Tap on the Google Lens icon to search for the image.

If you didn’t find Google Lens in the camera app or Google Photos, you can install it as a standalone app from the Google Play Store for free.
Using Circle to Search
Circle to Search allows you to search anything on your Android phone by highlighting it on the screen. It was first introduced on Samsung phones, then on Google Pixels, but it’s slowly expanding to all Android phones running Android 9 and above. Here’s how to use Circle to Search.
- To enable Circle to Search, go to Settings > Navigation Gestures and turn on the Circle to Search toggle. If this option is unavailable, your phone doesn’t support Circle to Search yet.
- Once enabled, long-press on the Navigation bar or home button to trigger Circle to Search.
- Highlight the part of your screen you want to search by drawing a circle around it. Within a moment, you’ll see the relevant results on Google search.

Reverse Image Search on iPhone
Like Android, there are a couple of ways to reverse search an image on iOS, one of them involves the Google app, and the other way is to do it via Google Chrome. There’s another way to reverse image search that’s coming soon, and it’s called Visual Intelligence. It’s essentially Google Lens but with Apple’s sprinkling its UI on top. Apple introduced it during the iPhone 16 series launch.
Using Google App
Unlike Android, Google Lens isn’t available as a standalone app on iOS, but the feature can be accessed using the Google app.
- Install the Google app from the App Store if you don’t have it already.
- On Google, tap on the Lens icon.
- Point the camera towards what you want to search and tap on the Search button at the bottom.
- You can also tap on the photo stash at the bottom right, beside the shutter, to select and search for an image from the gallery.

Using Google Photos App
Google Photos also has Google Lens built-in and is pretty effortless to use. Here’s how to use it:
- Install Google Photos from the App Store on your iPhone.
- Launch the app and tap a photo you want to search.
- Tap on the Lens icon at the bottom to search for the image.
- Readjust the corner brackets to search for a specific object in the image.

Using Google Chrome
Chrome is another Google app that comes with Google Lens built-in. Here’s how to use it:
- Install Chrome from the App Store on your iPhone.
- Launch the app and tap on the Lens icon from the search bar.
- When the camera viewfinder opens, tap on the shutter button. Or, choose an image from your camera roll to reverse search with it on Google.

Reverse Image Search on PC
While there’s no Google Lens app available for Windows or Mac, you can reverse image search directly using Google Search. Here are all the ways you can do it.
Uploading an Image to Google
You can reverse search by uploading an image to Google. Here’s how to do it.
- Visit Google and tap the Google Lens icon in the search bar.
- Now, drag and drop a file or click on the upload a file link.

- Select a file from your computer and click on Open.

- You should now see all the search results pertaining to the image you just uploaded.

Reverse Search with Image URL
Don’t have the image, but the image URL instead? You can search via URL as well:
- Head over to the webpage where the image is visible and right-click on it.
- From the menu that shows up, select Copy image address to copy its URL onto your clipboard.

- Now, go to google.com and click on the camera icon inside the search bar.
- You can now paste the copied URL onto the “Paste image link” text box and click on Search.

- You should now see all the relevant images based on the original one from the link you shared.

Reverse Image Search with AI
AI has emerged as an alternative to search engines. AI assistants/chatbots can also be used to reverse search images, and they’re surprisingly good at doing so. Here’s how you can reverse image search using two of the most popular AI assistants in the world right now – Google Gemini and ChatGPT.
Using Google Gemini
Google Gemini is pretty good at reverse image search, and it sometimes returns surprisingly good results. Here’s how to use it.
- Go to Google Gemini (website).
- Click the Upload image icon and select the image you want to search. You can also copy and paste the image using Ctrl + C and Ctrl + V shortcuts.

- Once uploaded, enter the prompt asking for the source of the image or where it came from.

- Gemini will return the information about the image. Click on the Sources and related content section to see the original information and where the image came from.

Using ChatGPT
ChatGPT has gotten much better since its release and is easily one of the best tools you can use to reverse image search. You can use ChatGPT itself or one of its custom GPTs – Reverse Image Search GPT to get the job done.
- Go to Reverse Image Search GPT (website) and login or sign up with your account.
- Once logged in, click the paperclip icon in the search bar and then click Upload from computer.

- Once the image is uploaded, enter a prompt to ask the chatbot about its source.
- ChatGPT will now return with the source of the image and relevant details.

And those are the ways you can use to reverse image search from Android, iOS, and PC. Do you know other clever ways to reverse search images on the web? Let us know in the comments.


 Ishan Adhikary


