Barring a few hiccups, exploring iOS 15 has been a pretty smooth affair for me. I have loved trying out the big-ticket features such as Live Text, SharePlay, Safari Tab Groups, and the ability to use FaceTime with Android and Windows. However, there are a few settings that have excited me the most but are slightly under the wraps. So, if you have started using the new iOS version and are all set to try out some of the best iOS 15 hidden features, you need to check out this list right now.
iOS 15 Settings to Change
Unlike iOS 14, iOS 15 hasn’t gone after full-on customization. This time around Apple has focused more on refinements that enhance the overall experience. Although it might disappoint people looking for a number of major changes, the update tends to bring about a much-improved user experience. After digging a little deep into iOS 15, I have rounded up the settings that, once tweaked as per your preference, can prove really helpful. While not all of them may be in sync with your taste, I bet you will find a bunch of cool features that could impress you right away. Without any more ado, let’s get started!
1. FaceTime Settings to Look at
Enable Portrait Mode in FaceTime and More Video Calling Apps
FaceTime has got a host of pretty cool features in iOS 15 and iPadOS 15. One of them is the ability to enable portrait mode for video calls. The best part is that you can take advantage of this feature to blur the background while using other video calling apps like Zoom, Viber, Skype, and even WhatsApp. Here’s what to do:
During a video call on FaceTime,
- Tap on your own video view in the bottom right corner.
- Then select the Portrait Mode button in the top left corner to enable the bokeh effect in the background.

There is another way to blur the background during a video call. This method also works for both FaceTime and other apps.
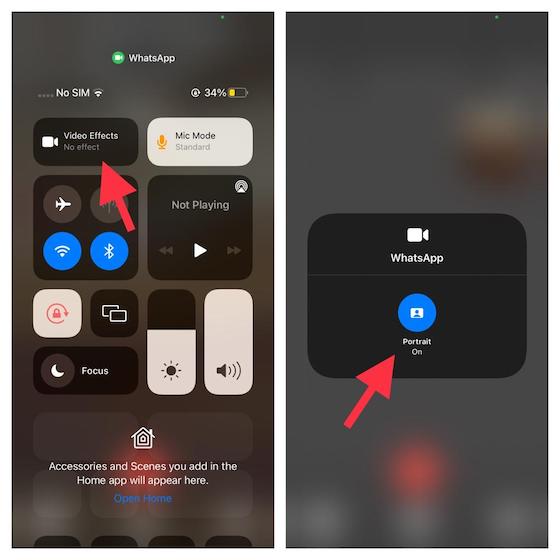
- Simply, start a video call and then swipe down from the top right corner of the screen to access the Control Center.
- Now, tap on the Video Effects tile. Next, tap on the Portrait button to enable the blur effect.
Enable Voice Isolation Mode in FaceTime and Other Video Calling Apps
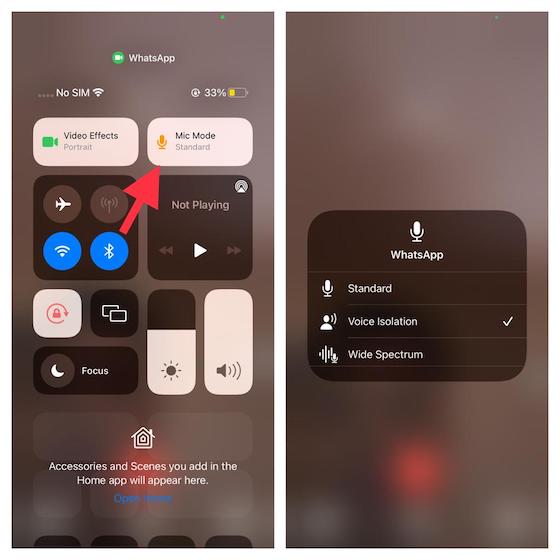
During a video call, the last thing I want to encounter is the background noise that can interrupt the entire conversation. That’s the reason why the “Voice Isolation” feature has managed to catch my attention. And I’m pretty sure it would win you over as well. It also works with both FaceTime and other video calling apps such as Skype, Zoom, and more.
- Just bring up the Control Center by swiping down from the top right corner of the screen or swiping up from the bottom of the screen during a video call.
- Tap on Mic Mode, and select Voice Isolation.
Enable Wide Spectrum Audio on a FaceTime Call
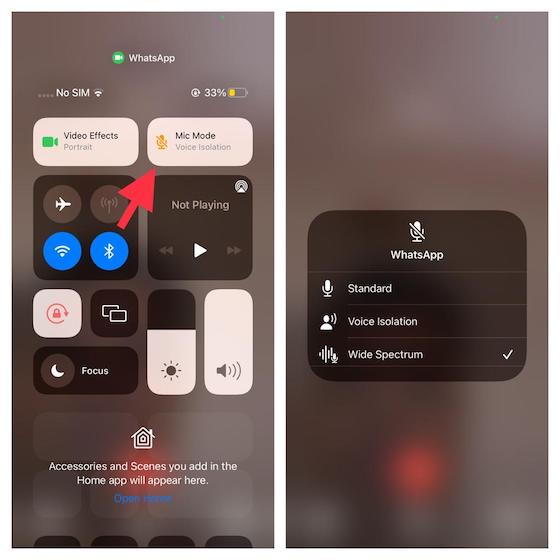
Wide Spectrum Audio is a notable yet lesser known iOS 15 feature that FaceTime has received. This microphone mode is designed to bring every single sound into your call, which makes it a handy asset when you want the other person to hear everything that’s happening in the room you are in. Yet again, it is compatible with both FaceTime and third-party video calling apps.
- To get going, open FaceTime and start a video call.
- In the Control Center, hit the Mic Mode button. Next up, choose Wide Spectrum.
2. Hide App Notification Badges on the Home Screen
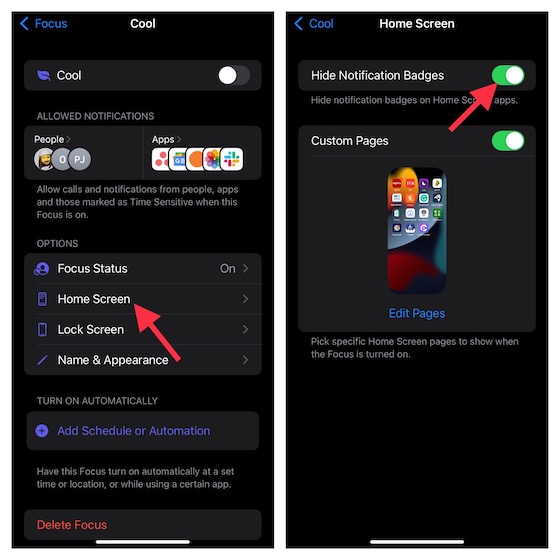
Imagine you have enabled Focus mode on your iPhone to keep all the distractions at bay. Suddenly, random notification badges begin to show up right on the home screen. Feeling frustrated? Most probably, you would. Well, this is where this neat feature comes into play.
In iOS 15, you can hide notification badges on the home screen for individual focus modes so that they do not disturb your focus. Follow the steps below to enable this.
- Head to the Settings app.
- Then select Focus. Following this, choose the desired focus (you have created).

- Now, tap on “Home Screen”. After that, turn on the toggle right next to Hide Notification Badges.
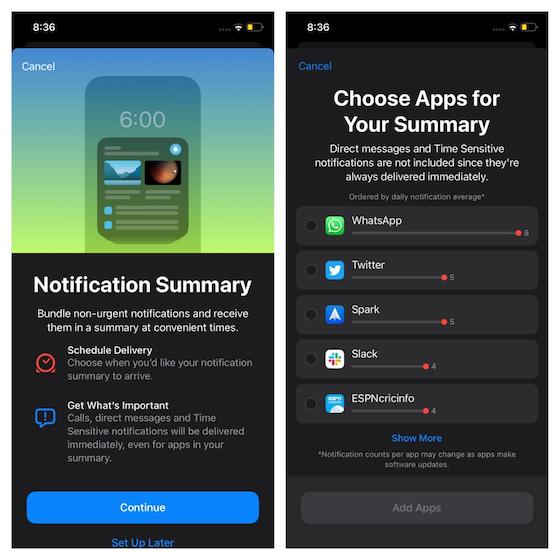
3. Enable Notification Summary
While the time-sensitive alerts manage to get your attention without any delay, it’s the non-urgent but important ones that often seem to get lost in the bunch of notifications received. iOS 15 has come up with a better way to keep a track of less urgent alerts from your preferred apps through a nifty feature called Notification Summary. What makes this feature super handy is the ability to automatically bundle alerts from your selected apps and deliver them all to you at a predefined time. So, you can navigate through them at your own pace without having to dig into the entire Notification Center.
- Just Navigate to the Settings app in iOS 15.
- Select Notifications and then Scheduled Summary. Now, turn on the toggle right next to the option.

- Once done, go ahead and customize the Notification Summary in line with your needs.
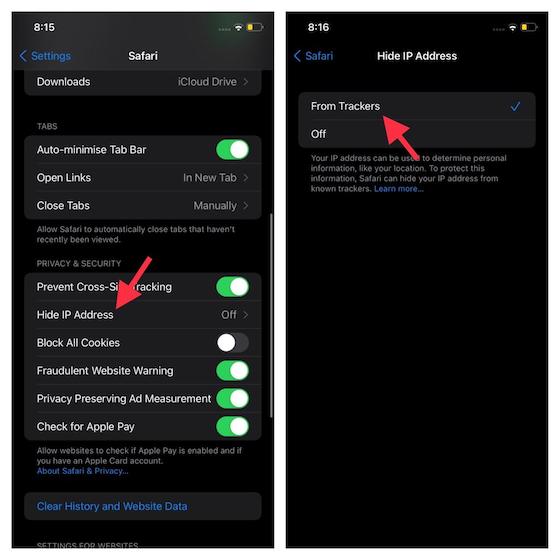
4. Hide Your IP Address in Safari
Let’s talk privacy. This security setting can be very helpful for most of us. Hackers and data trackers use an IP (Internet Protocol) address to determine personal information like your location and device. To safeguard your information, Safari can now let you hide your IP address from trackers. Thus, you can browse the web anonymously using Safari on your iPhone and iPad. For this,
- Go to Settings on your iPhone or iPad.
- Select Safari and then Hide ID Address.
- Now, choose From Trackers to conceal your IP address from trackers.
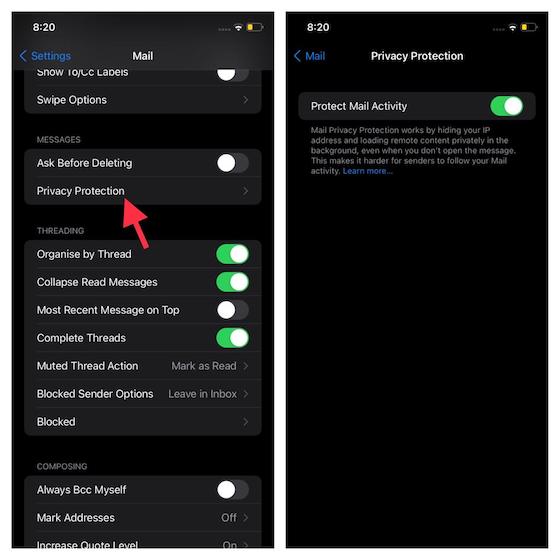
5. Enable Mail Privacy Protection
Apple has also introduced an email privacy feature called Mail Privacy Protection that prevents advertisers from tracking your interaction with their emails. Marketing platforms smartly use different tracking methods like remote images and invisible pixels to find out when and where you opened their emails.
To prevent this behavior, Mail Privacy protection hides your IP address and privately loads all the remote images in the background. Furthermore, Apple routes your IP address through several proxy servers and randomly assigns an IP address to safeguard your personal information. Hence, instead of your actual IP address, advertisers are able to see the one that corresponds to your regional location. As a result, they can’t get hold of much of your data.
- Head over to Settings.
- Select the Mail and then the Privacy Protection option.
- Now, turn on the toggle for Protect Mail Activity.
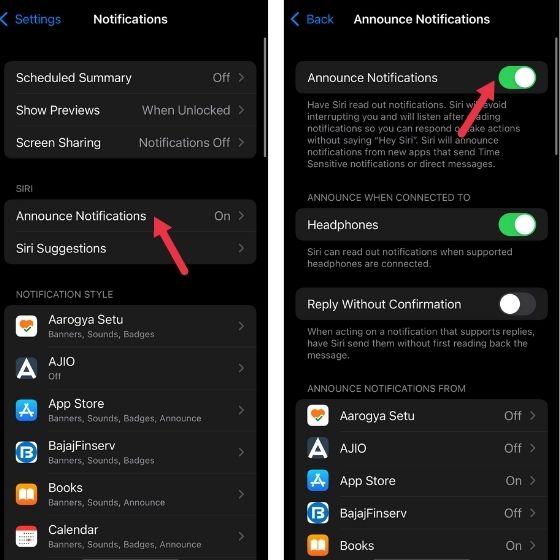
6. Enable Notifications Via Headphones
iOS 15 has also led to the introduction of notification announcements while your headphones are on. This allows you to get access to app notifications (much like message and call alerts) that otherwise go unnoticed.
- Head to Settings.
- Go for the Notifications option. Once there, enable the Announce Notifications option.
- You are also required to enable the Headphones option under the “Announce when connected to” to complete the process.
7. Turn off Night Mode
Night mode on an iOS device proved quite helpful for people to get some pretty cool low-light shots. However, it never came with an option to be disabled. iOS 15 paid heed to this and introduced the ability to turn it off. Here’s what to do:
- Go to the Settings app.
- Select the Camera option.
- Over there, tap the Preserve Settings option and then select Night mode.
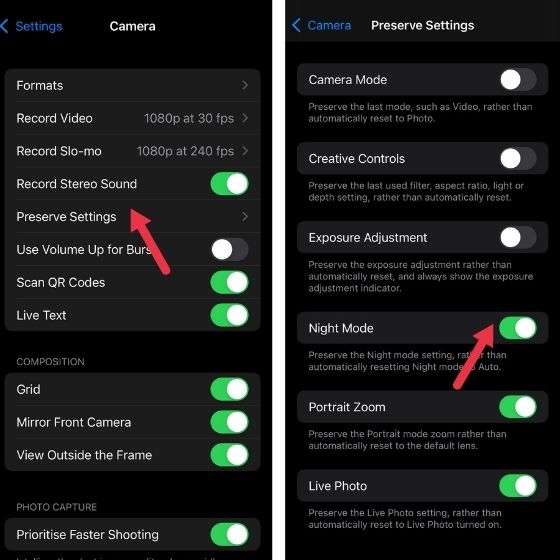
With this option enabled, the Night mode in the Camera app won’t switch on automatically until you decide to enable it. This setting applies to various other camera features such as Live Photos, Portrait Zoom, and more. You can choose to disable/enable the ones you like.
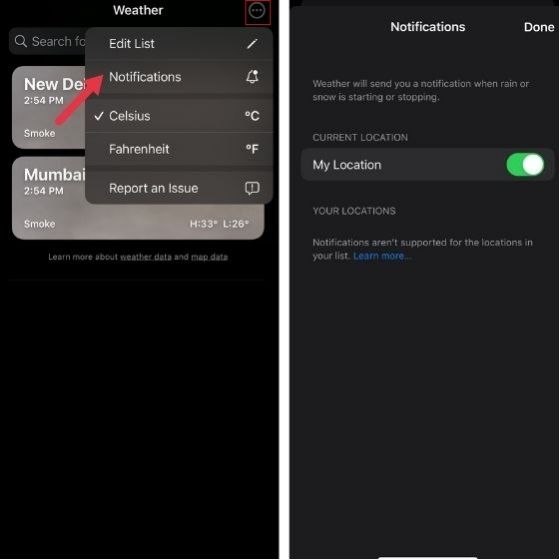
8. Get Real-Time Precipitation Alerts
Besides the plethora of changes iOS 15 has brought in, the Weather app has also seen a few of them. One of the exciting ones is that you can get real-time precipitation notifications based on your location. To enable this,
- Head to the Weather app.
- Select the option in the bottom right corner to get to the location list.
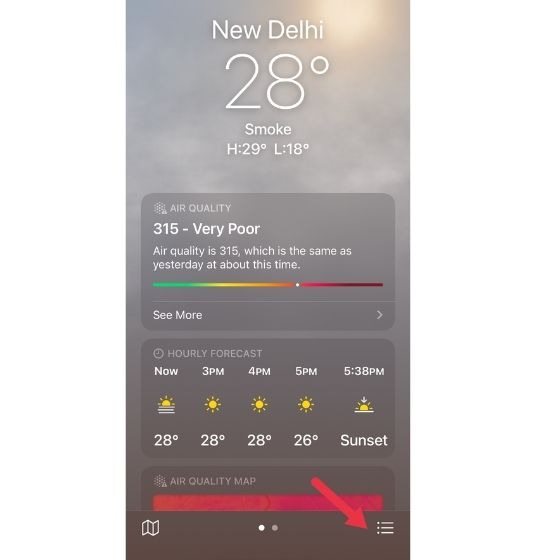
- Now, you will see the list of locations and a three-dotted menu in the top right corner. Tap on it.
- Select the Notifications option and enable it to get the alerts.
9. Change Hide My Email Forwarding Address
The Hide My Email feature works as a shield for your email, which prevents apps and websites from seeing your real email address. Apple creates a unique, random email address that forwards emails to your personal inbox. To be precise, this security feature enables services to contact you without receiving your email address. Moreover, it also offers you the flexibility to turn off email forwarding and even change the Hide My Email forwarding address depending on your needs.
- Open the Settings app.
- Select Profile and then iCloud.
- Now, scroll down to the bottom and tap Forward to. After that, select the preferred Hide My Email forwarding email address.

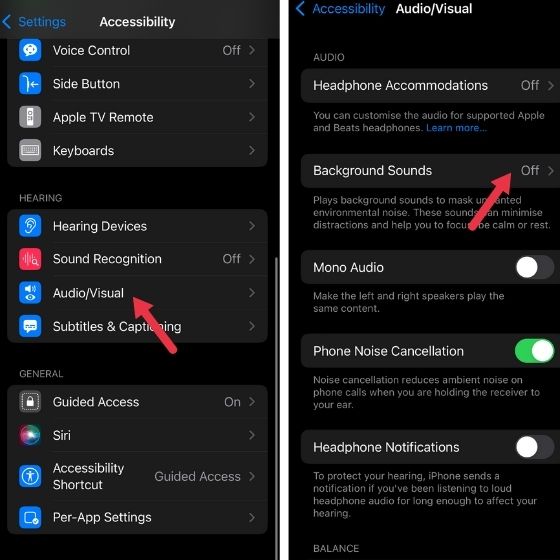
10. Use Background Sounds to Minimize Distractions
Interestingly, iOS 15 also comes with a handful of background sounds to let you minimize distractions so that you can fully concentrate on your task. As someone who prefers to use different sounds to enhance focus and also achieve some peace of mind, I have found Apple’s collection of background sounds worth taking note of. Currently, the library doesn’t include a lot of options but I’m sure Apple might introduce more in the future.
- To enable, go to the Settings app and head to the Accessibility section.
- Select the Audio/Visual option and then Background Sounds. Enable it.
- Choose Sounds and then select the preferred background sounds like balanced noise, bright noise, dark noise, ocean, rain, and stream. When you select a sound, it starts downloading. After that, you can play it just like any other sound.
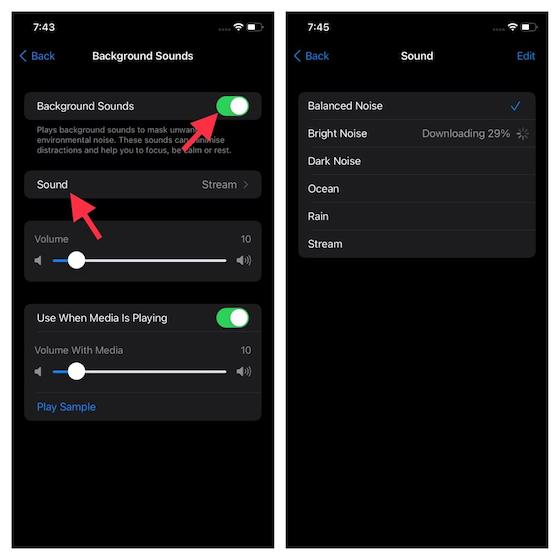
Do note that you also have the option to fine-tune the background sounds volume and the option to play the sound even when media is playing.
11. Get Notified If You Leave an Apple Device Behind
Did you ever forget to pick up your AirPods or an AirTag and wish there was a way to get a notification reminding you to collect the device? If yes, this nifty little feature is for you. Rightly called, “Notify When Left Behind,” it alerts if you have left behind an item at an unknown location.
- For this, open Find My app on your iOS device.
- Select the Devices/iTems tab and then select the device you want to set up the alerts for.
- After that, tap on the Notify When Left Behind and then turn on the toggle.
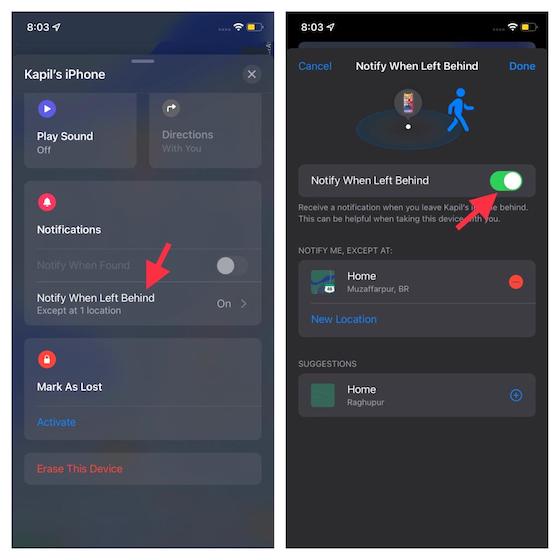
It’s worth pointing out that the feature automatically sets your home as a trusted location, a place where you often leave your items behind and don’t want to be alerted every time. You can choose to add/remove a trusted location as per your needs.
12. Set Up Per-App Text Size
For a more convenient reading experience, it’s always better to have the flexibility to adjust text size. iOS 15 has catered to the need and you can set up per-app text size on your iPhone or iPad right from Control Center. This lets you customize your experience for every app. To get going,
- Open Settings and then Control Center.
- Now, find the Text Size option and then tap the “+” button to the left of it.
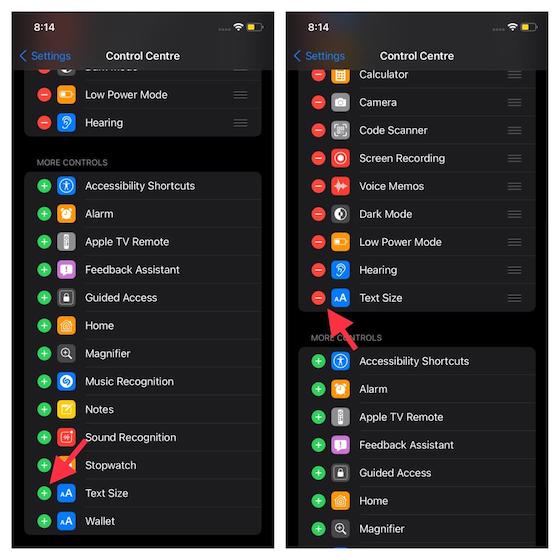
- Next, open the app for which you need to change the text size and then summon the Control Center and hit the text size button.
- After that, tap on the “Aa” option and then use the slider to increase/decrease the text size for the specific app.
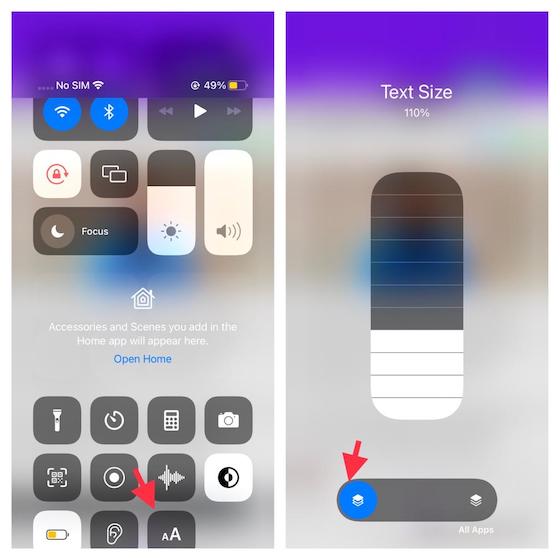
If you want to fine-tune the text size for all apps, tap on the button located on the right side and then adjust the text size slider.
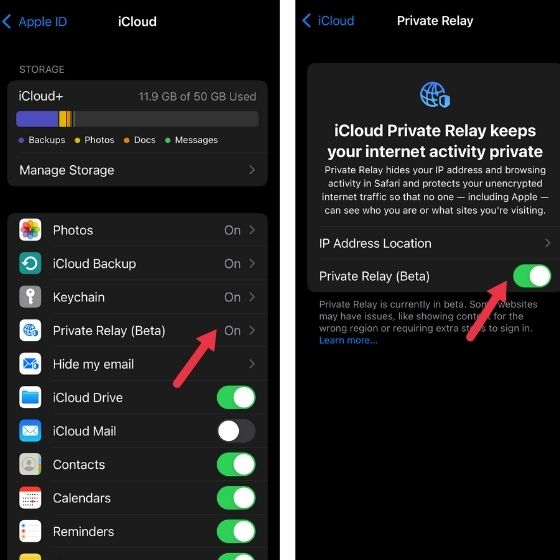
13. Enable iCloud Private Relay
This is another privacy-focused feature in iOS 15. iCloud Private Relay, which is a part of iCloud+ and meant for paid users, also ensures safe web browsing. This appears more like Apple’s in-house VPN service, but there are some differences between iCloud Private Relay and VPN services that you can check out from the linked article. That said, here’s how to enable iCloud Private Relay.
- Visit the Setting app and then select your Profile.
- Once there, select the iCloud option.
- There, you will find the iCloud Relay option. Select it to enable.
14. Focus Mode Settings to Look at
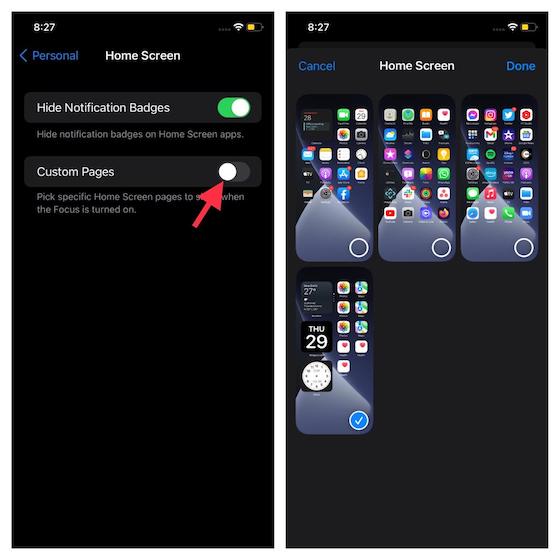
Hide Specific Home Screen Pages in Focus Mode
To let you keep unwanted home screen pages out of sight when you wish to completely focus on your task, Focus mode also lets you hide specific home screen pages. In case you have home screen pages with games and social media apps like Facebook that often distract, you can put them all away. Here’s how.
- Navigate to Settings and select Focus.
- Choose a Focus option and then select home screen.
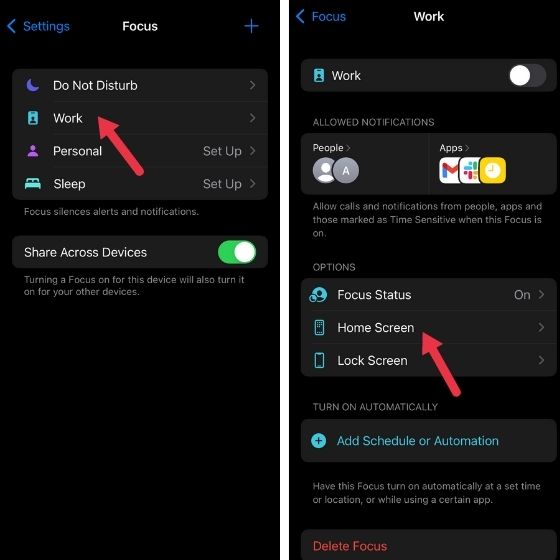
- Now, turn on the toggle for Custom Pages. After that, select only the home screen pages that you want to show. Tap Done to confirm.
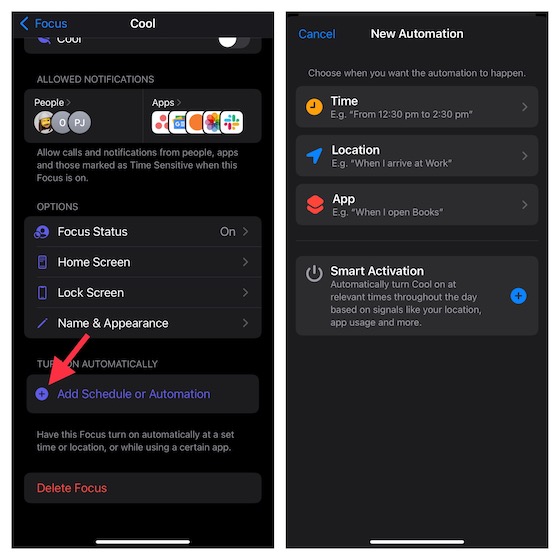
Enable Focus Mode Automatically
For me, the best part about the Focus Mode is the ability to activate it automatically based on location and app usage. So, if you use this feature on a regular basis, you should take advantage of it. Here’s what to do:
- Open the Settings app.
- Select Focus and then choose your preferred focus.
- Now, scroll down to the bottom and tap on the Add Schedule or Automation option. Now, customize the automation as per needs.
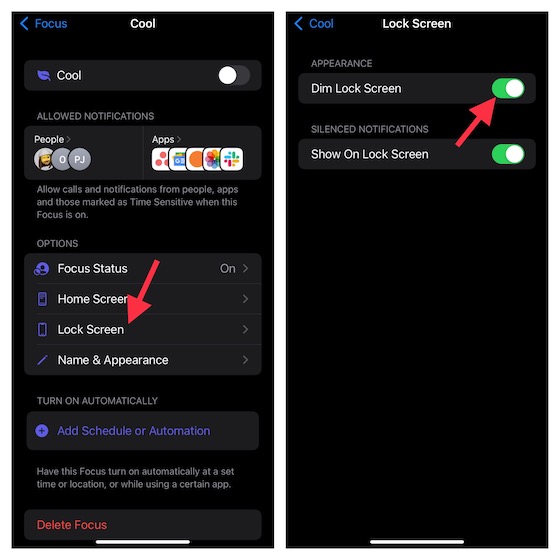
Dim Lock Screen When Focus Mode is Enabled
Focus Mode is all about helping you bring your entire attention to something that matters to you. Whether it’s your work, a peaceful mediation session in the morning, or a thoughtful reading session before you hit the sack, you must keep distractions away to dedicate time to yourself. But what if the gorgeous-looking wallpaper keeps grabbing your attention on the lock screen? There’s a way to sort this out.
- Open the Settings app and tap on Focus.
- Now, choose a Focus and then tap on Lock Screen.
- After that, turn on the switch right next to Dim Lock Screen.
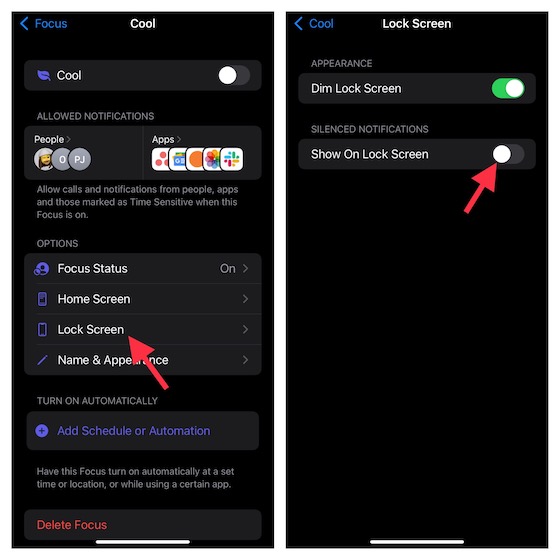
Hide Silenced Notifications from Lock Screen
Focus mode decreases the scope of distractions and to follow this, it’s always good to keep all the silenced notifications away from the lock screen. Else, every time you see those alerts, you may be tempted to dive into the details and the whole purpose gets defeated. For this,
- Head to the Settings app and then Focus.
- Choose a focus and select Lock Screen.
- Now, turn off the toggle right next to Show On Lock Screen.
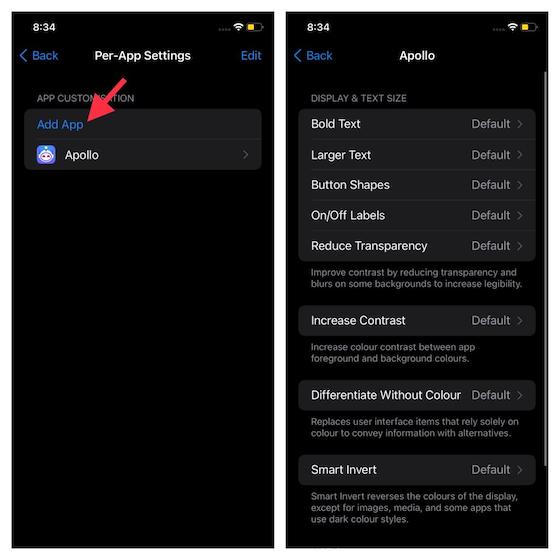
15. Adjust Per-App Accessibility Settings
Adjusting per-app Accessibility settings is something that I have wanted for a long time. There are certain Accessibility features like Button Shapes, Smart Invert, and the ability to reduce transparency that I want to use only in specific apps, and not across the system. By offering the flexibility to customize these settings on a per-app basis, it has made “Accessibility” more user-friendly than ever before.
- Open Settings app and then Accessibility.
- Select Per-App Settings and then the Add App option.
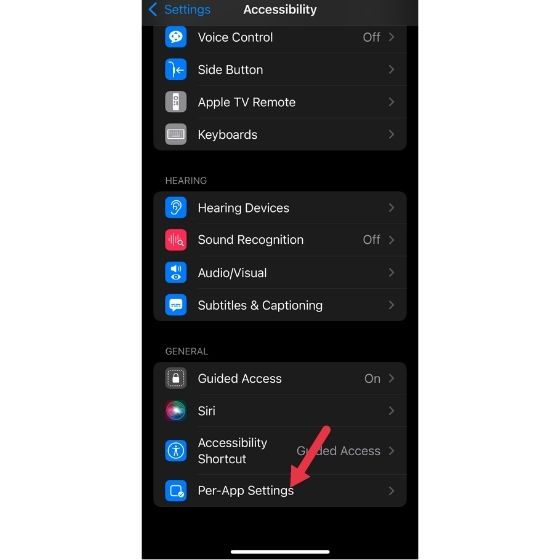
- Now, you will see a long list of apps. Select the one you want to use. You can select multiple apps to customize their settings. After that, tap on the selected app and then customize the Accessibility Settings to your heart’s liking.
16. Hide Photos from Spotlight Search
In iOS 15, Apple has integrated Spotlight Search with the Photos app. Hence, you can search your images by specifying locations, people, or scenes right from the home/lock screen without having to dig into the photos. While it’s undoubtedly a user-friendly feature, it also exposes your privacy. If you are a privacy-conscious person, you may want to stop Spotlight Search from showing up images. Luckily, there is a way to hide photos from Spotlight Search on iPhone and iPad.
- Open the Photos option on your iPhone or iPad via the Settings app.
- Select Siri & Search and then Photos. Now, stop Siri from showing content in search.
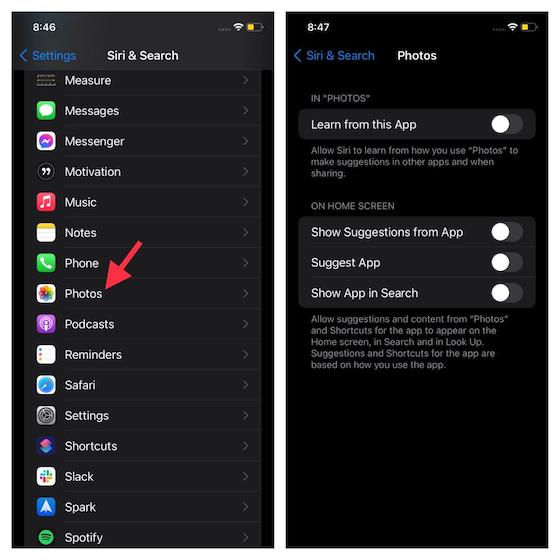
Besides that, you can also prevent the virtual assistant from showing suggestions from the app, learning from the app, showing the app in search, or even suggesting the app. For better control, turn off all the toggles on this screen.
17. Create Smart Folders in Notes
With iOS 15, you can do a lot to better organize notes on your phone. You can add tags to your notes to streamline things in the Notes app. What’s more? The latest version of iOS has also added a super handy feature to the Notes app called “Smart Folder” that automatically organizes notes based on your selected tags. So, if you find it rather tedious to manage notes manually, the Smart Folder has got you fully covered.
- To get going, open the Notes app on your device and head over to the Folders screen.
- After that, tap on the Folder button in the bottom left corner of the screen and choose Smart Folder.
- Next up, give a suitable name to your folder and select the preferred tags and you are good to go!
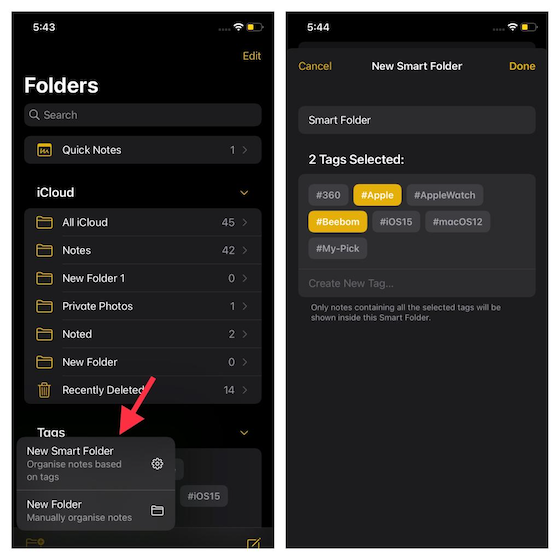
In addition to this, you can mention people in your shared notes so that people can get to know about the changes made.
18. Use Live Text Translation Offline
Even though Live Text is still a “work in progress,” it works quite efficiently in letting you extract text from images or objects. You can also use it to translate languages. Since it’s deeply integrated with Apple’s Translation app for iPhone and iPad, it supports offline translation too.
- Open the Settings app and then Translate.
- Now, turn on On-Device Mode.
- After that, tap on Downloaded Languages and then download the languages that you want to translate offline.
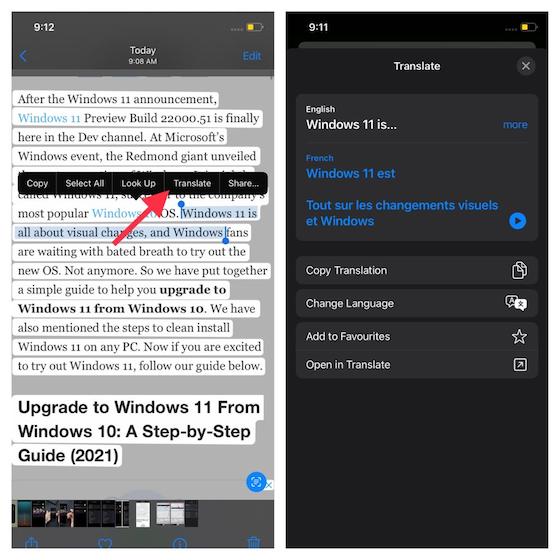
From now, you will be able to use Live Text to translate languages even without the Internet. One thing to note is that before using Live Text translation offline, make sure to enable the offline translation and also download the languages you wish to translate.
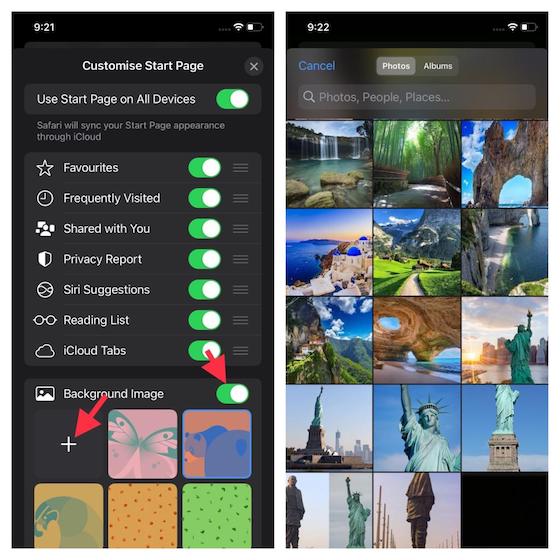
19. Set a Background Image for Safari Startup Page
If you are all about customization, this feature is for you. This iOS 15 setting lets you choose a nice-looking image for the Safari startup page. The stock web browser comes with some pre-defined wallpapers which look just fine. But if you want to amp up the customization game, you can choose a cool image from your photo library as the background image for the startup page.
- Launch Safari on your iOS device and then tap on the Tabs button in the bottom right.
- After that, tap on the “+” button. Next, scroll down and tap Edit. Now, enable Background Image.
- You can choose to select one of the available images or tap the “+” button and then select a photo from your camera roll.
20. Create a Safari Tab Group
While Safari has always been a feature-packed browser, tab management had long been missing from its armory. With iOS 15, Apple has looked into this aspect and now lets you keep all of your tabs organized by grouping them all together. So, you can now create separate tab groups for technology, entertainment, sports, and more to quickly access frequently used tabs and also keep everything in the right sync.
- Open Safari and tap on the Tab option in the bottom right corner.
- Now, choose the “New Empty Tab Group” option and name it. Following this, save it and press Done to complete the process.
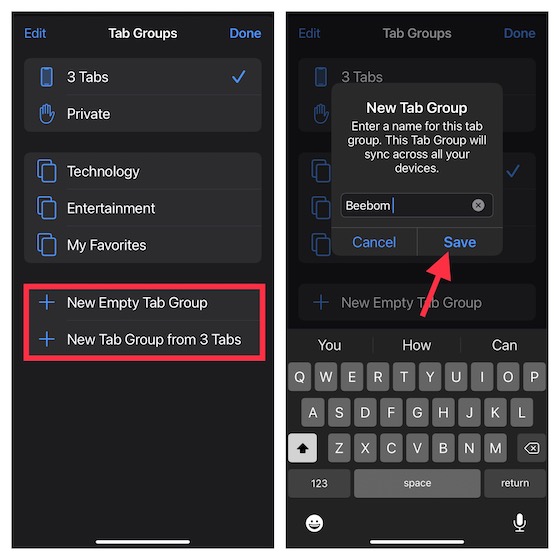
Do note that you also have the option to create a tab group based on the existing tabs. You can look into the detailed guide we have already created for you to organize tabs in Safari.
21. Add Legacy Contacts
Your data deserves to be managed well even after you are gone. And that’s why the Apple Digital Legacy feature comes in handy, allowing you to pass down your digital information to your trusted person in your absence. For this,
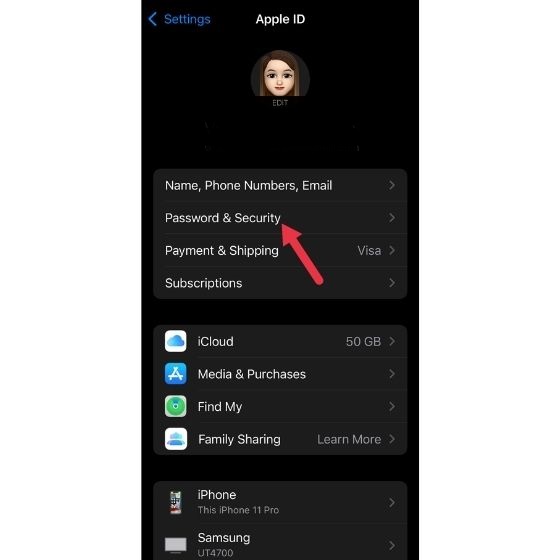
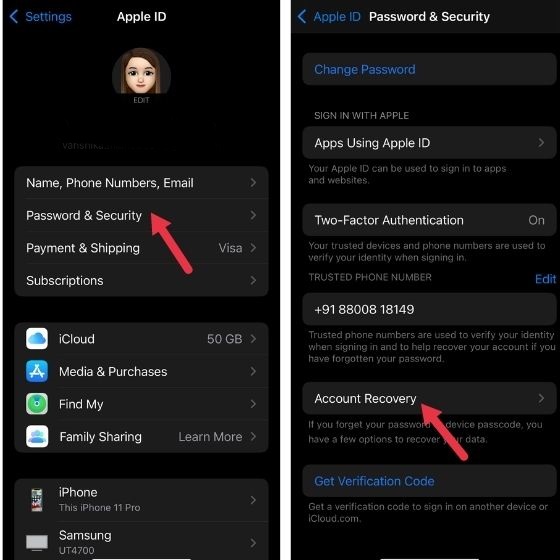
- Head over to the Settings app and then Profile.
- Select Password & Security.
- Go for the Legacy Contact and then Add Legacy Contact. Next, select a contact from your address book and follow the instructions to add it.
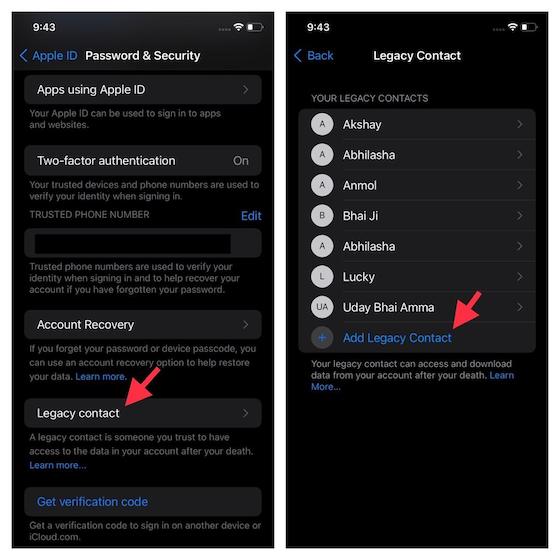
You can add as many legacy contacts as you want. Now, your legacy contact will be able to access and download data from your account after your death. Note that Apple has removed the Digital Legacy Contacts from the official version of the iOS 15 due to some issues. It is expected to add it later this fall.
22. Better Password Management with iOS 15
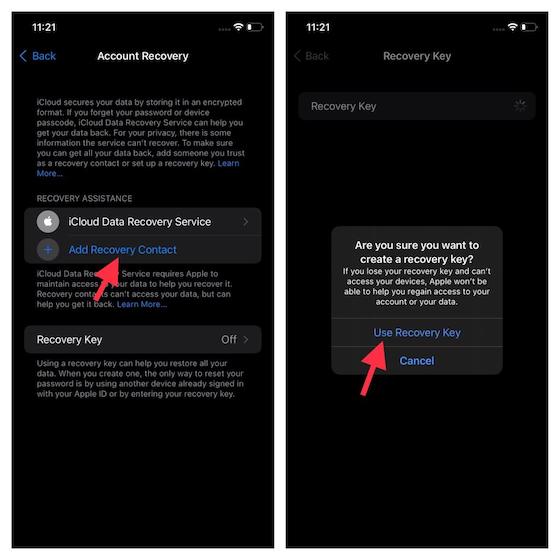
Let’s face it! Managing a ton of passwords is a nightmare for many. While easy passwords jeopardize the security of our accounts, the stronger alphanumeric ones are painful to remember. So, there comes a time when we forget our passwords and have to face the terror of being locked out of our own accounts. That’s when we look for account recovery software to rescue us.
To make account recovery hassle-free, Apple has launched a long-awaited feature named “iCloud Data Recovery Service.” It allows you to add trusted account recovery contacts and also set up a recovery key to restore your account if you ever happen to forget your passwords. Bear in mind, when you create a recovery key, the only way you can restore your data is either by entering your recovery key or using another device already signed in with your Apple ID.
- Open Settings app and then Profile.
- Select Password & Security and Account Recovery.
- Now, you can choose to add recovery contact or create a recovery key.
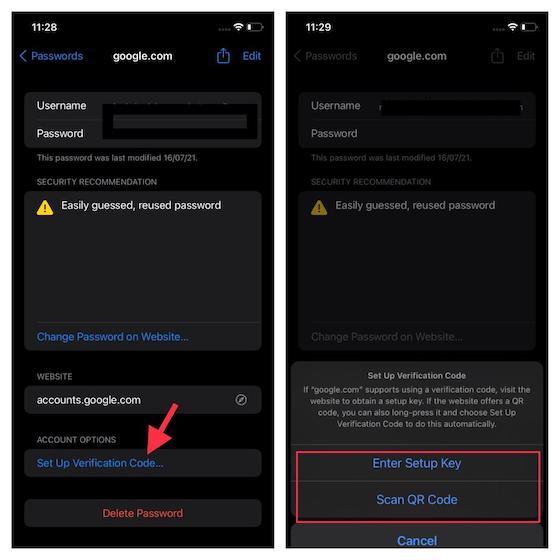
23. Use Built-in Password Authenticator
For an extra layer of shield against hacking, two-factor authentication has become a must. Until now, iOS users had to rely on third-party apps like Google Authenticator and Authy to authenticate passwords while signing into their accounts. With iOS 15, they can generate verification codes for extra sign-in security using the built-in password authenticator. To use this brand new feature,
- Launch the Settings app on your device and then choose Passwords. After that, authenticate using your Face/Touch ID or passcode.
- Next up, find the website you want to use and then hit Set Up Verification Code.
- Now, you can use a setup key (which you will be able to obtain from the website) or a QR code to set up the verification code.
24. Set Up Health Sharing
Health Sharing is another significant addition to Apple’s Health app. You can use it to securely share your health data with your family, friends, and doctor. If you are worried about your privacy, let me tell you that Health offers you complete control over what sort of data you share. Furthermore, you can also revoke access as and when you no longer wish to share the data.
- To get started, open the Health app and select the Sharing section in the bottom.
- Once there, select the “Share with Someone” option and select the contact with whom you want to share the data with.
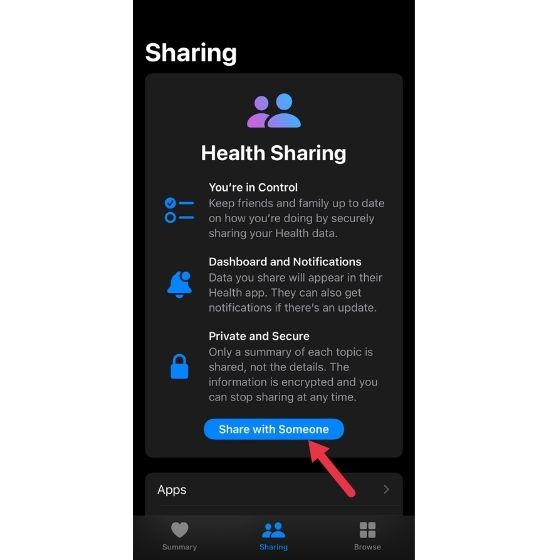
- Select the data and then send an invite for the same. Once the invite is accepted, you will able to kickstart the process.
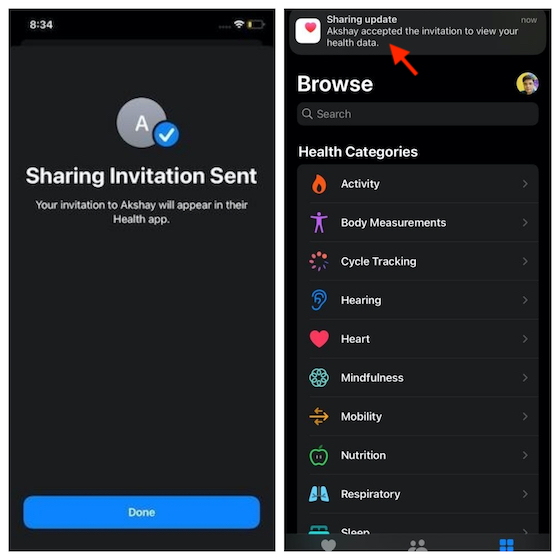
You can check out the article to get a detailed understanding of how to set up Health Sharing and more.
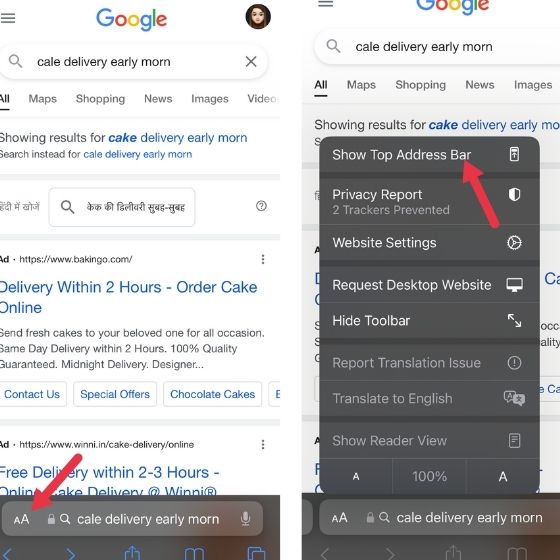
25. Bring Back Safari’s Top Search Bar
In addition to the various Safari changes as part of iOS 15, the placement of the search bar has also changed. In case you miss the earlier top search bar, you can easily get it. Here’s what to do:
- Head to Settings.
- Tap on the Safari option.
- Scroll down to reach the Tabs section and then select “Single Tab” option.
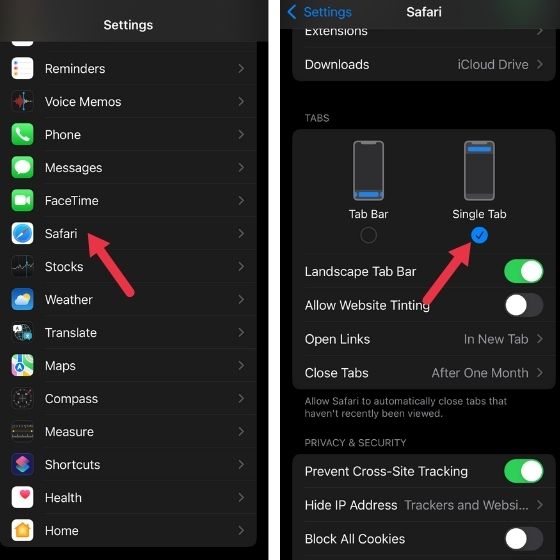
You will now see the top search bar in Safari. There’s another way to go about it. If you are on a web page, you can select the URL, find the “Aa” option and tap it, and then the “Show Top Address Bar” to make the changes.
More Nifty iOS 15 Settings to Check Out
This, of course, isn’t the end. iOS 15 has a number of features to try out. While we listed down the major ones, you can also check out other features that can help improve your iOS 15 experience. Here’s a look at a few of them:
- Adjust date and time of a photo: If you want to change the date and time of an image, just open one in the Photos app, select the “i” icon, and then select the “Adjust Date and Time” option for make the changes. You can have more details on how to view metadata of photos on iPhones and iPads, so do check that out.
- Keep a tab of app activities: This is a privacy feature that lets you know what an app is up to. Just head to the Settings, Privacy, and then select “Record App Activity” to know all the details.
- Change Memoji clothes: With iOS 15, you can now change the clothes of your Memoji. Just reach the Edit Memoji option via iMessage and you will be able to find the various clothes to dress it up. You can look into our detailed article on how to use Memoji.
iOS 15 Settings You Shouldn’t Miss
Well, those were the 25 iOS 15 settings that you should definitely take a look at to improve your experience using your iPhone. So, which one of these settings have you changed on your iPhone, and which ones are you skipping? Share your thoughts with us in the comments down below.