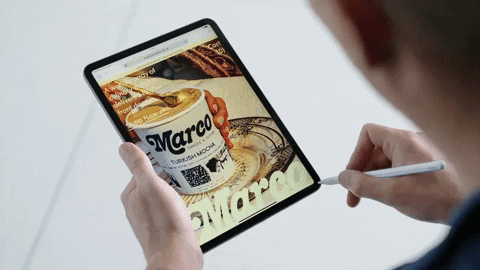
Besides being a haven for artists and professionals alike, the iPad has proven to be a hub for entertainment and more importantly getting work done. Moreover, if you have the Apple Pencil of either generation, you already know how easy it has become for you to navigate around your iPad and save precious time. However, you might not be aware of all the best ways you can leverage your Apple Pencil to its fullest potential. So if you own the Apple Pencil and want to get the best out of it, we have created a list of the 20 best Apple Pencil tips and tricks you can use to maximize your experience in 2021.
Apple Pencil Tips and Tricks
This article not only contains simple routine tips for the Apple Pencil but advanced gestures and the use of one of the best iPadOS 15 features you can utilize to get your work done faster and efficiently. Use the table below to jump to any Apple Pencil trick that piques your interest.
1. Pair the Apple Pencil Immediately
We all know the feeling of getting a new device but endlessly waiting as our phone or tablet detects it through Bluetooth. The Apple Pencil has no such problem.
For the 1st Gen Apple Pencil, Simply remove the back cap of the Apple Pencil and insert the connector in your iPad’s lightning port.
Works with: 1st Gen Apple Pencil
Owners of the 2nd Gen Apple Pencil need to attach the Pencil to the magnetic connector on the side of the iPad.
For both the steps, however, make sure you have turned on Bluetooth on your iPad. Once attached, you will see a simple pairing message. Press Pair and your Apple Pencil is all set up without needing any more steps!
Works with: 2nd Gen Apple Pencil
2. Use Apple Pencil with the iPad Locked
So you loved the Quick Note feature but want to jot stuff down without even unlocking your iPad. Well lucky for you there’s a feature you can leverage to do that. Simply take your Apple Pencil and tap it once against the lock screen. A fresh Note will open up where you can write and draw whatever you want without even unlocking the iPad. All the notes you create will be stored in the Notes app where you can edit them later on.
If this feature does not appear to be working for you, chances are it’s off by default. Simply go to Settings > Notes and under Lock Screen and Control Center you can turn it on. You can even set it to always create a new note or resume the last one.
Works with: 1st & 2nd Gen Apple Pencil
3. Scribble with Apple Pencil
Initially introduced in iPadOS 14, Scribble has remained a handy feature that bolsters the Apple Pencil with powerful features. Using Scribble brings with it a lot of tricks that leverage the Apple Pencil’s tip and adds editing functionality.

You can use Scribble to turn your handwriting into type, delete a part of the text by simply scratching it out. Furthermore, you can draw a line over the text you want to select, insert a word in between sentences and even join or remove letters together.
To enable Scribble on your iPad, simply head into Settings > Apple Pencil and toggle Scribble on and you’re all set. You can use scribble across text editing apps with ease.
Works with: 1st & 2nd Gen Apple Pencil
4. Use Apple Pencil’s Scribble Gestures
Though the scribble feature is useful, it can also be annoying to use if you need to delete text, select some text, and do other common actions. Fortunately, the scribble feature comes with a bunch of really useful gestures that can make your life extremely easy. These gestures are both intuitive and easy-to-use. Here are the Apple Pencil scribble gestures that you can use:
- Delete text: simply scratch out the text you want to delete
- Select text: draw a circle over the text you want to select
- Insert text: touch and hold the place where you want to add a word (or words). The iPad will soon make a space between the words and you will be able to simply scribble to add whatever text you want to insert.
- Join words: if scribble accidentally converted a word into two words (for example, if ‘hello’ got written as ‘he llo’), you can simply draw a line between the two words and they will get joined together.
- Separate words: conversely, if two words accidentally got mushed together, you can simply draw a line in the middle of the word you want to separate.
5. Shade with Apple Pencil
If you’re an artist, you will be glad to know that you can use the Apple Pencil to digitally shade your artwork. To do this, you can simply tilt the Apple Pencil, and start applying pressure the way you would if you were using a real pencil. The Apple Pencil knows when it is being tilted and you will see the effect on the screen when you try and shade with this method. It’s quite impressive and works very well.
6. Charge Your Pencil Efficiently
There are various ways to charge the Apple Pencil. Inside the box of the Pencil, you get a Lightning adapter that you can use to create a connection between your power outlet and the Pencil. However, there are easier ways to charge the Apple Pencil.
You can charge the 1st generation Apple Pencil by simply removing the back cap and inserting it into the iPad’s lightning port. The Pencil charges quickly so you won’t have to wait long before you can start using it again.
Works with: 1st Gen Apple Pencil
The 2nd generation Apple Pencil is even better. The Apple Pencil charges by simply attaching it to the magnetic connector that is present at the side of the iPad. You will see a small notification pop up in a second and the Pencil will start charging. Use this Apple Pencil tip long enough and it will become a habit before you know it.
Works with: 2nd Gen Apple Pencil
7. Easily View Remaining Battery
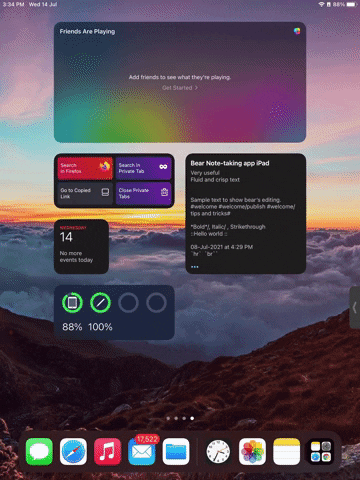
Want to check the Apple Pencil’s battery status? No problem. The easiest way to check the Apple Pencil’s battery is by using the new battery widget. With the new iPadOS 15 widgets on the home screen, it has become easier than ever. Refer to our guide to add a widget and once done, you will easily be able to see the Apple Pencil’s battery status anytime you wish.

Alternatively, you can navigate to Settings > Apple Pencil and check up on your Apple Pencil’s battery from there.
Works with: 1st & 2nd Gen Apple Pencil
8. Replace the Tip of Your Apple Pencil Easily
As you go about using your Apple Pencil every day you might start to feel resistance as the tip moves across the screen. This is a sign that your Apple Pencil’s tip has worn off and needs replacement. Using a Pencil with a worn tip not only hampers your experience but can cause permanent damage to the screen. As a general rule of thumb, replace the tip of your Apple Pencil every three months.
Replacing the tip is super easy, the trick is to unscrew the tip by rotating it counter-clockwise, and then taking it off. Once done, put the new Apple Pencil tip on top of the gold tip you will see and rotate it clockwise to lock it in place. And you’re all set! Repeat this handy Apple Pencil tip every three months to stay on top of your game.
Works with: 1st & 2nd Gen Apple Pencil
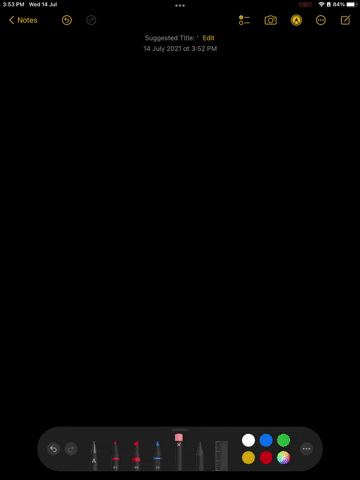
9. Quick Note
Among the plethora of features introduced in iPadOS 15, the Quick Note is perhaps one of the most useful. Put simply, Quick Note allows you to pull up a quick sticky note to jot anything down quickly. Apple Pencil users can bring up a Quick Note by swiping up from the bottom right corner of the iPad.
You can then use the Quick Note to write anything down and even create links to other apps and contacts. However, what’s even more interesting is that even if you don’t have an Apple Pencil you can perform the gesture and make a Quick Note. So the next time you feel lazy unlatching your Apple Pencil, use this handy tip.
Works with: 1st & 2nd Gen Apple Pencil
10. Take Screenshot with Apple Pencil (and Markup!)
A very useful Apple Pencil trick we love is the ability to quickly screenshot any part of the iPad’s screen and start making changes to it immediately. Taking a screenshot with your Apple Pencil is very easy. Simply swipe up with your Pencil from the bottom left corner of the screen and the system will capture whatever the screen was displaying.
You can now easily markup the screenshot using the provided tools. You can highlight any important elements, mark them with the Apple pencil, color various panels for use and even erase objects or turn it into a pixel eraser for more accuracy. Once you’re all done, tap the share button above to send the screenshot away. Use this Apple Pencil tip the next time you need to screencap something.
Bonus: If you need to take a scrolling screenshot, tap the Full Page option to do so.
Works with: 1st & 2nd Gen Apple Pencil
11. Change Apple Pencil Quick Gestures
If you’re a leftie like me or simply want to interchange how you bring up Quick Note and Screenshot with your Apple Pencil, you’ll be pleased to know you can do so. Simply go to Settings > Apple Pencil and under Pencil Gestures, you can change the left and right corner swipe actions to your liking.
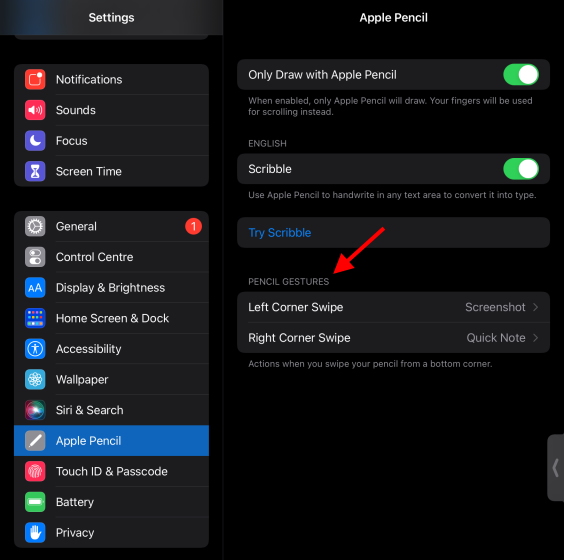
Post the new iPadOS 15 beta update, you can even turn the option off entirely. People struggling with specific gestures should check out this handy Apple Pencil tip to get it done.
Works with: 1st & 2nd Gen Apple Pencil
12. Convert Handwriting to Text
This neat little trick takes whatever your Apple Pencil’s tip writes and automatically converts it into text. So if you’re tired of using the on-screen keyboard, just open notes, tap the Pencil icon, and choose the handwriting tool. Now begin writing with your Apple Pencil and witness as it automatically converts to text and floats up to the text bar. Now you can keep writing your essay or random musings and record them in the text without any additional steps.
Bonus: You can even cut convert already handwritten notes into text and paste them across apps. Simply choose the selection tool from the toolkit, circle the notes wish to copy, and tap them to select Copy as Text. You can now paste this text across any app to get your pre-written point across.
Works with: 1st & 2nd Gen Apple Pencil
13. Easily Paste Between Devices
Apple Pencil owners who also own an iPhone along with their iPads will love this little trick. You can easily copy and paste text across your iPad and iPhone without using any additional app or setting. Simply Copy whatever you want on your iPad and then pick up your phone. Long press the phone’s screen and you will see the Paste option waiting for you. However, be aware that you need to be signed in to the same Apple account and have the internet enabled on both devices for this trick to work.
Works with: 1st & 2nd Gen Apple Pencil
14. Adjust Writing Posture and Palm Rejection
The good news is the Apple Pencil comes with Palm Rejection automatically enabled and configured. So whenever you write or draw anything, be assured that your palm won’t leave any stray marks on the screen. However, let’s say you’re taking down notes and want to adjust this setting and even your writing posture. Well, the good news is some third-party apps have palm rejection settings that you play around with.
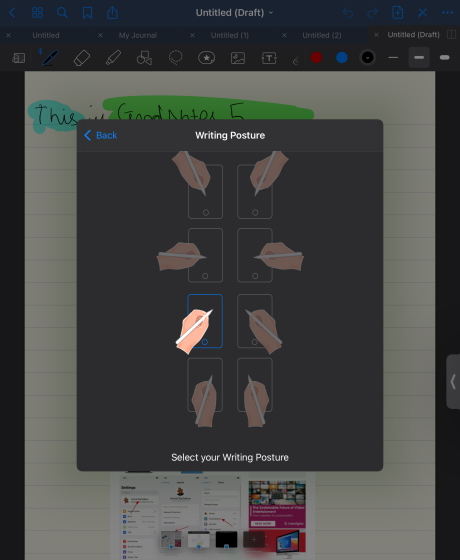
GoodNotes 5 for example has Stylus and Palm Rejection settings that you can adjust according to your needs. To get to this setting, simply double-tap the pen tool when inside a GoodNotes document and choose Stylus and Palm Rejection. Here you will see the settings to adjust the palm rejection sensitivity and even change your writing posture from the many options available. Use this handy trick the next you find stray drawings that didn’t come from your Apple Pencil’s tip.
Works with: 1st & 2nd Gen Apple Pencil
15. Draw Straight Lines with Ease
Let’s face it, we are no Leonardo Da Vinci. While you sketch that perfect creation away, you are bound to mess up your lines and accidentally have them crooked. Fortunately, the iPad has a neat trick up its sleeve that will make sure you never draw a jagged line again.
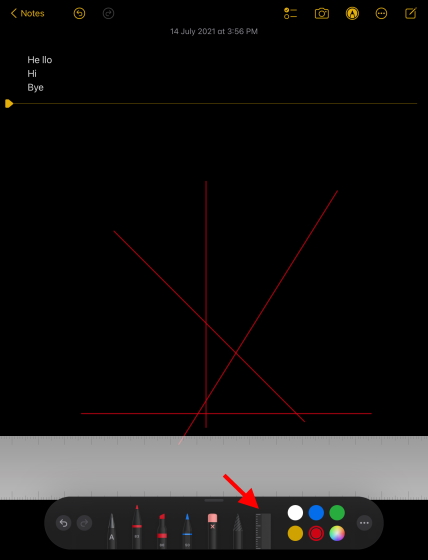
The next time you’re drawing something on Notes, choose the Ruler from the bottom right of the toolkit and place it according to your desired angle. Now position your Apple Pencil on the scale and draw away!
Works with: 1st & 2nd Gen Apple Pencil
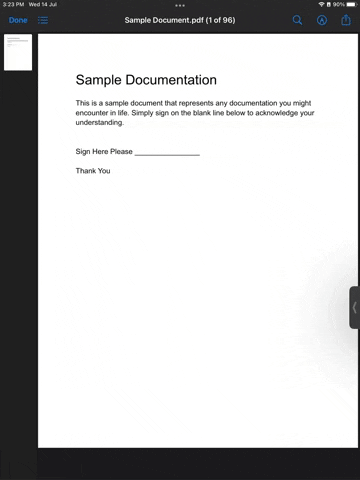
16. Use Apple Pencil to Sign Official Documents
This pandemic has everyone scared of touching almost anything. Thankfully, the Apple Pencil is one such tool you can use to stay all digital and sign any documents you need to. To use this trick, simply open up any PDF document on your iPad, tap the Pencil Icon. Press the Plus Sign from the bottom right and choose Signature. Here you can add and remove signatures and place them anywhere on the document. You even resize them.
Works with: 1st & 2nd Gen Apple Pencil
17. Stop Your Fingers from Interfering
If you’re an Apple Pencil user who wants to take the palm rejection and crank it up to exclusive Apple Pencil drawing, then you’re in luck. Tucked in Apple Pencil settings, lies this little toggle named Only Draw with Apple Pencil.
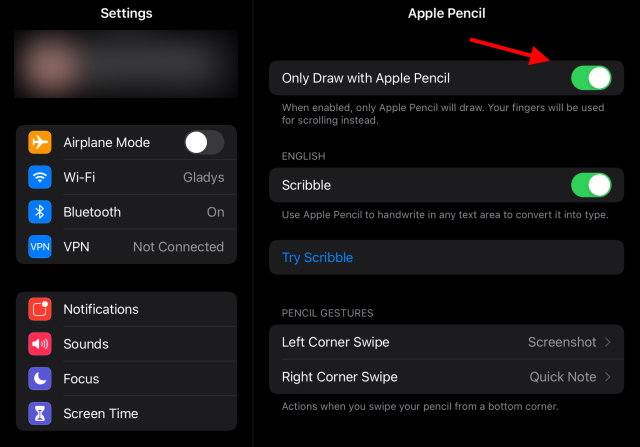
Once enabled, the iPad will only register the Apple Pencil’s keystrokes when you attempt to draw. However, you can still use your fingers for scrolling instead. To get back to drawing with your fingers, simply roll back this setting.
Works with: 1st & 2nd Gen Apple Pencil
18. Customize Apple Pencil’s Double Tap Feature
This one is for the people who use the 2nd Generation Apple Pencil. The double-tap feature is a 2nd gen exclusive that allows users to double-tap the pencil to quickly access some tools. By default, the double-tap gesture is set to switch between the current tool and the eraser.
To change what the double-tap gesture does, go to Settings > tap Apple Pencil and you will see a list of options you can choose from. Customize your 2nd gen Apple Pencil to switch between current and last tools, show the color palette or even turn it off. Use this handy trick to adjust your latest Apple Pencil according to your needs.
Works with: 2nd Gen Apple Pencil
19. Draw Perfect Shapes
Drawing a perfect square or triangle without having wavy lines is difficult. It’s especially more so if you’re not used to drawing on a digital display. Fortunately, the Apple Pencil and the iPad work well together to do the heavy lifting for you.

The trick to this little tip here to draw the shape you want and then pause for a second. This allows the Shape Recognition feature to kick in and the shape you have drawn will be perfected automatically. See it in action above and get to it yourself.
Works with: 1st & 2nd Gen Apple Pencil
20. Trace Real Paper Using the Apple Pencil
Taking things in a different direction, this is something interesting you can do with your Apple Pencil. If you have some paper drawings lying around that you want to get onto your iPad without scanning you can actually draw over them with your Apple Pencil. Simply tack the paper onto the iPad’s display and hold it in place using tape or some post-it notes. Provided the paper is thin enough, the iPad will register the Apple Pencils strokes over the paper and transform the paper drawing into a digital one. You can also use this to get better at drawing in general. Try it out!
Works with: 1st & 2nd Gen Apple Pencil
Apple Pencil Compatibility List
Are you looking to buy an Apple Pencil for your iPad but are not sure about which generation to buy? Depending on the generation, the Apple Pencil supports different iPad models. Check out the list below to see the full range of compatibility.
Apple Pencil (1st generation)
- iPad (8th generation)
- iPad mini (5th generation)
- iPad (7th generation)
- iPad (6th generation)
- iPad Air (3rd generation)
- iPad Pro 12.9-inch (1st or 2nd generation)
- iPad Pro 10.5-inch
- iPad Pro 9.7-inch
Apple Pencil (2nd generation)
- iPad Air (4th generation)
- iPad Pro 12.9-inch (3rd generation) and later
- iPad Pro 11-inch (1st generation) and later
Frequently Asked Questions (FAQs)
How long do Apple Pencil tips last?
It depends on your usage, but on average, Apple Pencil tips will easily last 4-5 months if you’re using them multiple hours every day. If your usage is even less frequent, the tips can last a lot longer as well. You can get Apple Pencil replacement tips on Amazon for quite an affordable price. Check out these replacement tips for Apple Pencil ($7.99).
Why does my Apple pencil feel weird?
If your Apple Pencil feels weird while using, it’s probably due to a worn out tip. We have mentioned how to replace the tip of your Apple Pencil above.
Can you convert Apple Pencil handwriting to text?
Apple Pencil natively supports converting handwriting to text using the Scribble feature described above. Moreover, you can also convert already existing handwritten notes on your iPad to text easily.
Have Fun with These Apple Pencil Tips and Tricks
That was our list of the best Apple Pencil tips and tricks you can use to make the most out of your Apple Pencil. Use them separately or together according to your need. You can experiment even more by trying the best Apple Pencil apps available or style it up with these Apple Pencil accessories. Don’t have an Apple Pencil? Check out these top Apple Pencil Alternatives you can buy. Got any more tips and tricks for the Apple Pencil we should add? Let us know in the comments below.