- Minecraft Texture packs allow you to modify the game's blocky appearance, including the surroundings, mobs, and structures, and they give you full control of the game.
- We have listed a step-by-step process for creating your own texture pack for both the Java and Bedrock editions.
- Once you make them, you can easily distribute these files with your friends or monetize them at the Minecraft Marketplace.
Imagine having the power to change the world in Minecraft. The ability to transform every single block and even to change the background of the main screen. If you have used any of the best Minecraft texture packs out there, you have experienced this power. But only in a limited way. Minecraft texture packs are a fantastic resource to change your game’s appearance completely, but the customization options are limited to what the creator decides. That said, if you want complete control over Minecraft’s appearance, you can create your own texture packs for Minecraft. If that interests you, here’s how to make a Minecraft texture pack.
Make a Minecraft Texture Pack: Explained (2025)
Note: You will need Minecraft Java or Bedrock installed to follow this guide.
Minecraft texture packs are awesome. They allow you to change the textures of everything from mobs to blocks and even liquids, making your Minecraft feel like a completely different game. Some really good texture pack creators might even have the potential to get the pack listed on the official marketplace and monetized.
The process of making a texture pack involves various steps. So, to keep it simple, we have separated our guide into several sections. You can use the table below to explore each section with ease.
How Does a Minecraft Texture Pack Work
Due to Minecraft’s simple, blocky, and pixelated world, an in-game texture is nothing but an image wrapped upon a bunch of cubes. These cubes then combine to create separate structures, mobs, and even in-game items. As you might expect, if these textures or image files are changed, the changes are reflected inside your Minecraft world.
Texture Resolution
The default resolution for these textures is 16×16 pixels, but players can push them up to 128×128 pixels. However, such high-quality textures might not work well on every platform. So, your best bet is to stick to the resolution of 16×16 pixels or 32×32 pixels.
Texture Pack Creators
Moving on to the creation, the easiest way to make Minecraft texture packs is using one of the many free creators. Let’s go over the best ones for each platform.
Nova Skin Resource Pack Creator (PC)
Nova skin’s resource creator is the most thorough and easiest online tool for making a Minecraft texture pack. You get a tree-like folder-based structure to find the textures of every single model in the game. Moreover, it has a built-in paint-like editor that you can use to edit the texture without leaving the site. But if that isn’t enough, it allows you to go beyond textures too.
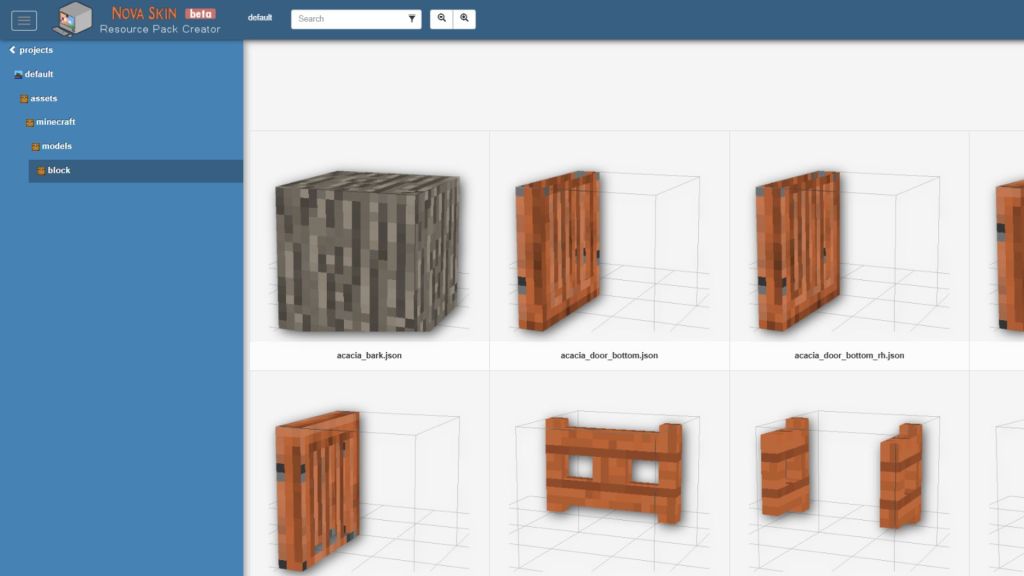
Nova skin also allows you to edit font, music, particles, and more. So, in many ways, it is an all-in-one online tool to make a full-fledged resource pack in no time. Once done, you can save your resource pack on the cloud or download it for your Minecraft world.
AddOns Maker for Minecraft PE (Android)
Note: As of March 2025, there is no reliable app or tool for creating texture packs for iOS, iPad OS, and console users. They have to rely on the manual process for making a texture pack for the Bedrock edition, which we will cover later in the guide.
This Android app is one of the most popular Minecraft tools on the Play Store, and from our experience, it’s all for good reasons. As you might expect, it has a built-in editor that can be used to paint over existing in-game textures. But if you don’t want to do it all manually, you can also choose one of the many in-app textures and apply them directly to specific items.

The app also allows adding structures, sounds, trees, biomes, and new recipes to the game. Taking texture packs a step further, this app allows you to create a modpack for Minecraft PE. Even with so much power, this app has a major downside: its ads. You can do a lot with the app if you can handle getting ads on almost every other tap.
How to Make a Minecraft Texture Pack for Java Edition
Thanks to the unencrypted game files, it is really easy to unlock Minecraft’s texture files and edit them on Java edition. Contrary to what many of you might expect, you don’t even need to download anything to make a Minecraft Texture pack manually. Here’s what you need:
- Minecraft Java
- Zip file extractor like Windows Explorer
- A basic image editor like MS Paint
- Text editor like Notepad
If you are on either Mac, Windows, or Linux, all the apps mentioned above or their alternatives are most likely present on your device. With that, let’s begin by creating a Minecraft texture pack:
1. Extract Minecraft Texture Files
Texture packs are based on custom edits and personal preferences. So, once you know what changes you want to make, follow these steps to edit Minecraft’s textures:
- To begin, open the game’s directory. If you don’t have it set as custom, paste this address –
%appdata%\.minecraft\in your Explorer address bar or the Run window to open the default location. You can access the Run window through the Windows 10 keyboard shortcut “Win + R”.

- Then, in the Minecraft directory, open the “versions” folder. Within it, open the folder with the most recent game version, which is currently Minecraft 1.21.4.

- In the version folder, copy (Ctrl +C) the Jar file with the name of your game’s version number. It will be the only file with a “.jar” extension unless you have mods installed.

- Then, create a new folder within the Minecraft directory or anywhere on your PC and paste the Jar file (Ctrl + V) there. It can have any name.

- Now, you need to change the file extension from “.jar” to “.zip” by renaming it. Then, you can extract the file by right-clicking on it and choosing the “extract option.” Alternatively, if you have WinZip or WinRAR installed, you can directly extract that Jar file, too.
Edit Textures
Now that everything is ready, we just need to edit the texture files to make a Minecraft texture pack. Here’s how to do it.
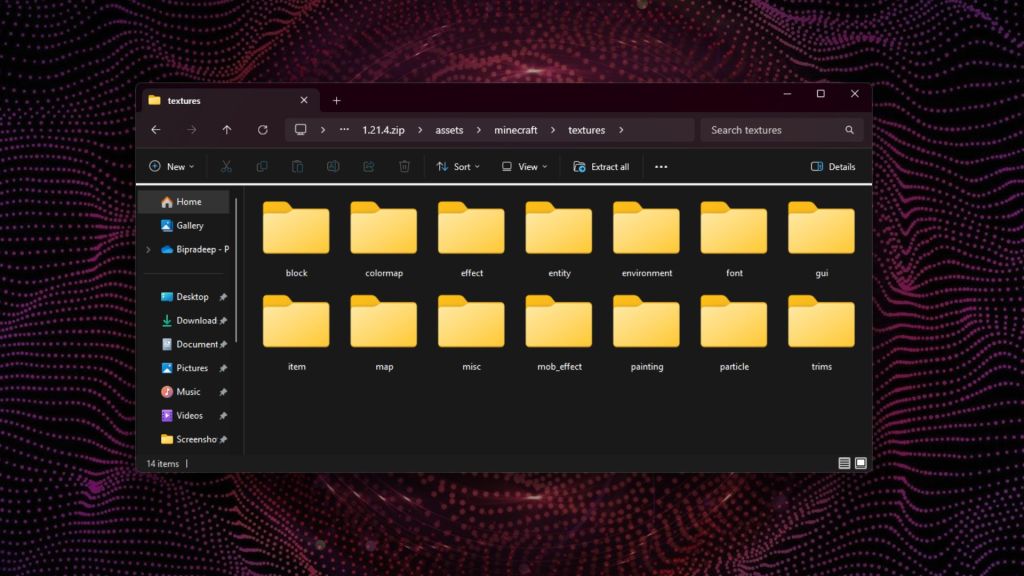
- First, open the newly extracted folder and reach the “textures” folder. This can be done by opening the extracted folder, then “assets,” and finally, the “Minecraft” folder to reach it.
- Within the texture folder, you will find various subfolders categorically dividing the in-game textures. The “block” folder contains all the placeable blocks of Minecraft.
- Meanwhile, the animals and mobs are in the “entity” folder. Similarly, you can find folders for the environment, items, and more. Choose the category of texture you want to edit and open its folder.
- Find the PNG texture file you want to edit within the folder and open it in paint using the “open with” option.
- You can also use any other image editor, but MS Paint is enough to get the job done. Because of a layering system, some of these texture files might be in subfolders.

- Then, within your photo editor, make the edits you want, and save the file as PNG in the same location with the same file name. You can repeat the process until all your desired textures are edited.

Create MCMETA File
- Once you are done editing textures, go back to the main extracted folder with the “asset” subfolder. Then, create a new text file by right-clicking and choosing the new option.

- Then open the text file and paste the following code in it:
{
  "pack": {
    "pack_format": 7,
    "description": "[Custom Description for your Texture Pack]"
  }
}
You can replace the description with your text, but please avoid using any special symbols in the same. As for the “pack format” number, you can use the table below to find the appropriate one for your version:
| pack_format | Game Version |
|---|---|
| 15 | 1.20 to 1.20.1 |
| 18 | 1.20.2 Pre Release 2 |
| 34 | Snapshot 24W21A – 1.21 |
| 48 | 1.21 – 1.21.1 |
| 57 | 1.21.2 – 1.21.3 |
| 46 61 | 1.21.4 – Pre Release 1 |
- Finally, save the file using the save as option with the name “pack.mcmeta“. Select “all files” in the “save as type” drop-down box.

Save & Install Texture Pack
Once every texture you want to change is edited and the “.mcmeta” file is saved in the pack’s folder, it’s time to make your texture pack usable in the game.
- To create a texture pack file, press the “ctrl” key simultaneously to select the “assets” and “.mcdeta” files. Then right-click and choose the “compress to zip file” option. The file’s name can be anything.

- Now, to use this newly created texture pack, copy and paste the zip file in one of the following directories:
- %AppData%\.minecraft\resourcepacks (Minecraft 1.16.1 and later)
- %AppData%\.minecraft\texturepacks (Minecraft 1.16 and earlier)

- Then, load up your game, click on the “options” button on your home screen, and then click on the “resource packs” button within options.
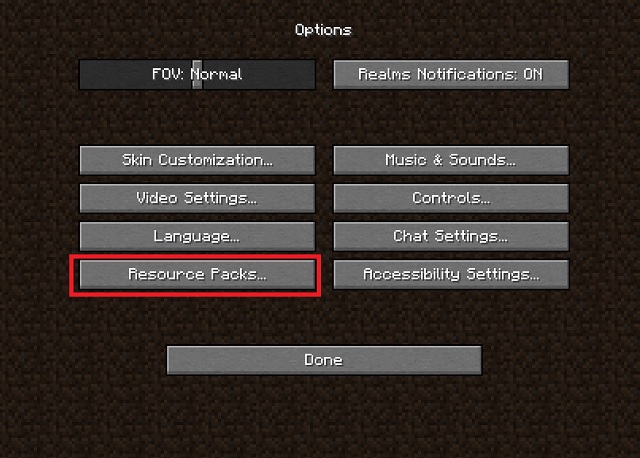
- Finally, click on the resource pack’s icon to activate your Minecraft texture pack. Doing so will move it from the left-hand column to the right-hand column.

- With your pack activated, all that’s left for you to do is load up your Minecraft world and look for blocks, items, or entities you made changes to. If you don’t find desired results, head to our FAQ section for a solution.

Note: we have a detailed guide on how to install Minecraft texture packs that you can follow if you need more help.
How to Make a Texture Pack for Bedrock
Texture or resource packs for the Bedrock edition work slightly differently from the Java edition. Though, there are no changes in how you edit the texture itself. Let’s see how.
Things You Need
You only require the following items to create a texture or resource pack add-on for the Bedrock edition:
- Minecraft Bedrock (Xbox Gamepass edition also counts)
- Zip file extractor like Windows Explorer
- Basic image editor like MS Paint (use GiMP, Paint 3D or Photoshop if you want to add transparency)
- Text editor like Notepad
- Vanilla resource pack
Unlike the Java edition, you can’t extract the texture files from within the game. So, you have to download the vanilla resource pack using this link separately.
Edit Minecraft Texture Files
Once you have downloaded the vanilla resource pack, follow these steps to edit your Bedrock texture pack:
- Extract the vanilla resource pack zip file into a new folder. You can use any file management software to do this. If you are on Windows, right-click on the file and choose the “extract all” option.

- Then, in the newly extracted folder find the subfolder called “textures” and open it.

- In the folder, “textures”, you will find categorically divided subfolders of Minecraft textures. Open the one whose texture you want to edit.

- Each categorical folder has PNG, TGA, or subfolders with PNG and TGA files for that in-game texture. Open the texture’s PNG file in paint to edit it. If you are editing a TGA file, you can use Adobe Photoshop or GiMP instead.

- Make your desired changes to the texture in your image editor and save it at the exact location with the same name as the original file. Repeat the process for all textures you want to edit.

Prepare the JSON File
Once you are done editing, follow these steps to prepare the resource pack’s JSON file. This file communicates with the game and allows our external textures to replace the game’s built-in textures.
- To prepare a JSON file, we need two UUID codes. It can be generated using this tool. Generate two unique UUIDs and note them down for use later on. Make sure to develop version 1 UUIDs only using the linked tool.

- Next, create a new text file in the main folder that had the “textures” subfolder earlier. Then, open it using Notepad or any other basic text editor.

- Paste the following code in your text editor:
{
  "format_version": 2,
  "header": {
    "description": "Tutorial Resource Pack",
    "name": "Tutorial Resource Pack",
    "uuid": "dcf11606-8e52-11ec-b909-0242ac120002",
    "version": [1, 0, 0],
    "min_engine_version": [1, 17, 30]
  },
  "modules": [
    {
      "description": "Tutorial Resource Pack",
      "type": "resources",
      "uuid": "3f958580-8e53-11ec-b909-0242ac120002",
      "version": [1, 0, 0]
    }
  ]
}
- You can put any text in front of the name and description of your texture pack in both parts of the code. As for the UUID, paste the ones you generated earlier and make sure not to repeat the same UUID in both sections.
- Leave the rest of the code unchanged as a single additional or missing symbol can make the file useless.
- Finally, save the file as “manifest.json. ” In the “save as type” drop-down box, select “all files.”
- Remember to double-check the lines of code and avoid using special characters in your pack name or description.

How to Install and Test Minecraft Texture Pack for Bedrock
Follow these steps to add the texture pack to your Minecraft Bedrock:
- First, to make your pack your own, rename the extracted “vanilla resource pack” folder to the name of your choice. Please avoid using any symbols in the folder name.

- Open the “resource packs” folder of your Minecraft Bedrock. Depending upon your device, the folder address in the default installation location will look like the following:
On Windows 10 and 11:
%localappdata%\Packages\Microsoft.MinecraftUWP_8wekyb3d8bbwe\LocalState\games\com.mojang\resource_packs
On Android:
/storage/emulated/0/Android/data/com.mojang.minecraftpe/files/games/com.mojang/resource_packs
On iOS:
/files/on%20my%20iphone/minecraft/games/com.mojang/resource_packs
- Then, copy and paste your resource pack folder into your Minecraft directory’s “resource packs” folder. Ensure no files are missing from your resource pack, especially the JSON and texture files.

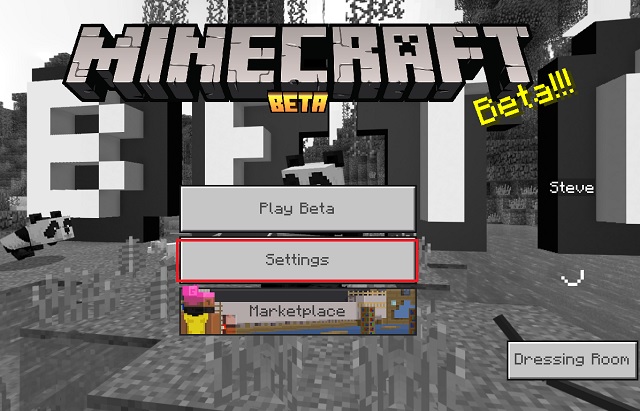
- Finally, open your Minecraft Bedrock and click on the “settings” tab on the homescreen.
- Within the settings, click on the “global resources” button in the left side pane.
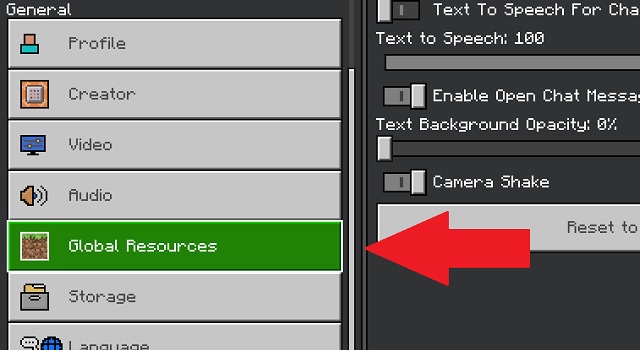
- Your resource pack is under the “my packs” section here. Click on the pack and then on the “activate” button to apply it.

- Then open your Minecraft world and find your edited textures in the game.

How to Distribute Your Minecraft Texture Pack
Congratulations! At this point, you can change the look of your Minecraft world completely. The next obvious step is to share it. Fortunately, it is much easier than editing a texture. Follow the steps below to learn how:
Share Minecraft Texture Pack for Java Edition
Users of the Java edition can directly share their archived file for their resource/texture pack. If the file has a “.zip” file extension, users can download and install it in their game. However, to avoid any glitches, they should use it only on the version it was created for.
To distribute your texture pack, you can upload it for free on any of these community websites:
Alternatively, you can also share it on one of the many Discord servers for Minecraft.
Share Minecraft Texture Pack for Bedrock Edition
Unlike the Java edition, you can’t share your resource pack folder directly with other players. However, with slight preparations, you can make the installation process easier for everyone. Here’s how to go about it.
1. Create MCPACK File
Follow these steps to create an MCPACK file for your resource/texture pack:
- To begin with, we need to archive our texture pack folder into a zip file. On Windows, you can do so by right-clicking on it and selecting the “compress to zip file” option.
- Alternatively, you can use software like WinZip, Winrar, and more on most platforms.

- Now, rename the file to “your pack name.mcpack”. You must replace the “.zip” file extension with the “.mcpack” one.

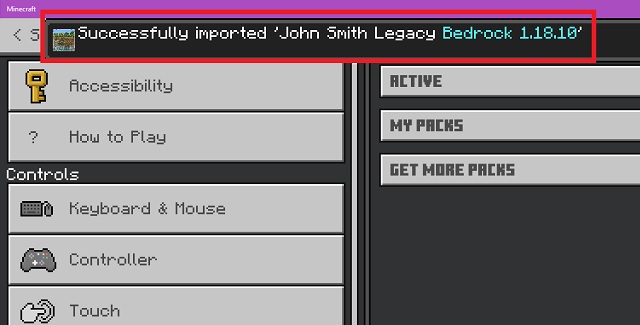
- Any player can double-click the MCPACK file to add the texture pack to their Minecraft Bedrock immediately. This makes the installation and distribution much easier and faster.
- The installation takes only a few minutes, and the game displays an “import successful” notification once it’s completed.
Minecraft Partner Program
The Bedrock edition’s texture pack file can be shared on the same community sites as the Java edition. But, the developers also offer an official space to share and even sell your texture packs. Yes, we are talking about the official Minecraft marketplace which is only available in the Bedrock edition.

However, Minecraft only allows a few creators to submit their content on the marketplace. To join this exclusive group, you must apply for the Microsoft or Minecraft Partner Program.
Both companies and individuals can register using the same application form. As for the selection criteria, the developers check your creative portfolio, which should have sample texture packs, skins, or add-ons for Minecraft Bedrock.
Enable RTX for these textures
Lastly, we have the popular ray-tracing mechanics that can take your texture packs to the next level. Do keep in mind that the RTX for Minecraft Bedrock only works with the game’s Windows edition due to platform-based restrictions. As for your texture pack, it needs to have PBR-enabled textures to work with ray tracing.


The actual process of enabling PBR will take this guide to a completely different segment. But if you are interested in the same, you can use the official NVIDIA guide to make your Minecraft texture pack RTX ready.
Easily Make Your Minecraft Texture Pack Today
With that, you now know everything there is to know about making a Minecraft texture pack. Whether for commercial purposes or just for fun, you can use our guide to create a texture pack for any edition of Minecraft. These modpacks change in-game textures and add a variety of mods to the game at once. However, you have to install Forge in Minecraft to run them.
Coming back to the texture packs, you can make them look even better by using shaders in Minecraft. These shaders require you to install Optifine to run, but once they are up and running, your game’s graphics can even compete with RTX graphics.
The process of making a Minecraft texture pack is intensive and long but also very rewarding. Do you have any questions about making a texture pack? Feel free to reach out in the comments below!
As the packs only affect the user, you can freely use your texture or resource pack on an online server. Most popular servers already have a resource pack in place for players. Players also have a history of exploiting texture packs to find rare items. So, a few online servers have put a complete ban on the usage of texture packs.
A UUID or a universally unique identifier is a digital label used to identify information in the game. Adding one to your Minecraft texture pack ensures the game doesn’t confuse your custom pack with any other texture pack or the default in-game textures.
By default, Minecraft is programmed to look first for TGA files, then PNG files, and finally for JPEG texture files. So, if you are only editing a PNG file for a texture, it’s best to delete the TGA file to detect your texture. As for the JPEG, it doesn’t support transparency, so you should avoid using JPEG files for the Bedrock edition.
On Windows, you can go to “folder options” by searching for them in the start menu. Then, you will find the option to “hide file extensions for known file types” in its view section. Uncheck it to see all file extensions on your system. Mac users can turn the option to “show all filename extensions” in the advanced preferences of the Finder app.
Minecraft Java allows you to install texture packs with a “.zip” file extension only. Meanwhile, Bedrock users can either use a “.mcpack” file extension or directly place the texture pack folder in the game’s directory.


