
Having released two developer previews of Android 13, Google is now rolling out the first Android 13 beta for eligible Pixel phones ahead of Google I/O 2022. If you have a supported Pixel phone, you can try out the upcoming Android 13 in the beta channel right now. In this article, we have detailed the steps involved to install the first Android 13 beta on your Pixel phone.
How to Install Android 13 Beta (2022)
Android 13 Eligible Pixel Phones
The following Pixel phones will receive the Android 13 update directly from Google. This time around, Google is dropping support for Pixel 3a and 3a XL. Check out the complete list of supported Android 13 Pixel devices below:
- Google Pixel 4
- Google Pixel 4 XL
- Pixel 4a
- Google Pixel 4a (5G)
- Google Pixel 5
- Pixel 5a (5G)
- Google Pixel 6
- Google Pixel 6 Pro
- Pixel 6a (likely to launch with Android 13)
Install Android 13 Beta Using Android Beta Program
Unlike Android 13 developer preview builds, Google offers an official OTA program for beta releases. This way, you can opt in to enroll in the beta program and get new beta updates as soon as they are released. Follow the steps below to enroll in Android 13 Beta OTA program.
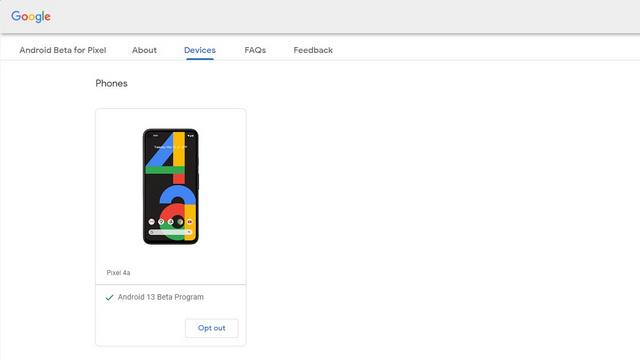
1. Visit Google’s Android 13 Beta program website and sign in with your Google account. You will now see a list of all your eligible devices under the “Devices” section. Click on the “Opt in” button present below your device’s name to enroll in the Android 13 beta OTA update. You can also opt out of the beta program later from this page.

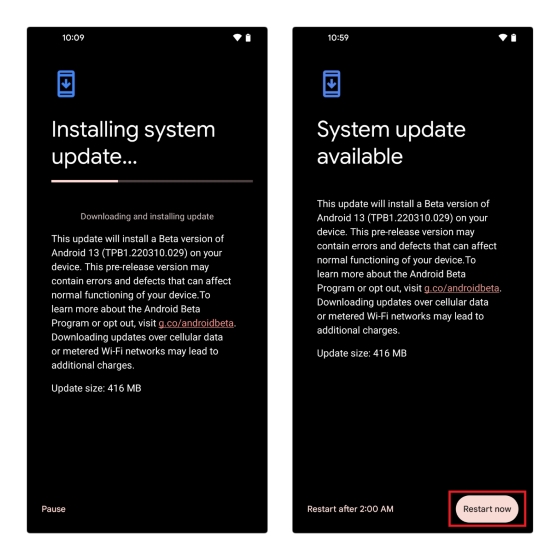
2. After enrolling in the beta program, wait for a few minutes for the OTA to reach your Pixel phone. You can manually check for updates from Settings -> System -> System Update.


3. Once the update arrives, download it and wait for the installation process to complete. Restart the phone after the update to start using Android 13 beta on your Pixel phone.
Sideload Android 13 Beta OTA Image
In case you prefer manually installing the OTA image instead of signing up for the official OTA, you can do that too. It’s worth pointing out that sideloading the OTA image doesn’t wipe your phone. Furthermore, you don’t have to unlock your bootloader to install the OTA image, making this a convenient method to install the Android 13 beta.
As a prerequisite, make sure you have installed ADB on your PC and have enabled USB debugging on your phone from Settings -> Developer Options -> Enable USB Debugging. In case you’re not seeing Developer options, you can tap Settings -> About Phone -> Build number seven times to enable it. With that out of the way, follow the steps below to sideload Android 13 beta OTA:
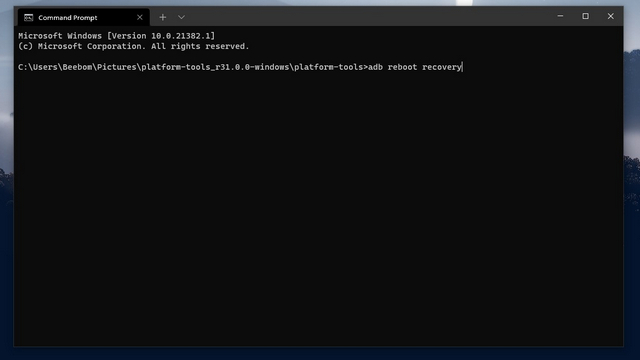
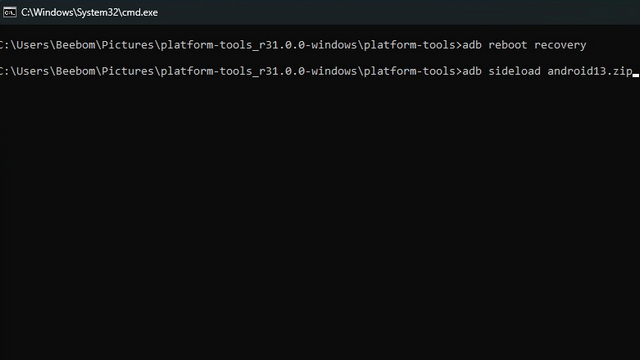
- Download the Android 13 beta OTA image for your Pixel phone from Google’s OTA downloads portal. You should place the downloaded image in the folder where you have installed ADB on your PC. Up next, open a Command Prompt window in the ADB folder and use the following command to reboot to recovery mode:
adb reboot recovery
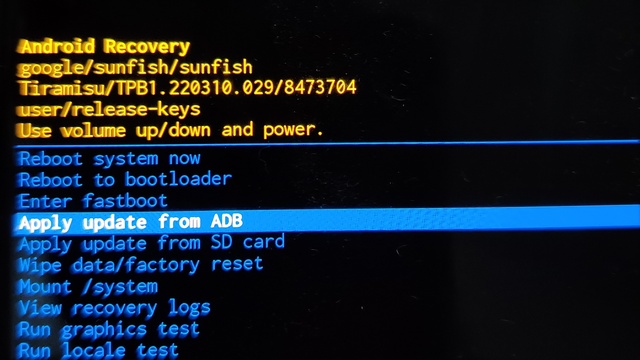
- You will now see the “No command” screen with the Android logo. Press and hold the Power and Volume Up buttons for a moment and release the Volume Up button followed by the Power button to completely enter recovery mode. Once the phone reboots to recovery mode, choose the “Apply Update from ADB” option. You can use the volume buttons for moving up and down and the power button to make a selection in recovery mode.
- To start the installation process, use the following ADB command on your PC. Here, <filename> refers to the Android 13 beta OTA image you downloaded earlier. For the sake of simplicity, you could rename the zip file to “update” or “Android 13”, although pasting the file name directly works just fine too.
adb sideload <filename>.zip
After the installation process ends, choose “Reboot system now” to restart your Pixel. Your phone should now boot to Android 13 beta and you can pick up right where you left off.
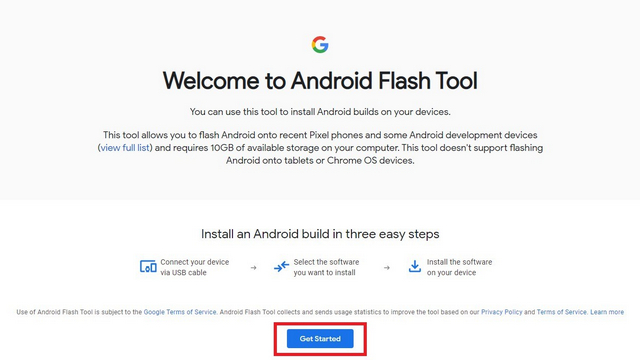
Install Android 13 Beta Using Android Flash Tool
Another method to install the Android 13 beta is using the Android Flash Tool. To get started, check if you have enabled USB Debugging and OEM unlocking on your phone from Settings -> Developer Options. Once that’s done, follow the steps below:
- Connect your Pixel phone to your PC. If you are on Windows, you might need to download and install Google USB Drivers. Up next, visit Android Flash Tool’s website and click on “Get Started”.
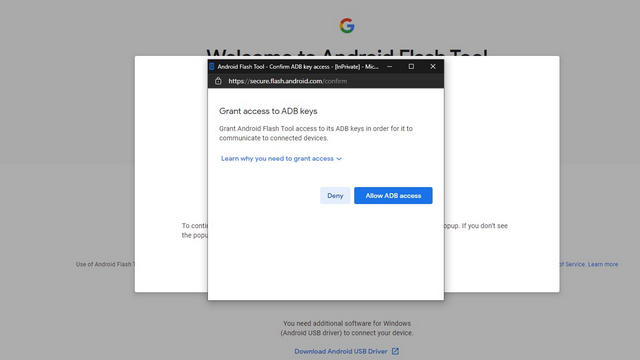
- You will now see a pop-up that urges you to allow access to ADB keys. Click on “Allow ADB access” and authorize the USB debugging prompt from your Pixel phone.
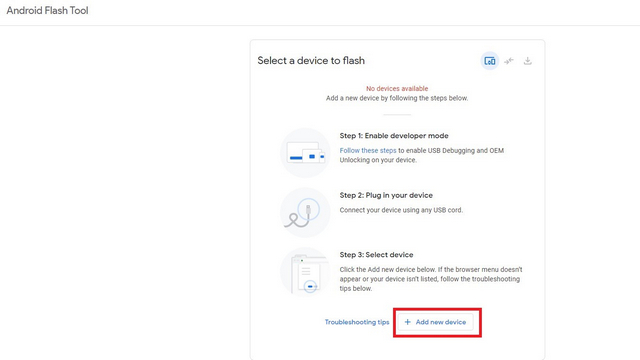
- Click on “Add new device” to link your Pixel phone to the Flash Tool.
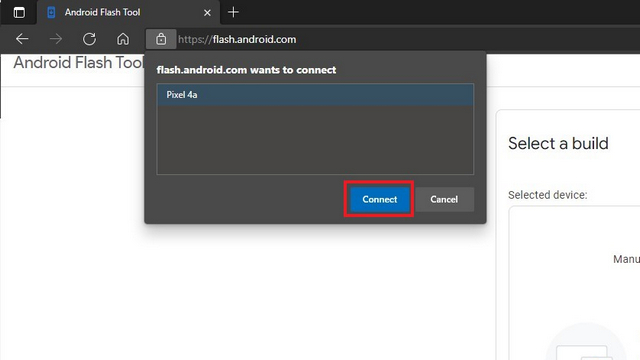
- A prompt will now appear in your browser’s top-left corner. Pick your Pixel phone and click on “Connect” to connect your device.
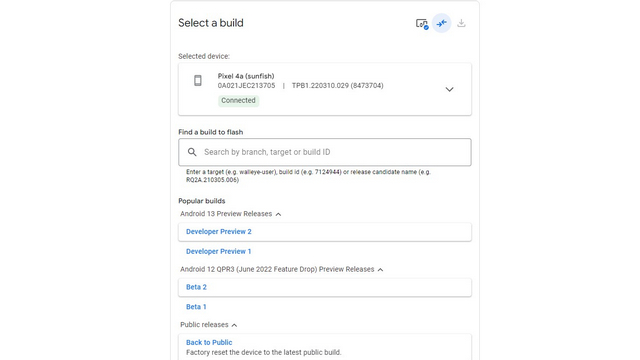
- Choose “Android 13 Beta 1” as the target build from the list of available builds. While it’s not showing Android 13 Beta 1 in the screenshot below since the device is already on Beta 1, you will see the Beta 1 listing on your end.
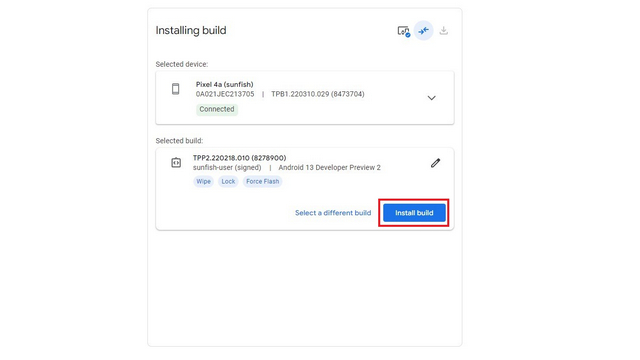
- By default, Android Flash Tool wipes your phone and relocks your bootloader. Tapping the pencil icon next to the build number offers you the option to tweak the settings. Finally, click on “Install build” to start the installation process.
- If everything goes well, you will see the “Install Complete. The build has been successfully installed. It is now safe to unplug your device” message in the Flash Tool. Your phone should now be running Android 13 Beta.
Install Android 13 Beta Factory Image
Installing Android 13 beta using a factory image is also a possibility you could consider. This method is ideal for those who are using a Pixel device with an unlocked bootloader. After ensuring that you have enabled USB debugging, use the steps below for installing Android 13 from a factory image:
- You should first download the factory image for your Pixel from Google’s Factory Images download portal. Extract the downloaded zip file to your ADB installation folder. The installation script wipes data by default, but you can choose to retain data. To do that, edit the flash-all.sh or flash-all.bat (Windows) file and remove the “-w” flag using a text editor.
- Open a Command Prompt window in the ADB installation folder and use the following command to reboot to fastboot mode.
adb reboot bootloader
- Double-click on ‘flash-all.bat’ if you’re on Windows or run the command ‘flash-all’ if you are on macOS or Linux to start installing the Android 13 factory image. After the installation process is complete, your phone will boot into Android 13 beta.
What’s the Easiest Way to Install Android 13 Beta?
The easiest way to install the Android 13 beta is through the Beta OTA program. Sign up for the program and you will receive the build in a while. If you are someone who’s comfortable with ADB commands, sideloading the OTA image is the next best method. While the initial setup might take a few minutes, installing the build is as easy as running a simple ADB command.
Then there’s the Flash Tool method, which is ideal for those with a reliable internet connection. Meanwhile, the factory image method is meant for those who are already used to tinkering with their devices and have an unlocked bootloader. Of all these methods, you can pick the one that works the best for you.
Install Android 13 Beta on Your Phone
That brings us to the end of this Android 13 installation guide. In case you run into errors or roadblocks during the installation process, feel free to let us know in the comments and we will try to help you out. If you don’t have a compatible Pixel phone, feel free to go through our Android 13 coverage to stay updated with all the top features Google has planned to introduce in this iteration of Android.

