
Whether you are just starting out or at an advanced level in Minecraft, iron is one of the most reliable ores in the game. Iron is easy to find, enables a solid upgrade from basic tools, and as a block, helps you create unique Minecraft houses. Unfortunately, just like other Minecraft ores, you can only find a limited amount of iron in a particular area. You have to venture further into your world to collect more iron. Lucky for you, we’re here to put an end to that painstaking search. You simply have to learn how to make an iron farm with this step-by-step guide and then you will never have to look for iron again. No more mining required. Sounds exciting, right? So, let’s not waste more time and find out how to build an iron farm in Minecraft.
Make An Iron Farm in Minecraft (2022)
As a structure, an iron farm in Minecraft has a lot of individual segments. We will cover each of the construction steps in separate sections, along with the mechanics behind this farm. First up, let’s start by learning how an iron farm in Minecraft works.
How Does an Iron Farm Work in Minecraft
In Minecraft, there are two methods to collect iron. The harder way is to find and mine iron ores. And the more brutal one to get iron is by killing Iron Golems. As the name suggests, all Iron Golems are made out of iron and drop iron ingots on dying. This is the same mechanic that allows our automatic iron farm to function.
An iron farm in Minecraft spawns iron golems after every few seconds and kills them to collect iron ingots. The player doesn’t have to play any manual role in its functioning. You just have to go and collect the iron, and everything else happens automatically.
Mechanics of Iron Golem Spawning
Iron Golems naturally spawn within villagers. But if you want to spawn them manually, you have to fulfill the following requirements:
- Three villagers
- Three beds for villagers to sleep in
- One zombie to scare the villagers and trigger the Iron Golem spawning
So, in simple terms, an Iron Golem spawns when there are at least three scared villagers in an area where they can sleep. Moreover, there should not be another Iron Golem already present in that area. With these circumstances in mind, it’s always best to make the iron farm away from other villages in Minecraft. Though, slaughtering an entire village, except three villagers is also an option.
Items Required to Make an Iron Farm
You need the following items to build an iron farm:
- Three villagers
- One Zombie
- Twelve pieces of scaffolding or ladders (optional)
- Three stacks (192 copies) of any solid blocks (including glass)
- Two sticky pistons
- Two sculk sensors
- One bucket of water
- One bucket of lava
- Four wooden signs
- One hopper
- One chest
- One nametag
All of the above-mentioned items are basic and easy to collect. You can find villagers, chests, and solid blocks inside villages of Minecraft. Same villages can also spawn zombies at night, so that’ssorted as well.
Sticky Pistons


To craft a sticky piston you have to combine slime balls with a regular piston. Meanwhile, the crafting recipe of a regular piston consists of a piece of Redstone dust, four cobblestone blocks, three wooden planks, and an iron ingot.
Buckets


You can craft a bucket in Minecraft by combining three iron ingots on a crafting table. Then, to get started with an iron farm, you have to use a bucket of water and lava to collect those liquids.
Sculk Sensor


Sculk sensor is a powerful sculk block that only spawns in the deep dark biome that was introduced in the Minecraft 1.19 update. Since they are not exclusive to Ancient cities, you can easily find a sculk sensor far away from the scary new mob Warden. But you must use a hoe with a silk touch enchantment to break and obtain this block. Otherwise, the sculk sensor will be destroyed when broken.
Sign


Signs are easy to create in Minecraft. You simply have to combine six wooden planks with a stick to get three signs at once. Use the crafting recipe shown in the screenshot above.
Hopper


Hopper is one of the most useful utility blocks in Minecraft. Without it, our iron farm can’t function properly. To craft a hopper, you have to combine five iron ingots with a chest using the recipe above.
Nametag
Nametags are rare items in Minecraft that allow players to give a name to any mob in the game. Unfortunately, there’s no way to craft them. Instead, you have to venture into the Minecraft world to find them. The nametags usually spawn inside chests of dungeons, mineshafts, and woodland mansions. But you can also get nametags by trading with librarians villagers and by fishing in rivers and oceans.
How to Make an Iron Farm
Iron Farm in Minecraft is made up of several interrelated components. To make the steps simpler to understand, we have added dedicated tutorial sections for all of them. Make sure to maintain the overall sequence while building each individual component.
Villager Area
We have to trap at least three villagers in a floating structure to control the spawn location of the Iron Golem. Follow these steps to create this structure:
1. To begin, create a climbable tower to build a structure upon. You can use ladders with any solid blocks or scaffolding for the task. Make sure the tower is at least 12 blocks high.

2. Then, use the tower to build a platform that covers at least a 7 x 7 area.

3. Finally, build a 2 blocks high border surrounding that structure and place three beds inside. This border should be internal and can’t extend the area of the platform horizontally. Then, place three beds in it for villagers to sleep in.

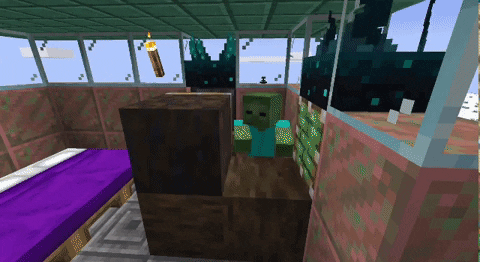
Zombie Area
The villagers must see the zombie for an Iron Golem to spawn. But they should also be able to unsee it, so they can sleep at night for the mechanic to keep working. It doesn’t matter how long they sleep. With that in mind, let’s create the simplest active cage for a zombie.
1. First, choose any corner of the villager’s platform and place three blocks on its sides to create a small one-block high boundary.

2. Then, break two blocks that are located above the new border block in the villager area’s boundary and put sticky pistons in the empty gaps (as shown below). These pistons should be facing inwards.

3. Then, place a sculk sensor on top of each sticky pistons The vibrations of villagers and zombies will keep the sensors on, and in turn, the sticky pistons active.

4. Finally, place a pushable solid block on top of the middle block of the zombie cage’s border. The sticky pistons will push it around to hide and display the zombie to the villagers.
Many builders also create complex Redstone mechanics for the zombie cage. But you can use the sculk sensor to skip the same.
Iron Golem Spawn Area
The last structure of the iron farm in Minecraft is the spawn area for Iron Golems, and sadly, also their killing area. Follow these steps to make the perfect killing and item collection area of the iron farm:
1. To begin, create a roof over the villagers’ structure and add a three-blocks high internal boundary to the roof. You’ll get a platform similar to the villagers’ area.

2. Then, place water in one corner of the platform. It will automatically flow and cover most of the area, leaving only the opposite corner empty. Adding a roof to this watered platform is optional.

3. Next, replace the corner block with a hopper. Then, place two signs right above the hopper. One will be stuck to the wall and the other will be floating. You have to press the crouch button to easily place the second sign while looking at the first one.

4. Finally, place two more signs on the border blocks that are right above the adjacent blocks to the empty corners. Then, place lava on top of the original two signs. We suggest you try to replicate the setup in the image below.

5. Now, whenever the iron golem spawns inside the flow of water it will be pushed towards the lava. There, it will slowly cease to exist and drop iron ingots.

6. To collect the iron ingots, you can check the hopper we placed on the top platform. Or, to make your life easier, you can also connect a chest for a more organized collection in your iron farm in Minecraft.

How to Get Zombie and Villagers on The Farm

A common problem that players face while creating mob-based farms is transporting the mobs to their dedicated spots. So, here are some quick solutions for the same.
- Minecarts: The simplest way to transport zombies and villagers into an iron farm is by putting them into minecarts. Then you can create a simple rail road that leads to an opening to dedicated spots.
- Bating: If you don’t want the complexity of the minecarts, you can also lure the mob to their dedicated spot by creating a simple path. Villagers can be lured by placing job site blocks. Meanwhile, zombies are hostile mobs that follow the players by default.
- Force: The players looking for the most cost effective method can simply push the mobs on the planned path. But too many hits can hit the mobs so subtle precautions must be taken in this method.
Prevent Zombie from Despawning
If you are not in the area or at times, if you reload your world, Minecraft can make the zombie despawn from its cage. To prevent that from happening, you have to use a nametag on the zombie. The name you give it doesn’t matter. Moreover, because of the beds, the villagers don’t face such issues. So, you can leave them unnamed.
Bonus: How to Make an Iron Golem Farm
Usually, the design of an iron farm concludes with the death of an Iron Golem in Minecraft. But with a few basic efforts, you can simply use the same design to create your Iron Golem farm. Instead of collecting iron ingots, this farm will spawn and collect iron golems. Let’s go over the simplest way to make it happen.
Pit of Iron Golems
As you know, water can push Iron Golems into a corner. So, using the same mechanic, you just need to create an opening in the structure’s boundary. Water will push the Iron Golems to a corner and then out off the structure through this opening. Then, you simply need to add a deep pit with water at the landing site. The pit will collect golems, and the water will protect them from fall damage.

Once a golem is inside the pit, you can transport it away from the farm using lead, flowing water, or simply baiting via hostile mobs. If you leave them at the spot, the extra Iron Golems can hamper the spawn rate of your farm.
Frequently Asked Questions
How far does my iron farm need to be from a village?
Your iron farm in Minecraft should be at least 64 blocks away from the nearest village and another Iron Golem.
How high should my iron farm be?
The main spawning area of the Iron Golems should be at least 20 blocks above the ground. Otherwise, the mob might spawn below your farm.
What blocks can iron golems not spawn on?
An Iron Golem can’t spawn on air, snow, lava, water, and other non-solid blocks.
Make an Iron Farm in Minecraft 1.19 Right Now
Whether you want an army of Iron Golems or the world’s largest collection of iron in Minecraft, our guide is here to serve you. And because of its easy design, you can use it with other Minecraft mobs too. Just make sure to do the required modifications. But if you want something even more efficient than farms, then only the best Minecraft mods can help you out. With that said, what are you going to do with your iron farm in Minecraft? Tell us in the comments below!


