The much-awaited Journal app for iPhone is finally here with the iOS 17.2 update. The Journal app helps users remember and write about their experiences complete with details from their day, including people, places, activities, and even music & workouts, in addition to their photos. While the new Journal app in iOS 17 has a straightforward UI, many users may get confused or overwhelmed since it is brand new. This post details how you can use the Journal app in iOS 17 on your iPhone.
Create New Entries in the Journal App on iPhone
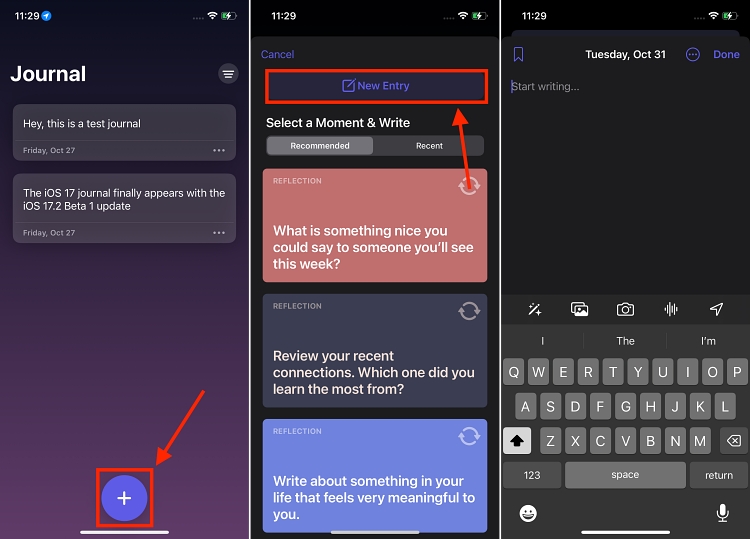
Primarily, the Journal app allows you to write entries with audio, photo, and video inputs on your iPhone. You can write about your fond memories and include pictures, videos, and voice messages, as well as location tags. Here’s how you can make a new journal entry in the Journal app on iOS 17:
Before you begin with a new journal, there are two options – Recommended and Recent. Recommended section is to give you a few topics you can start writing about. Under this section, you will see suggestions like “Write about something in your life that feels very meaningful to you,” or “What’s the biggest challenge you’ve ever overcome? How did you do that?”
In the Recent section, there are Journaling suggestions, which Apple curates from your recent photos, trips, geo-location data, and the music you were listening to. For privacy enthusiasts, it is worth mentioning that Apple states that all the data shown in the Journaling suggestions is stored on the device and is not shared with any third-party app.
If you simply want to start writing from scratch without any suggestions and recommended inputs, tap on the “New Entry” button on the top. Here are the steps you need to follow:
- Open the Journal app, tap the + button at the bottom center to create a new journal entry, and then tap on “New Entry” at the top.
- Type in the text that you want to input in your journal. You can also add photos, videos, and music to the journal entry (discussed in detail below).
- Once you are done with the writing process, tap the “Done” button at the top right and your new journal entry will get saved and appear on the app’s home screen.
Add Photos, Videos, Locations, or Voice Notes to Journal Entry
To add photos and videos to the journal entry, tap the Photos icon in the bottom menu, then select the photos and videos you want to add to your entry from the Photos app.

To add a voice note, tap the voice icon at the bottom. Then tap the Red Microphone icon to start recording. Once done, tap the “Stop” button, and the voice note will get added to your journal entry.

To add a location to your journal entry, tap the location icon at the bottom right, and choose a location from the list of available options or search for a location using the search bar.

Add Music, Podcast, or Workout History to a Journal Entry
The Journal app lets you easily add music and podcasts you are listening to on the Apple Music app into your journal, your older workout details, and even save your thoughts on a book, website, or news article you are reading. Here’s how:
1. Music & Podcast
- Open the Apple Music app and play your preferred song.
- On the music player screen, tap the three-dot button next to the song’s name, and then tap the “Share Song” option in the pop-up menu that appears.
- Now, swipe right on the apps shown on the sharing screen and tap the Journal app icon. Doing so will take you to the new journal entry screen in the Journal app.

- Here, type whatever you feel about the song, then tap the Save button at the top to save the journal entry. The same process works for the Podcast app as well.

2. Workout Entry
- Open the Fitness app on your iPhone and select a workout from the workout history.
- Once done, tap the share button at the top right, then swipe right on the available apps on the sharing screen and tap the Journal app icon.
- Now, start writing what you feel about the workout and tap the Save button at the top.

Edit, Delete, or Bookmark Entries in the Journal App
Each journal entry has its importance in our life. However, there will always be certain journal entries that are more important than others or some that you no longer want to revisit later. To help you with this, the Journal app in iOS 17 lets you edit, delete, and bookmark entries so you don’t face difficulty finding them. Here’s how:
- Open the Journal app on your iPhone and tap & hold a journal entry until a pop-up menu appears. Alternatively, you can tap the three-dot button available below the Journal entry.
- Now, tap the Edit option to edit the journal entry, the Delete option to delete the entry, or tap on Bookmark to bookmark the journal entry.

Lock iOS 17 Journal App on iPhone
Journal entries are personal, and we all know how much Apple emphasizes user privacy; the same is true with the iOS 17 Journal app. To protect your journal entries from unauthorized access, you can lock them with the Face ID so only you can access them.
While the Journal app will prompt you to lock your Journal entries in the setup process, there is a possibility that you ignored it or simply crossed it off. In that case, here’s how you can lock the Journal app on your iPhone:
- Open the Settings app on your iPhone, then scroll down and tap the Journal app here.
- Now, locate and tap the Lock Journal option. Then, enter your iPhone’s passcode.

- Once done, enable the toggle next to Lock to turn on the lock for the Journal app.
- You can also set the time after which your iPhone will require the Passcode or Face ID to unlock the app by tapping the Require Passcode tab.

Change Entry Date in iOS 17 Journal App
- Open the Journal app and select the entry for which you want to change the entry date.
- On the entry editing screen, tap the three-dot button next to the entry date at the top.
- Here, choose and tap the Custom Date option, then choose the preferred date and tap Done.

Set up Journaling Schedule in the Journal App
Journaling needs consistency, but it is easy to forget about penning down certain entries in our busy lives. To help you with the consistency issue, the Journaling app in iOS 17 allows you to set a schedule for the start or end of your day to help make journaling a consistent habit on your iPhone. Here’s how:
- Open Settings on your iPhone, then scroll down and tap the Journal app to access the app’s settings.
- Here, locate and tap the Journaling Schedule menu, then tap the toggle next to Schedule to turn on the Journaling Schedule for the iOS 17 Journal app.
- Now, choose the days of the week and the time at which you want to write new entries in the Journal app.

And that’s it. We have shared everything you need to know about using the iOS 17 Journal app on your iPhone. If you find Apple’s latest Journal app lacking some useful features, there are some best Journal App alternatives you can use instead.


