AirPods Pro, the latest truly wireless earbuds from Apple, are selling like hotcakes. It not only brings the long-awaited noise cancellation feature but also has a new “Transparency” mode which allows users to listen to their environment. This new mode is quite helpful in situations where you need to be aware of your surroundings. Both these modes make AirPods Pro a better product than AirPods 2. That said while switching between the two modes is fairly easy on an iPhone (you either long press on the “Force Sensor” on AirPods Pro’s stem or go to Control Center -> Force Touch on volume -> choose the desired mode), it’s not so straight forward on the Mac. So, in this article, we are going to show you how you can easily switch between noise cancellation and transparency mode on AirPods Pro on Mac.
Switch Between Noise Cancellation and Transparency Mode of AirPods Pro on Mac
While the long pressing on the Force Sensor of AirPods Pro will work while you are using the earbuds on Mac, this method doesn’t give any visual feedback . If you want to be sure that you have turned on the right setting, visual feedback is always important. Also, while the Force Sensor allows you to switch between noise cancellation and transparency mode, it doesn’t allow you to switch them off. In situations when none of these modes are important (like working on your Mac at your home), turning them off is a good option as it results in better battery life. So, with that out of the way, let’s see how you can do the needful, shall we?
Switch Between Noise Cancellation and Transparency Mode Using Native Method
To switch between the noise cancellation and transparency mode on Mac using the native method you just need to click on the “Volume Control” app on the Menu Bar and then choose AirPods Pro. You will then be provided with three options; Off, Noise Cancellation, and Transparency. Choose the one you want to use.

Switch Between Noise Cancellation and Transparency Mode Using NoiseBuddy
NoiseBuddy is an app developed by Guilherme Rambo, who is known for creating such awesome utilities. Many of you might remember him from his previous app AirBuddy ($5) which is an app that brings iOS-like AirPods connectivity splash screen to the Mac. Now, he has build AirBuddy, which allows you to switch between noise cancellation and transparency mode on AirPods Pro with one-click from your Menu Bar or Touch Bar. What’s even better is that this time the app is free to download and use. Here, are the steps you need to use this app.
1. First, click on the link to download the app.

2. Now, double-click on the Zip File to extract the app. After extraction, you will find the app just as shown in the picture below (marked with blue square).

3. Drag the app to your Application folder as shown.

4. Now, launch the app. Since the app is not signed by Apple, you will have to grant it permission to launch. Don’t Worry, Guilherme Rambo is a renowned Apple developer so you don’t have to worry about malicious intent. Just click on the “Open” button.

5. Now, the app will present you with simple settings. Whether you want to launch the app at login, Enable button in Menu Bar, and Enable button in Touch Bar. Click on the checkbox of the options that you want to enable.
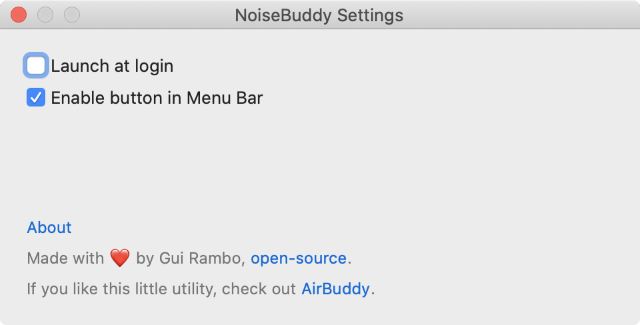
Note: As you can see, the “Enable button in Touch Bar” is missing on our screenshot. That’s because we tested the app on a non-Touch Bar Mac.
6. Finally, you should see the app icon. It will correctly display the state of your AirPods Pro mode. You can click or tap on the icon to change between the modes.


Enjoy AirPods Pro on Your Mac Without Fumbling Through Settings
As you can see, the NoiseBuddy app makes it really easy to switch between transparency and noise cancellation mode. All you need is a single click or tap. This is a great app and the fact that it’s free makes the deal even sweeter. Keep following us for similar nifty tips and let us know how you are liking your new AirPods Pro by writing in the comments section below.