Modern apps built on the WinUI 3 design framework are being released on Windows 11, but Windows 10 is not getting much love from Microsoft. Recently, we wrote how to install the new Microsoft Store on Windows 10, so that users running the older desktop OS can also experience the new store and its modern design. And now, we have compiled another tutorial on how to get the Windows 11 Paint app on Windows 10. Yes, you can run the new redesigned Paint app on your Windows 10 PC. So without any delay, let’s check out the instructions.
Install the Windows 11 Paint App on Windows 10 (2021)
We have mentioned the steps to install the Windows 11 Paint app on Windows 10 in this article. I would suggest you follow the guide step-by-step to get the new Paint app. With that said, let’s get started.
Download the MSIXBUNDLE File of Windows 11 Paint App
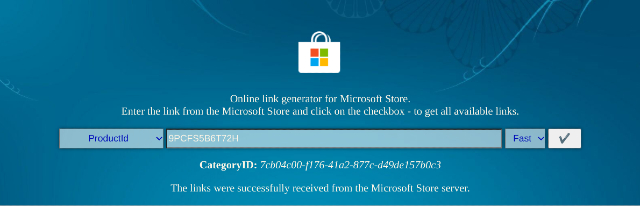
1. First, open this website and paste 9PCFS5B6T72H in the text field. After that, set the drop-down menu to the left of the textbox to “ProductId”. Next, choose “Fast” from the drop-down menu to the right of the textbox, and hit the “OK” (checkmark) button.
2. Now, you will see a long list of files on your screen. You need to download the MSIXBUNDLE of the Windows 11 Paint app. Just search for the below string and download the file. On Chrome, you will have to right-click on the link and choose “Save as…”. The file size is around 8MB.
Microsoft.Paint_11.2110.0.0_neutral_~_8wekyb3d8bbwe.msixbundle

3. After downloading the file, go ahead and download 7-Zip (Free). It will enable you to access and extract the MSIXBUNDLE file.
Modify the Windows 11 Paint App File
1. Once you have installed 7-Zip, open it and locate the MSIXBUNDLE. Select the file and click on “Extract” at the top. The files will be instantly extracted in the same folder/ drive. Click “OK” on the pop-up window that appears.

2. Next, open the extracted folder.

3. After that, scroll down to the bottom. Here, you will find a “…x64.msix” file. Select it and click “Extract” on top. Another folder will be created with all the extracted files on top.

4. Open the Paint_x64 folder.

5. Here, right-click on the “AppxManifest.xml” file and choose “Edit” to open the file in Notepad.

6. Now, depending on your Windows 10 version, you will have to make the changes. Open Windows Settings and go to System -> About to check the version number. Here, note down the OS Build.

7. Move back to the Notepad file and replace “MinVersion” with 10.0.XXXXX.XX (replace X with your build number). For example – my OS build is 19043.28, so I changed it to 10.0.19043.28. Now, save the Notepad file and close it.

8. Once the changes have been made, delete the following files and folders in the same x64 folder. You can click “Delete” on top. Now, you can close 7-Zip.
AppxBlockMap.xml
AppxSignature.p7x
[Content_Types].xml
AppxMetadata folder

Install the Windows 11 Paint App on Windows 10
1. Now that you have modified the MSIXBUNDLE file of the new Paint app, let’s install the Windows 11 Paint app on Windows 10. Press the Windows key once and search for “developer”. Then, select “Developer settings” from the search results.

2. Here, turn on Developer Mode using the “Install apps from any source, including loose files” toggle. On the next prompt, choose “Yes”.

3. After that, press the Windows key again and search for PowerShell. On the search results screen, click “Run as administrator” on the right pane.

4. Now, navigate to the extracted MSIXBUNDLE folder and open the x64 folder. Here, look for the “AppxManifest.xml” file that we modified in the section above. Hold the “Shift” key and right-click on the “AppxManifest.xml” file, and choose “Copy as Path“.

6. Move back to the PowerShell window and enter the below command. Make sure to replace filepath with the path you copied in the step above. Right-click on the PowerShell window and the path will be included at the end of the command. Finally, hit Enter.
Add-AppxPackage -Register filepath

7. Now, open the Start Menu, and you will find the new Windows 11 Paint app is installed on your Windows 10 PC. Since the package name is different, you can use both the old and new Paint app on your Windows 10 computer. Enjoy!

New Windows 11 Paint vs Classic Windows 10 Paint
So far, in my testing, I have found that the prominent changes in the new Windows 11 Paint app are only visual. On the classic Windows 10 Paint app, every button and UI element is labeled, whereas buttons do not have any labels on the new Windows 11 Paint app, and it may be confusing to some users. Depending on the visual icons, you will have to guess which button does what, but I am sure that users will get used to it easily after spending some time in the app.

Apart from that, on the performance front, the new Paint app is noticeably slower than the older classic one. And it’s on the expected lines, as the new Paint app is still in preview and will need more bug fixes to make it as snappy as the older one. To sum up, I like the UI changes and clean buttons on the new Paint, but for most users, the Windows 10 Paint app will still be the preferred choice for now.
Try out the New Paint App on Windows 10
So that is how you can modify the new Windows 11 Paint app and make it compatible with Windows 10. From the looks of it, the new Paint app is not coming to Windows 10 since the package name is different and there are no 32-bit builds in the MSIX package. So if you want to use the new Paint app on Windows 10, this is the only way to do it. Anyway, that is all from us. If you want to learn how to install the new Microsoft Store on Windows 10, follow our linked guide. And if you have any questions, let us know in the comment section below.