Misaligned strokes and messy outlines are a nightmare for any artist. Without smooth bold lines, many artworks would lose the clean and captive value of their aesthetics. Well, the new Procreate 5.2 update brings a much-requested feature to help you with this problem. One of the major features in Procreate 5.2 is called stroke stabilization. As a major upgrade over the existing streamline feature in Procreate, it has been one of the most demanded features by artists. There’s a lot we can unpack with the stabilization feature, so let’s not waste more time and learn how to use stroke stabilization in Procreate on iPad.
Stroke Stabilization in Procreate: Explained (2021)
The aim of this feature is to help artists create smoother and more tapered strokes. You don’t have to constantly worry about each turn and twist while drawing outlines or shapes with stroke stabilization enabled. Procreate can help you draw faster and without many accidental fluctuations. The final result here will be even and smooth and work on any supported iPad model, including the M1 iPad Pro and even the new iPad mini 6. As the stabilization option packs a ton of options, use the table below to skip to the features you are interested in reading out.
How to Turn On Stroke Stabilization Per Brush in Procreate
Stroke stabilization in Procreate has both global and brush-wise settings. First, we will focus on the brush-based feature that you can apply to individual brushes. It has more in-depth options and is used more often than global stabilization. So, open the Procreate app, and let’s get started.
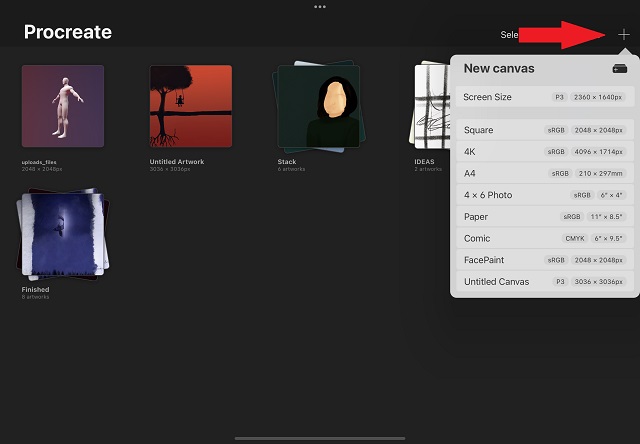
1. First, open any of your existing artworks or create a new one. You can tap the “+” button at the top right corner of the screen and choose a size to create a new canvas that best suits your needs. You can also choose to import and paint 3D models in Procreate. The app doesn’t allow us to edit brush settings from outside the canvas.
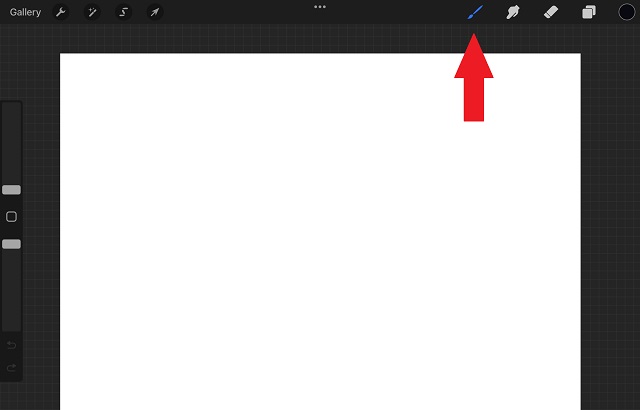
2. Once the artwork opens up, tap on the paint-brush icon located at the top right side of the screen. It will open the brush library with a list of available brushes in Procreate.
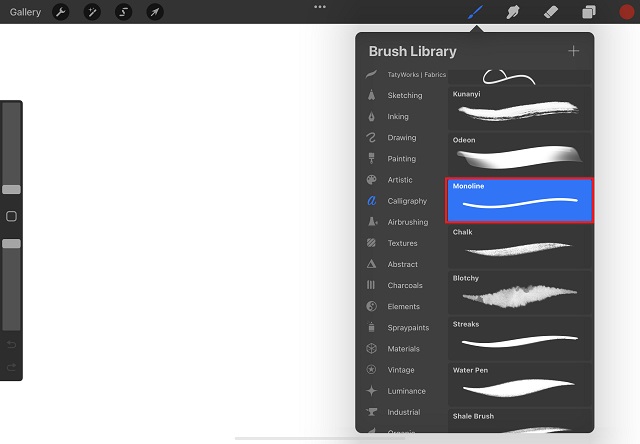
3. Here, you can scroll through the various brushes installed in your app. Once you find the brush whose settings you want to adjust, tap on the brush’s name or pattern. This will open the brush settings page. We will edit the settings of the “monoline” brush under the Calligraphy category for this tutorial.
4. Tapping on the brush will lead you to the Brush Studio, i.e. the settings page. You can find various settings for each brush available in the app here. Move to the “stabilization” section from the left sidebar to access the stroke stabilization feature in Procreate.

Now, there are several individual options in the stabilization section of the Brush Studio. We will go over each of them while talking about the differences they will bring to your strokes.
Stroke Stabilization Features in Procreate
The new Stabilization section in Procreate Brush Studio includes three options, including StreamLine, Stabilization, and Motion filtering. Each of them may sound similar, but they offer unique ways to smoothen your strokes. So without further ado, let’s go over each of the options to understand them better.
StreamLine
Many Procreate users might already be familiar with the StreamLine setting as it has been available in the app even before the 5.2 update. Not much has changed with this popular brush setting. StreamLine removes any type of minor accidental unsteady movements that you might make while creating a stroke.
With a regular stroke, the ink from your brush moves freely and is affected even by the smallest movement of your fingers. Meanwhile, with StreamLine turned on, the ink follows a stricter path and does not let your stroke be affected unless there’s a major movement of the brush. Let’s see what happens to a simple circular figure if I increase the amount of StreamLine from 0% to 100%.

As you can notice, the circle drawn with 100% StreamLine is smoother and less wobbly than a regular circle. It’s even close to an actual shape of a circle with the same minimal effort. You can use this feature for calligraphy, creating shapes, and even for outlining. StreamLine has two internal settings:
- Amount: It defines the stickiness and evenness of your stroke. You can use the slider to turn up the StreamLine value for smoother strokes. However, turning it off will get you back to your natural strokes.
- Pressure: If the pressure in StreamLine is turned off, the stroke smoothening is going to start as soon as you make a stroke. But if you increase the pressure using the slider, the smoothening effect will only kick in when you apply some pressure while drawing a stroke.
Stabilization
This feature can be seen as a more aggressive version of StreamLine. Stabilization, technically, takes an average of the movements you make with a stroke and only draws that predictive average of what you were trying to make. In simpler terms, instead of following your natural pencil movements, it makes your shape a lot straighter and smoother automatically.
So, what you get with stroke stabilization enabled in Procreate is a simpler shape than your actual movement or original stroke you made. To understand it better, see what happens to a regular circular as I increase the stabilization value from 0% to 100%.
As you can notice, if you push the stabilization high enough using the slider, it might end up completely changing the shape. Another aspect in play here is the speed at which you make a stroke. The faster your strokes are, the smoother and straighter they become. So, if you want to use stabilization, we suggest you either draw slowly or keep it at a lower amount. It’s a great feature to fill in the minute details that your artwork might require.
Motion Filtering
If you think stroke stabilization is too serious about turning your hand-drawn circle into a straight line, wait till you see motion filtering in action.
As the name suggests, this feature filters out all the unstable movements detected by Procreate’s algorithms. Yeah, there’s no averaging out or focusing on the accidental movements like in the other two options. Unlike stabilization, motion filtering isn’t affected by the speed of your strokes. So, irrespective of your pressure or speed, motion filtering will give you smooth and straight strokes. Let’s see how the feature looks in action and affects a simple circular figure.

As you can notice, if you push it high enough, motion filtering can completely change the form of your drawn item. It’s a great option to draw patterns and shapes with straight lines without worrying too much about getting them right naturally. If you feel that this feature might take away the natural flow of your strokes even at lower levels, there’s an option to fix that. Let’s see how we can adjust motion filtering in Procreate:
- Amount: Use the amount slider to increase the motion filtering and make the strokes straighter and smoother. Keep it below 70 to avoid losing the ability to make curved figures
- Expression: This setting acts as a counter to the strict behavior of motion filtering algorithms. It gives some of the natural expression back to your strokes. That means it ignores a few of the minor fluctuations and tries to include more of your natural stroke flow while still keeping the figure mostly straight and smooth.
Note: The expression feature doesn’t have any effect on higher amounts of motion filtering (~70 and above).
How to Enable Stroke Stabilization for All Brushes in Procreate
If you want to use stabilization with one or two brushes, adjusting it in the internal settings (as shown above) seems like a good option. But, if you want canvas-wide stabilization to save time and effort, that’s also possible. With the Procreate 5.2 update, the app has introduced global “Pressure and Smoothing” settings for the users’ ease. Here’s how to access it.
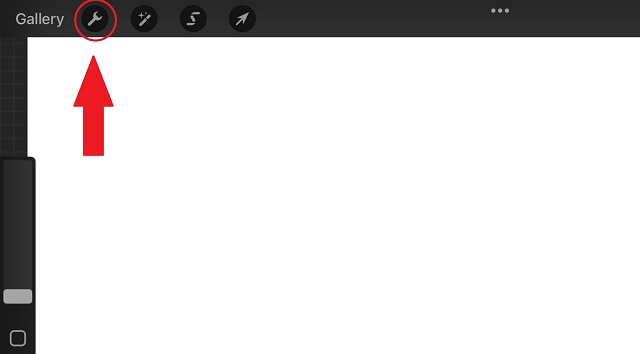
1. First, tap the “Actions” button (wrench icon) at the top left corner of the screen. It’s present next to the “Gallery” option.
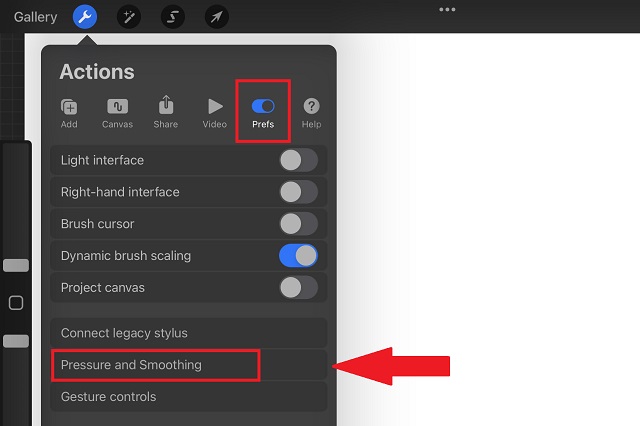
2. Then, from the Actions drop-down menu, toggle on the “Prefs” option. Then, tap on the “Pressure and Smoothing” option.
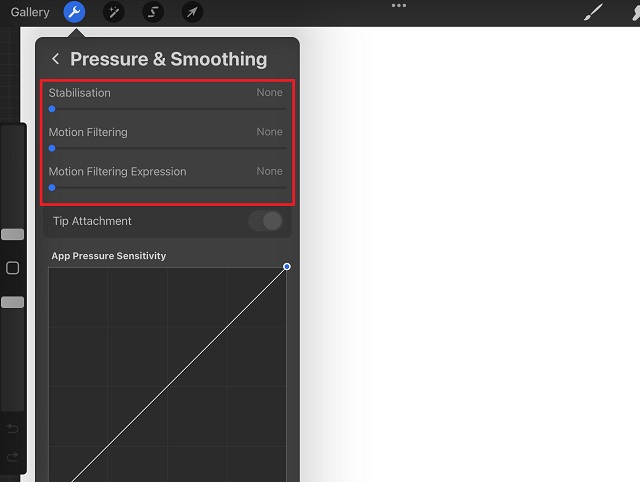
3. Now, you will see the option to adjust the Stabilization, Motion Filtering, and Motion Filtering Expression. The usage of these options remains the same as described in the section above. You can use the slider for each option by swiping your finger or pencil over it to adjust the values. The rest of the settings here are related to pressure, and you can leave as they are.
Stablilization vs StreamLine in Procreate 5.2 Update
In the versions before Procreate 5.2, users only had the option to use StreamLine as the only reliable option to make smooth strokes. The app didn’t even have the option to work according to the applied pressure. In comparison, the latest update gives you 3 different types of stroke stabilizers. Each one of them has unique functionality and techniques to smoothen your strokes in Procreate. Plus, you also have the option to make them work according to the speed, pressure, and desirability of natural expression in your strokes.
To understand how much difference this update really makes, let’s make a figure with the original StreamLine option and then recreate it using the new stabilization options. In both cases, we have kept the stabilizers at medium (50) levels.
As you can notice, even over longer curves and straight lines, the smoothness isn’t uniform. There is a certain wobbliness (natural strokes) to the lines in the overall shape. Another detail you can notice is that the algorithm doesn’t make any attempts to turn the strokes into a certain shape. It keeps following the literal guidance of the hand movement. This might be a good thing in detailed artworks, but in simpler shapes like this, it can make things harder. Let’s now try to draw the same shape with stroke stabilization enabled in Procreate 5.2.
The very first difference you can notice here is the smoother flow of lines. The stabilization feature automatically removes any jitters or fluctuations you might have had while drawing. Then, they also help you automatically make a shape, which is most noticeable in the triangular flag portion. Stroke stabilization in Procreate 5.2 doesn’t take away your natural shape if you are using it with the right settings. You can play around with each of the stabilizers until you find what suits you the best.
Start Using Stroke Stabilization in Procreate 5.2
These are all the ways you can use stroke stabilization in Procreate. This is one of the many features that the new Procreate 5.2 update has in store for us. There is even an option to view 3D models in AR using Procreate and edit the 3D lighting and environment, alongside other features. Fortunately, there are several reliable alternatives to Procreate on Android, but none of the apps have equally good stabilization features. If you face any trouble while trying out new Procreate features, drop your query in the comments section. Our team will help you out right away. What more new features do you expect from the app in the future? Let us know in the comments below!