iPhones may not be as freely customizable, but when it comes to features, they are at-par with their Android counterparts. With every new iOS update, Apple pushes out a bunch of great new features and tricks, some of which they show off at their Keynote, and others, they leave for the users to discover on their own. So, if you’re looking for some unknown iPhone features to help you use your device better, check out these 12 hidden iPhone features you should be using:
1. Pin Screen and Disable Access to Specific Parts of an App
Much like the screen pinning that we see on Android devices, iPhones come with their very own Guided Access, that you can use to pin a particular app on the iPhone’s screen. This is particularly useful, when you need to give your iPhone to some one else, to take a look at some app, and you don’t want them to be able to peek into other data on your phone. To use Guided Access, just follow the steps below:
- First, enable Guided Access by going to “Settings -> General -> Accessibility“.
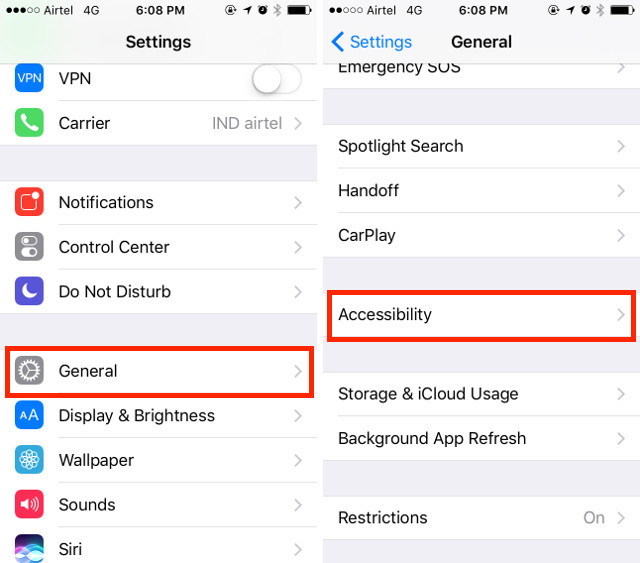
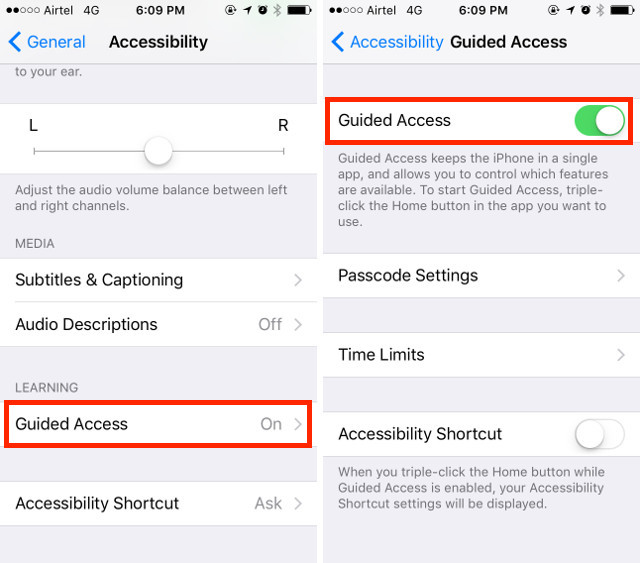
- Here, scroll down and tap on “Guided Access“, and toggle the Guided Access switch to ON. You should also set up a Passcode for Guided Access.
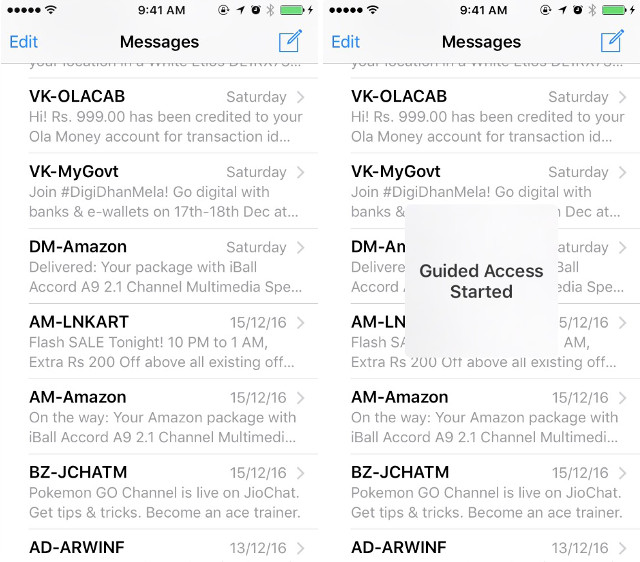
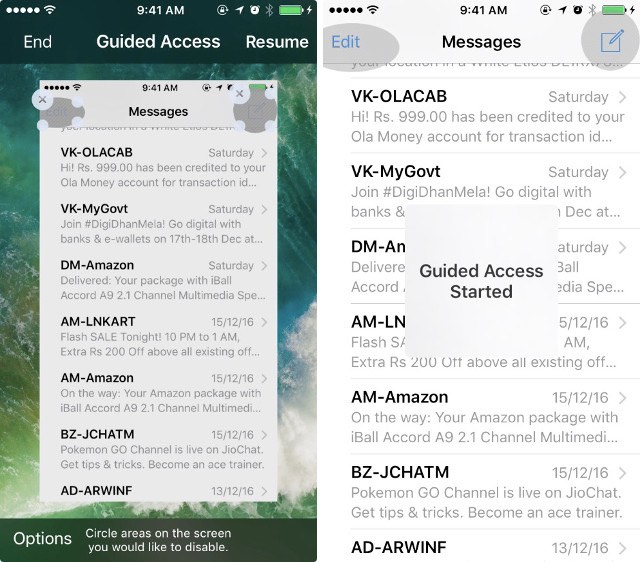
- Go to the app that you want to pin to the screen. Now, triple click the home button on your iPhone to start Guided Access.
- To disable access to specific parts of the app, you can simply draw circles, or boxes around the UI elements that you don’t want the person to be able to tap on, and they will show up with a mask.
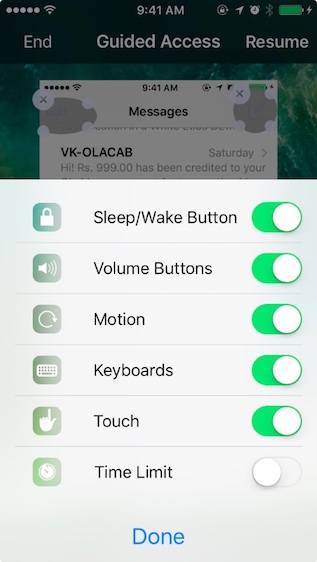
- You can also tap on “Options” in the Guided Access screen, to allow (or not) the person to use the sleep/wake button, volume keys, touch, and a lot more.
So, the next time you need to give your phone to someone else to let them see something in an app, you can use Guided Access to not allow them to use any other apps on your phone, or to browse through your personal data.
2. Use 3D Touch to Prioritize App Downloads
This one comes in exceptionally handy while downloading multiple apps at the same time. You can use this to prioritize a particular app to download first, so that it is ready to use faster. To do this, simply 3D Touch on the downloading app, and select “Prioritize Download“.
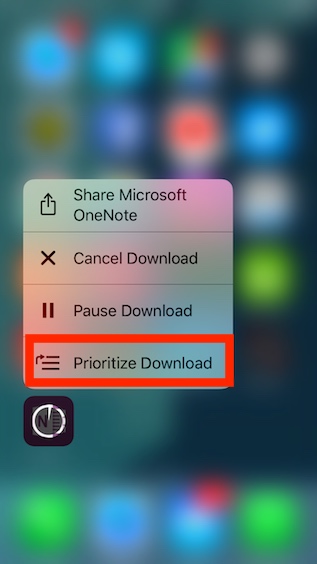
When you do this, the iPhone makes downloading that particular app, a priority, so it downloads faster than the other apps. This can come in exceptionally handy if you’ve reset your iPhone, and are downloading all of your apps again.
3. Have Siri Announce Caller Names
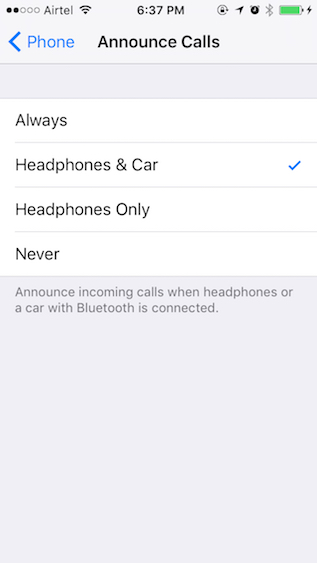
I find this feature very useful, especially while I’m driving. With this feature enabled, whenever you get a call, Siri will read out the name of the caller, and you don’t have to take the phone out of your pocket, just to check if it’s an important call. To enable this useful feature, just follow the steps below:
- Go to “Settings -> Phone“. Here, tap on “Announce Calls“
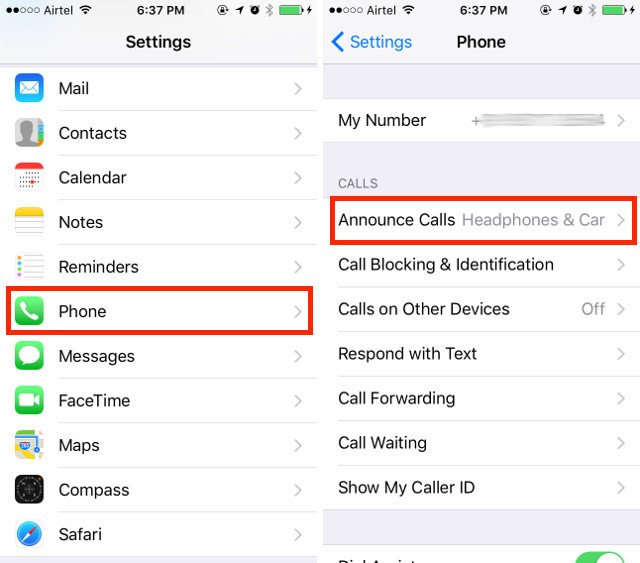
- Now, you can choose when you want Siri to announce the caller’s name.
4. Use Custom Numeric/Alphanumeric Passcodes
Apple recently switched the default passcode length to 6 digits. Obviously, this adds a bit more security to your passcode, but it may still not be enough. Also, you may want to revert back to the old 4 digit passcode that you were already accustomed to using. To do this, just follow the steps below:
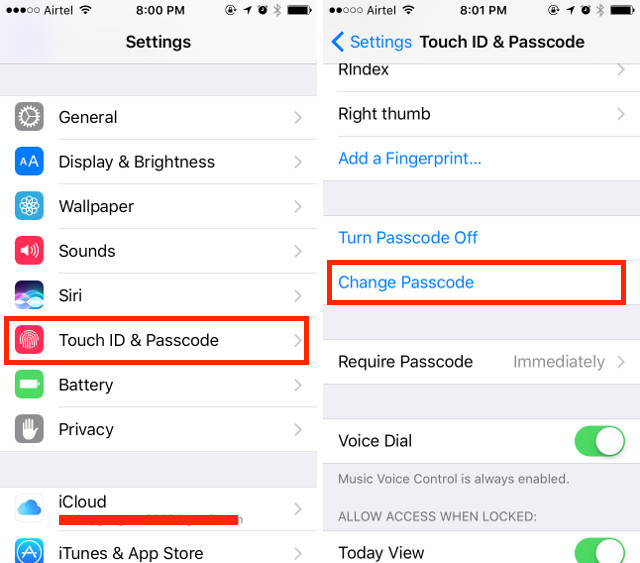
- Go to Settings -> Touch ID & Passcode. Enter your current passcode, and then tap on “Change Passcode“
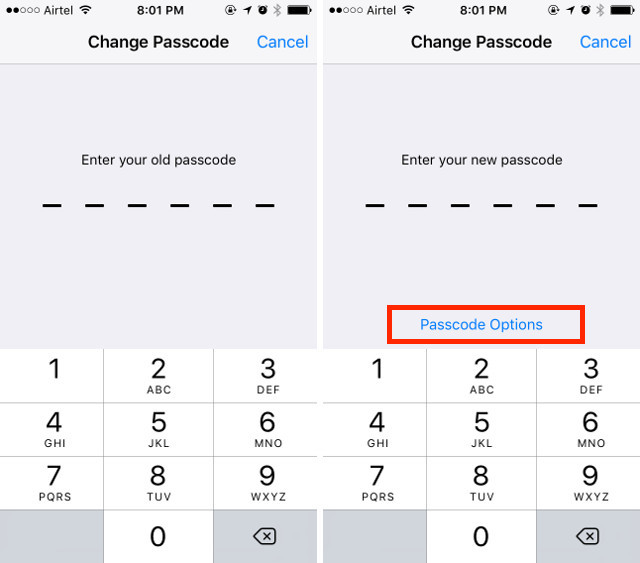
- Enter your current passcode again, and in the next screen, instead of entering a 6 digit pin, tap on “Passcode Options“
- You will now get three options. You can choose “Custom Alphanumeric Code” if you want to set a passcode that is a combination of letters and numbers. You can choose “Custom Numeric Code“, if you want to set a passcode of a different length, than the default 6 digits. You can also tap on “4-Digit Numeric Code“, if you want to revert back to the old standard 4-digit passcode that you’re probably accustomed to.
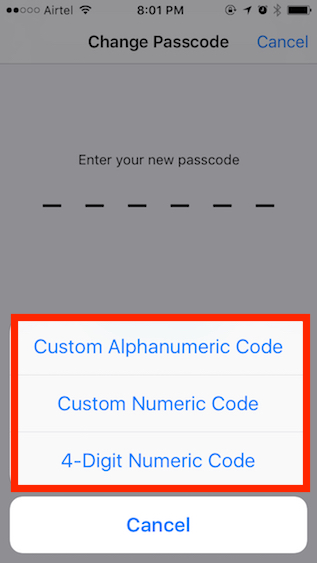
Alphanumeric passcodes are much more secure than numeric passcodes, as the number of possible combinations increases vastly. However, they are also more difficult to enter.
5. Use the iPhone Camera as a Magnifying Glass
You may already be using the “zoom” feature that iOS comes with. It is a very handy feature that you can use to magnify anything on your iPhone screen, and read it easily, without using glasses. With magnifier, you can use your iPhone’s camera as a magnifying glass. This will allow you to read those extremely tiny writings on the back of product cartons, and the like. To use the magnifier, just follow the steps given below:
- Go to Settings -> General. Here, tap on “Accessibility“.
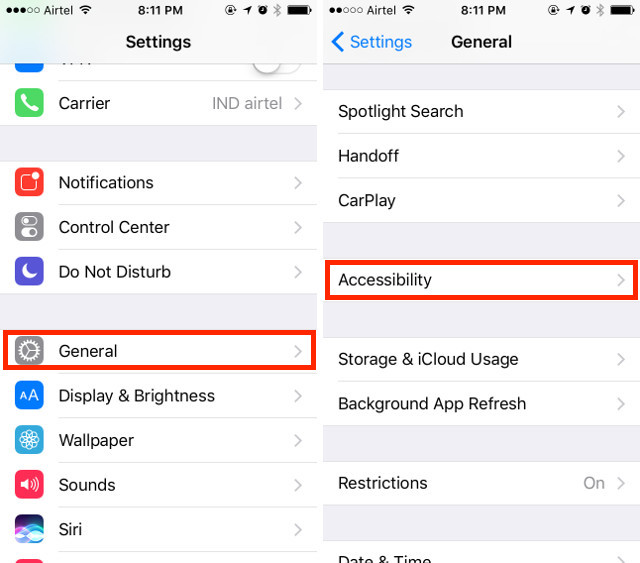
- Then, tap on “Magnifier“.Simply toggle the switch to on.
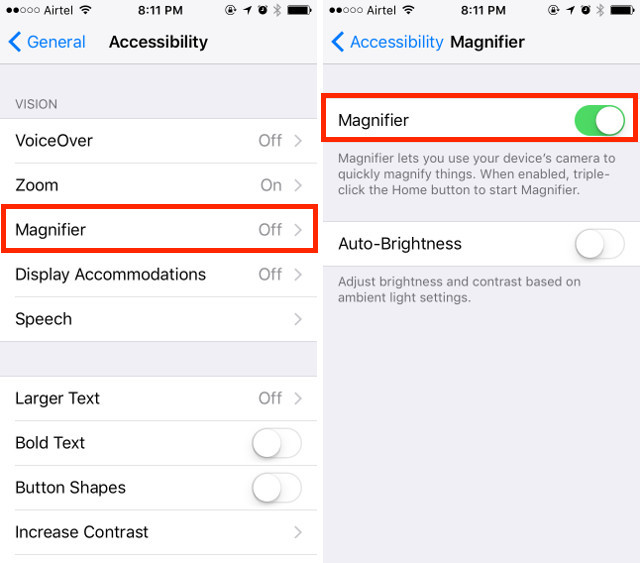
Now you can triple click on the home button, and you will be taken to a camera interface with a slider on the bottom that you can adjust to change the level of zoom. You can even click pictures in this interface, adjust the white balance, and more.
6. Automatically Mark your Parking Location
iOS 10 is smart enough to know when you park your car, and automatically mark it with a pin on the map. This makes it easier for you to find your car when you’re trying to locate it, afterwards. To be able to use this feature, you need a CarPlay enabled car, or a car whose stereo supports Bluetooth. Enabling the feature is easy:
- Go to Settings -> Maps. Here, scroll down to the end, and enable the toggle next to “Show Parked Location“.
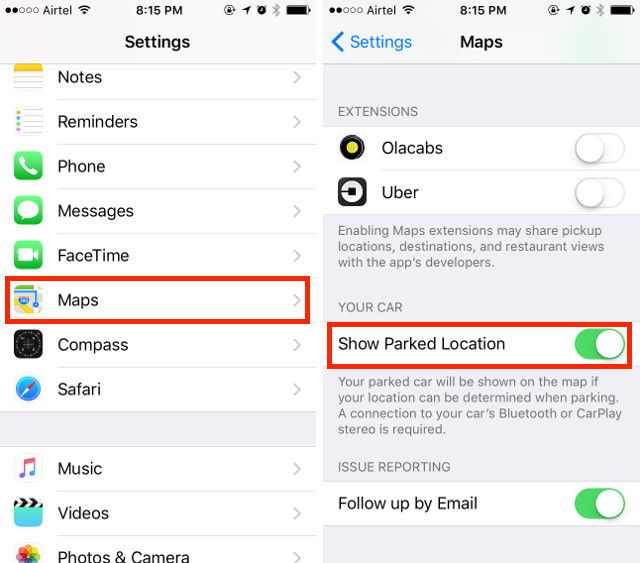
That’s it. Your iPhone will now automatically remember where you parked your car, and you can see the marked location in Apple Maps. Unfortunately, you can not use other map services, such as Google Maps, because… Apple.
7. Hide Apps Using Restrictions
If you want to hide apps on your iPhone, you must have noticed that there’s no real option (nor app), to do this. However, you can use this trick to hide apps on your iPhone. If you want to hide stock apps, you can actually just delete them right off your iPhone, as iOS 10 doesn’t really delete them, per se, but only hides them away. You can get them back from the App Store, even if you’re offline.
If you want to hide third party apps, that’s more of a challenge, because there is no way to hide specific apps. You can, however, restrict apps by age, which will make your iPhone hide the apps that are not in the allowed age range. To teach by example, say you wanted to hide Tinder on your iPhone, you can do this by following the steps below:
- First, go to the App Store, and look for Tinder. In the App Store listing, you will be able to see the age rating for the app. Tinder is rated 17+.
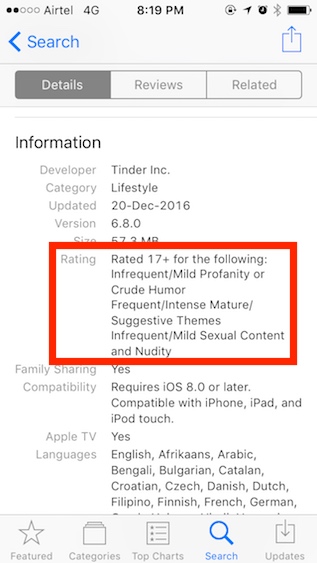
- Now, go to Settings -> General -> Restrictions.
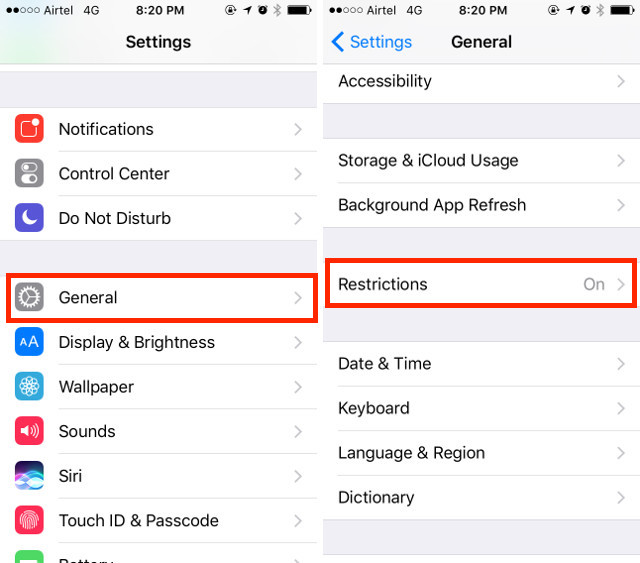
- Here, tap on “Apps”, and tap on “12+“. This will hide apps that are rated 17+, which includes Tinder.
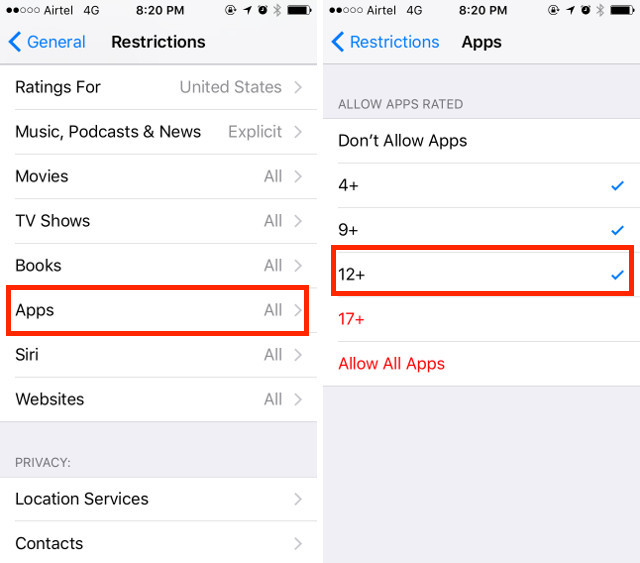
Go back to your home screen, and you will see that Tinder is no longer visible there. The catch with using this trick, is that if you have multiple apps that are rated 17+, they will all be hidden, even if you only wanted to hide just one of them.
8. Export Webpages to PDFs in Safari
There is a hidden option in Safari, that can let you export webpages to PDF files. This can come in handy in a lot of situations where you want to save a particular webpage as a PDF file on your iPhone. To do this, just follow the steps given below:
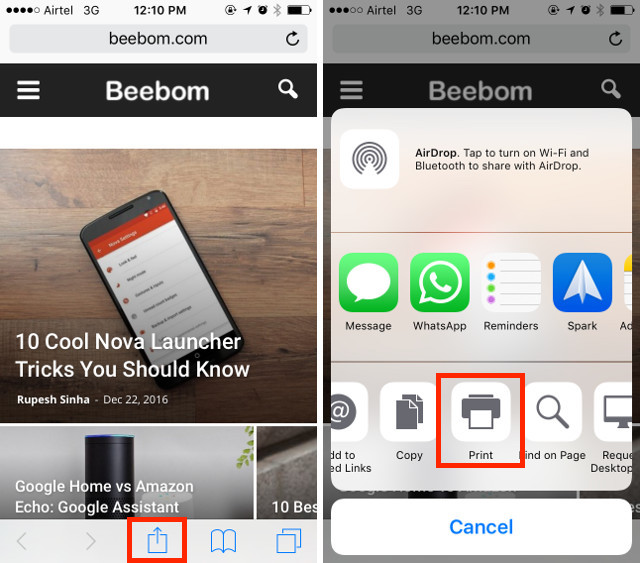
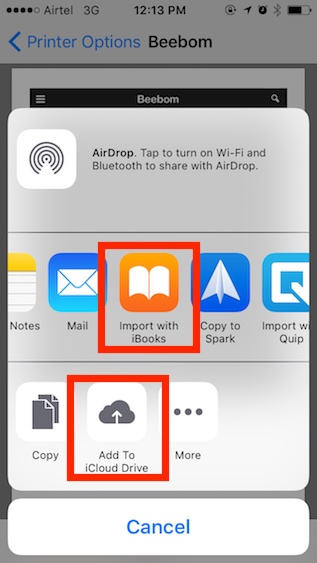
- Open the webpage you want to save as PDF in Safari. Tap on the “share” option, and select “Print” from the bottom row of options.
- In the Printer Options, pinch out on the page, and then tap on the “share” icon again.
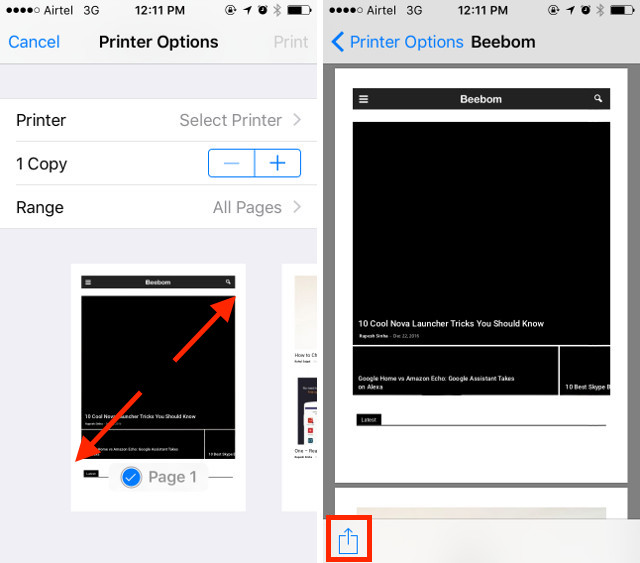
- Here, you can select “Add To iCloud Drive“, or on “Import with iBooks” to save the PDF file on iCloud Drive, or to directly add it to iBooks.
9. Emergency SOS
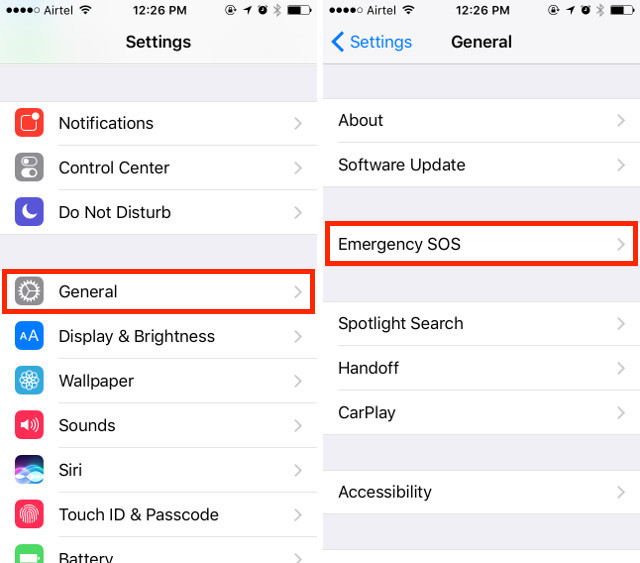
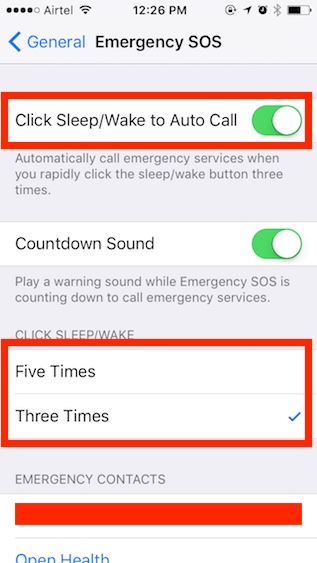
This is a feature that I hope you never need to use, but it’s good to have it set up, just in case. With this feature enabled on your iPhone, you can quickly click the sleep/wake button on your iPhone three times (you can customise it to be five clicks, also), to automatically call emergency services, and send a message to your emergency contacts telling them your location. To enable this feature, just follow the steps below:
- Go to Settings -> General -> Emergency SOS
- Enable the toggle next to “Click Sleep/Wake to Auto Call“, and choose whether you want to use three clicks, or five, to enable Emergency SOS.
10. Create and Set Custom Vibrations for Contacts
You must have noticed that your iPhone vibrates when you get a call. However, if you want to, you can change this vibration pattern for individual contacts. This can let you easily figure out who’s calling, simply from the way your phone vibrates. If you want to assign custom vibration patterns to specific contacts, simply follow the steps below:
- Go to Contacts, and select the contact you want to edit the vibration pattern for. Here, tap on “Edit”.
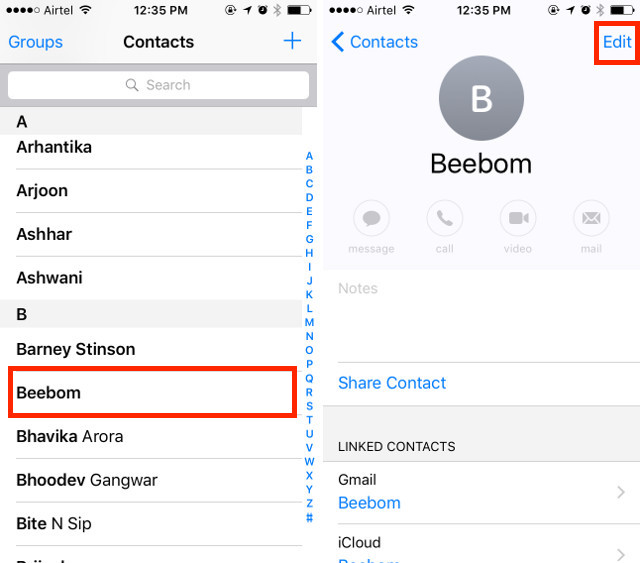
- Tap on “Ringtone“, and then on “Vibration“.
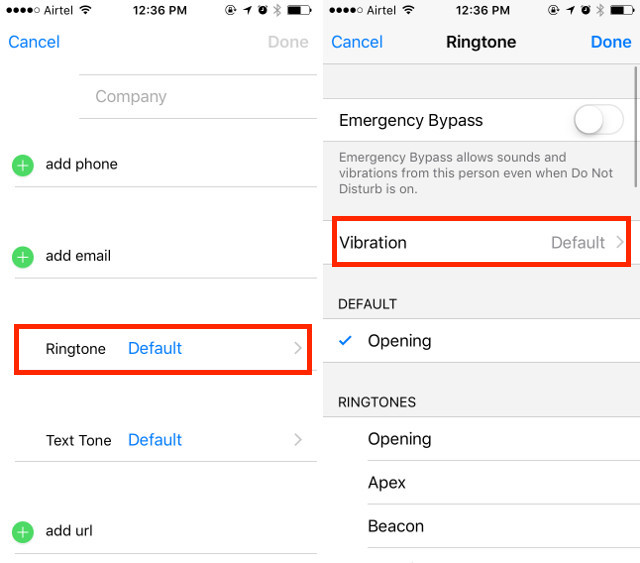
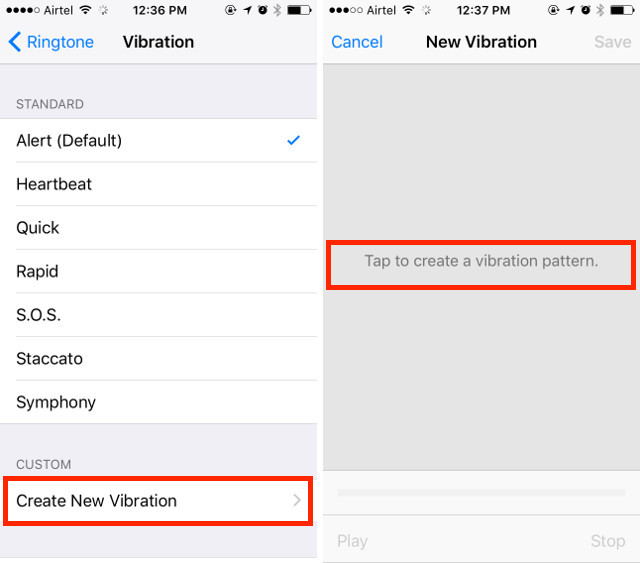
- Here you can select from some standard vibration patterns, or you can tap on “Create New Vibration“, to create your own vibration pattern. In the next screen, you can tap to create vibration patterns. Short taps register as short vibrations, and longer taps register as longer vibrations.
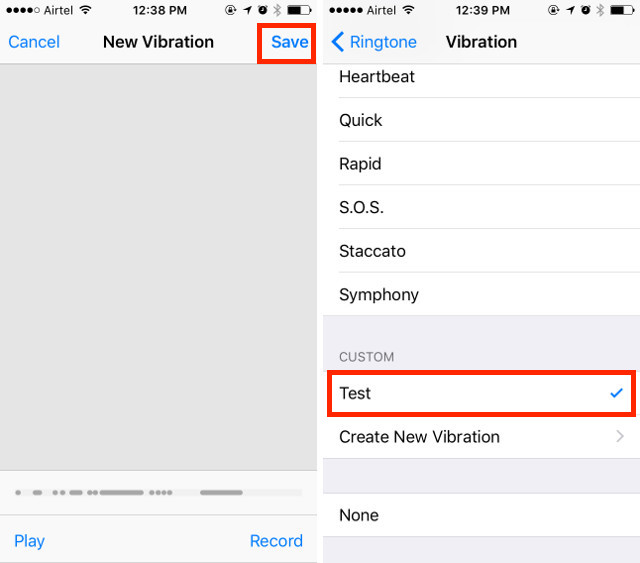
- Once you’re done, simply tap on “Save“, to save the vibration with a custom name, and that pattern will automatically be assigned to the contact.
11. Use Siri to Speak Screen
One of the great uses of Siri, is to get it to read out the text on your iPhone screen. This essentially turns Siri into a screen reader for you. To use this, follow the steps below:
- Open any webpage, eBook, or note with text content. Launch Siri, and say “Speak Screen“.
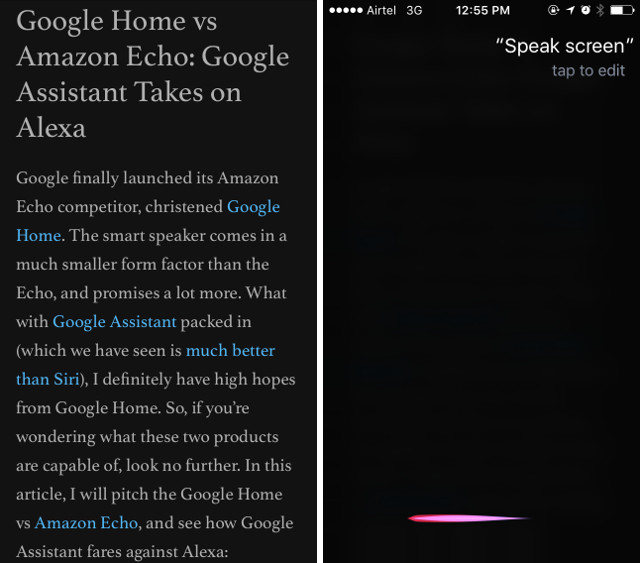
- Siri will then begin reading out the text on the screen. You can use the on screen controls to increase, or decrease the speed with which Siri speaks the text.

12. Use Siri to Save Links, Emails, Notes and More
If you use an app like Pocket to save links that you want to view later, you can delete it off your iPhone. Siri can help you do the same, and with ease. To use Siri for saving links, just open the webpage, email, or note that you want to save; launch Siri, and say “Remind me about this later“. Siri will then add it to your reminders, along with the app icon, which you can tap on to directly open the saved link.
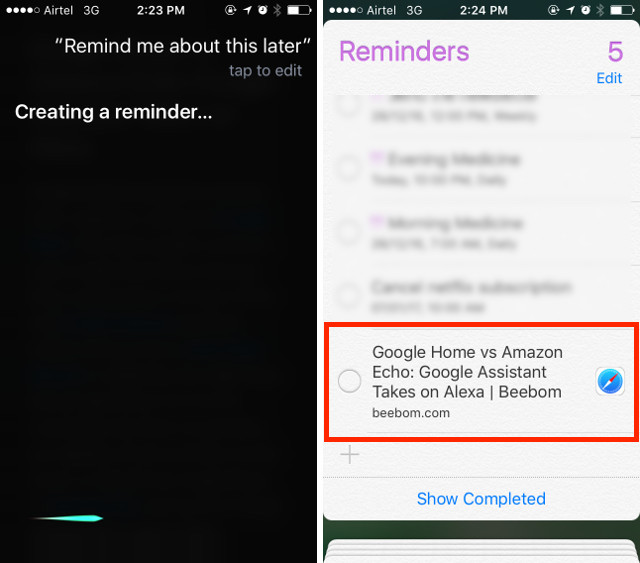
If you want to be reminded at a particular time, you can say something like “Remind me about this at 6 PM“, and Siri will add it to your reminders, and will push a notification to your iPhone at 6.
SEE ALSO: iMessage in iOS 10: All The Cool New Features to Use
Use These Hidden iOS Features on Your iPhone
These were 12 unknown features that you should definitely start using on your iPhone, as they will help you use your phone in a much better, and more productive way. Let us know about your thoughts on these hidden features, and iPhone tricks that we shared with you. Also, if you know of any other really great features for the iPhone that you think we should include in this article, do let us know about them in the comments section below.
