
- If your AirTag isn't working, the first thing you need to do is check and replace its battery if needed.
- The next thing to try is to reset your AirTag by taking out the battery and putting it back in 5 times.
- If it still doesn't work, try other fixes like making sure 2FA and Find My are enabled and updating your iPhone to the latest version.
When it comes to tracking items efficiently, AirTag comes close to being a perfect item tracker when compared to alternatives like Galaxy SmartTag. No wonder many are calling it the gold standard for 21st-century luggage tracking. Now, without undermining the rave reviews, Apple’s item tracker has had a fair share of issues even during the early days. While some users have stated that Apple AirTags are not working at all, others have found the much-talked-about “Precision Finding” inconsistent. Irrespective of what sort of problems have come your way, try out these 11 fixes if your AirTag is not working or connecting to your iPhone.
How to Fix AirTag Not Working or Connecting to iPhone Issues
So, what could be causing the AirTag to misbehave? There could be more than one culprit behind the problem. Though network-related issues might be the wrecker-in-chief, you should never overlook a faulty battery as a possible concern. Besides, the incorrect setup may also be equally responsible. Therefore, we will look into all the possible causes and try the best AirTag tips and tricks accordingly.
Method 1: Check and Replace Your AirTag’s Battery
One of the main reasons AirTags stop working is when they’re low on battery. An AirTag’s battery generally lasts for a year, but you can easily check whether the battery is low from the Find My app. The Find My app will show a low battery icon next to your AirTag if it’s indeed low. It won’t appear otherwise. In this case, you can easily replace the CR2032 battery for the device.
- To do so, pull out the AirTag from its case/ accessory, and press down the stainless steel back of the AirTag with two fingers.
- While still pressing down, make sure to rotate anticlockwise until the cover stops rotating. Next, pull apart the two halves of the AirTag.
- Then, remove the old battery and place the new one.
- You’ll hear a beep sound if the battery is properly connected.
- Place the stainless steel cover back and rotate it clockwise to secure it.

Here are a few links to the best CR2032 battery for AirTag on Amazon:
- LiCB CR2032 3V Lithium Battery: $5.99 for 10-pack
- Duracell CR2032 Coin Battery with Bitter Coating: $5.69 for 4-pack
- Amazon Basics CR2032 Coin Cell Battery: $4.74 for 4-pack
- Energizer CR2032 Coin Cell: $4.49 for 4-pack
Method 2: Reset Your AirTag
While resetting the AirTag is generally the way to go when you’re trying to use a tag previously being used by another Apple ID, it’s also helped many users when their AirTag isn’t connecting to their iPhone. Here’s how you can reset the AirTag:
- Remove the stainless steel cover from the AirTag following the same instructions as explained above.
- Then, remove the battery from your AirTag and place it back until you hear a sound. Let the sound play out completely.
- Take out the battery and put it back 4 more times. This means you need to repeat the process a total of 5 times. Each time, you’ll hear a sound when you put the battery back in.
- On the 5th time, you’ll hear a different sound from the first 5 times. This means you’ve completed the process accurately.
- Now, put the stainless steel cover back and check if your AirTag woes have been resolved. You’ll need to pair it again with your device, though.
Method 3: Make Sure Two-Factor Authentication is Enabled
For AirTags to connect to your iPhone/ iPad, you must have two-factor authentication enabled. So, make sure to turn on 2FA on your iOS or iPadOS device if it isn’t already.
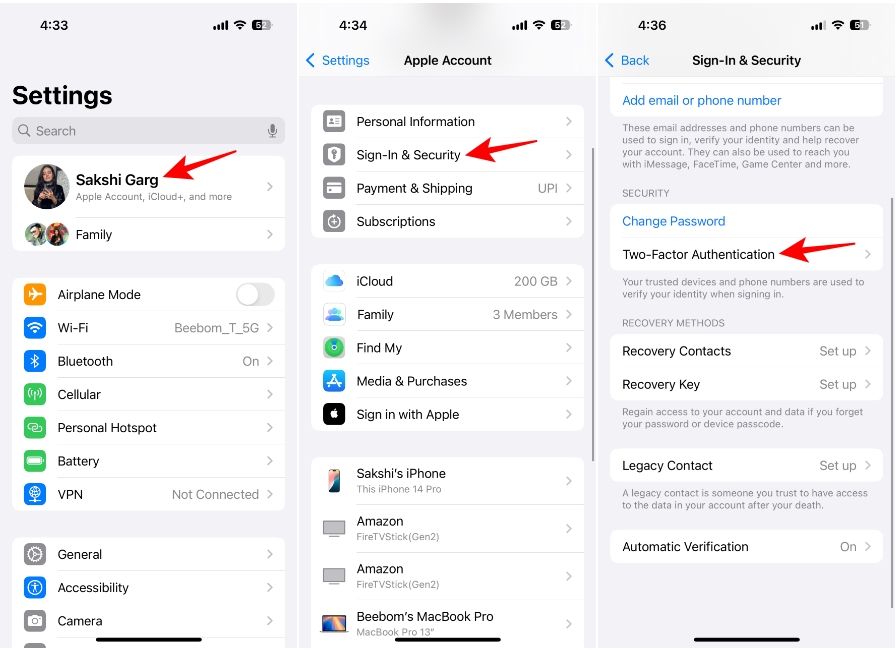
- To enable two-factor authentication on your Apple ID, head over to Settings.
- Tap on [your name] at the top.
- Navigate to Sign-In & Security.
- Now, go to Two-Factor authentication and make sure it is turned on. You will need to enter your phone number and answer a few security questions to enable 2FA for your Apple ID.

Method 4: Make Sure You Aren’t Using a Managed Apple ID
Apple clearly states that if your iOS/ iPadOS device is using a Managed Apple ID, you can’t set up an AirTag. So, if an AirTag is not connecting to your iPad or iPhone, be sure your device complies with this requirement.
For those unfamiliar, schools or colleges can create Managed Apple IDs for students to facilitate education. They are unique to each organization and separate from your standard Apple ID. To find out more about Managed Apple IDs and how they work, head over to the Apple Support page.
Method 5: Ensure That Find My is Enabled
Apart from being available as a full-fledged app, Find My comes with a system-wide switch located in the Settings app. So you can enable/ disable it depending on your needs. Make sure that you have the service enabled; otherwise, AirTag won’t work with your device.
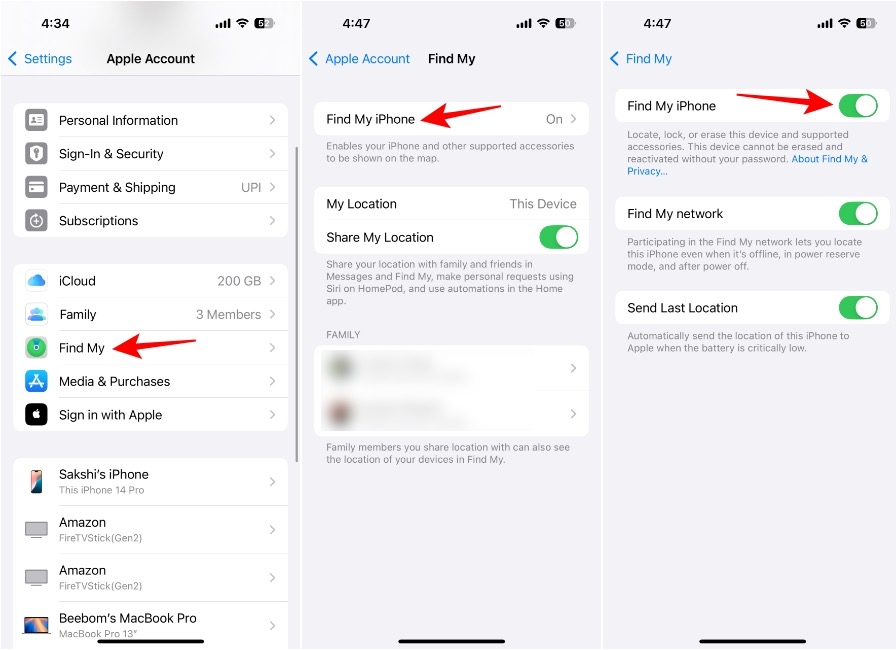
- To do that, head over to Settings > [your name].
- Go to Find My.
- Tap on Find My iPhone.
- Now, make sure the Find My iPhone toggle is turned on.
Method 6: Remove and Re-add Your AirTag
You can also try removing the AirTag from your Find My app and adding it again. Since it has helped several users fix common AirTag issues, including signal being weak, Precision Finding not working, and other connectivity issues, the chances are it could do the trick for you.
Note You can only remove an AirTag from Find My on an iPhone or iPad and not on a Mac or on iCloud.com.
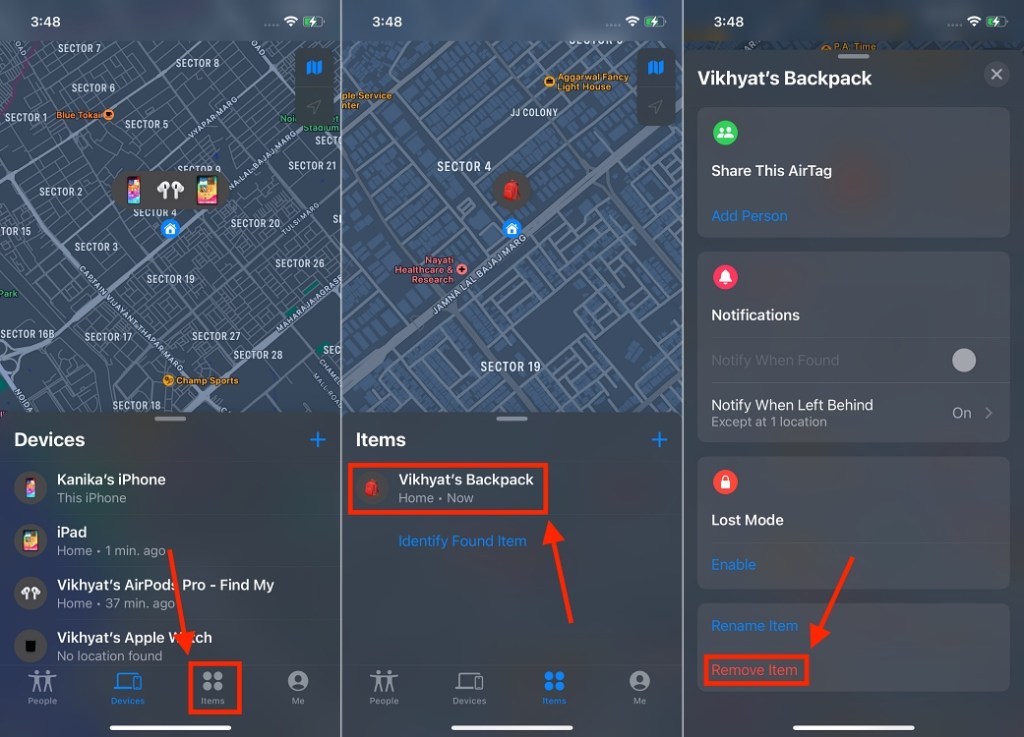
- Open the Find My app and go to the Items tab.
- After that, choose the AirTag you want to remove.
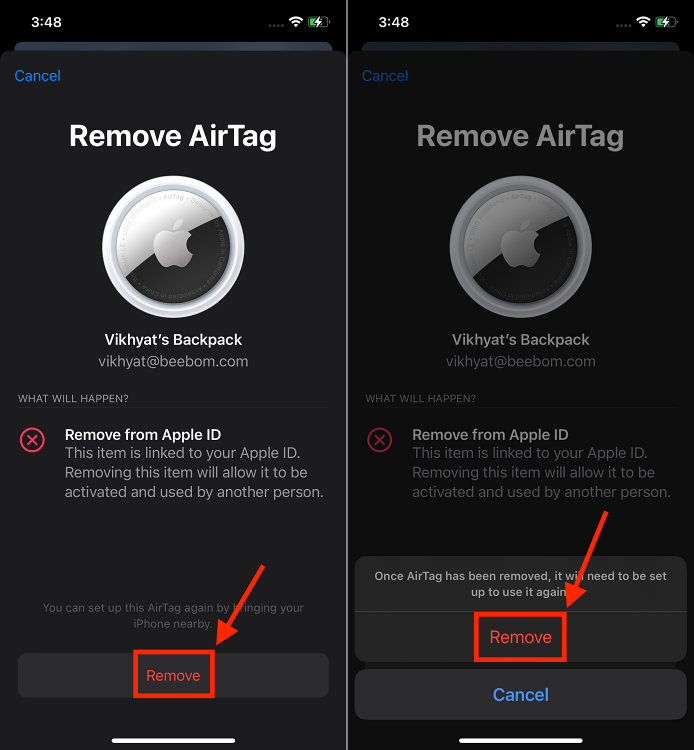
- Then, swipe up to access AirTag settings and tap on Remove item at the bottom.

- Tap on Remove on the screen.
- Finally, confirm your action by tapping on Remove again.

Once you have successfully removed the AirTag, reconnect it to your iPhone or iPad.
- Just hold the AirTag near your device and tap on the Connect button that pops up on the screen.
- If you have multiple AirTags and see the More than one AirTag detected message, ensure that only one AirTag is near your device at a time.

Method 7: Turn Bluetooth, Wi-Fi, and Cellular Network Off/ On to get AirTag Working
Another thing you should do to fix the AirTag not working problem is to turn on/ off Bluetooth, Wi-Fi, and your cellular network. Since they play a key role in helping AirTag work effectively, any sluggishness or malfunctioning on their part could be the cause of AirTag not connecting to your device.
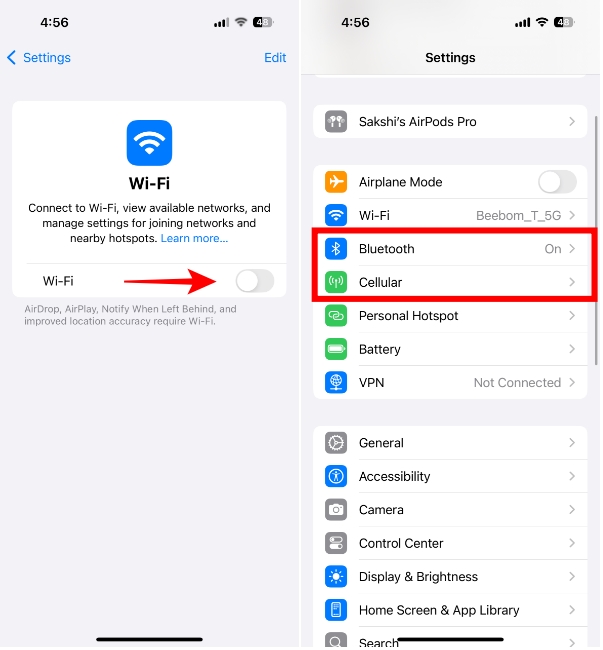
- Go to the Settings app on your iPhone or iPad.
- Then, go to the Wi-Fi menu and turn off the Wi-Fi toggle.
- Similarly, go to the Bluetooth and Cellular menus one after the other and turn off the toggles for each.

- Now, restart your device.
- To restart iPhone and iPad with Face ID: Press and hold the volume up/ down button and power button at once. Then, drag the power-off slider to shut down your device. After that, press and hold the power button to reboot the device.
- To restart iPhone and iPad with Touch ID: Press the power button and then drag the power-off slider to turn off your device. Now, hold down the power button to restart the device.
- After your device has restarted, head over to the Settings app and turn on the Wi-Fi, mobile data, and Bluetooth toggles once again.
Method 8: Turn Location Services Off/ On to Connect AirTag
Location Services needs to be enabled so that AirTags can work with precision. If you face issues, even if it’s turned on, disable/ enable the ‘Location Services’ toggle to get rid of any random glitch that may have cropped up.
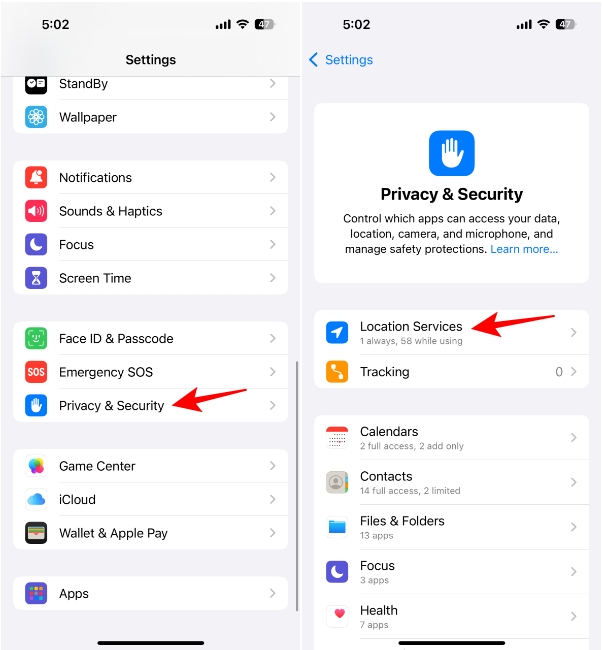
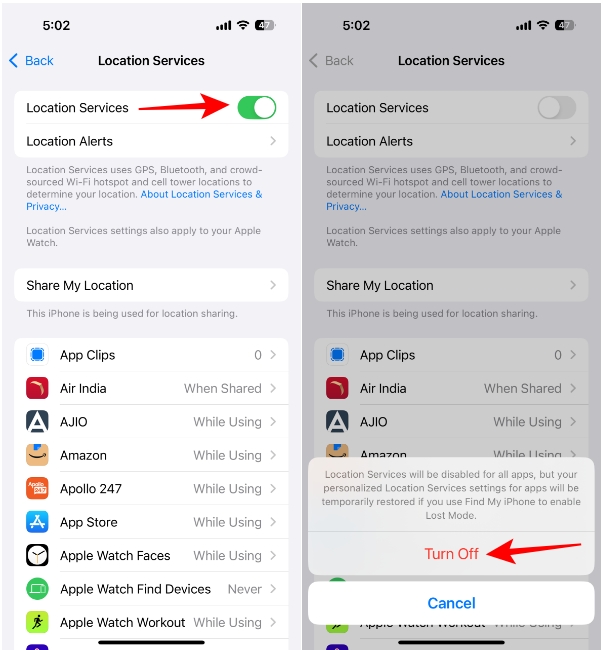
- Open the Settings app.
- Navigate to the Privacy & Security menu.
- Tap the option for Location Services.
- Next, turn off the toggle for it and tap on Turn Off from the confirmation pop-up.
- Then, restart your device and toggle it back on before trying to pair your AirTag.
Method 9: Turn On Precise Location for Find My to Enable Precision Finding for AirTag
As the name suggests, Precision Finding lets you accurately determine the distance and direction of a misplaced AirTag when it is in range. It uses the U1 chip, present in AirTags and all the latest iPhone models since iPhone 11, to precisely locate and communicate with each other.
The U1 chip takes advantage of ultra-wideband technology and uses input from key components, including ARKit, accelerometer, gyroscope, and the iPhone’s camera to guide you to a lost AirTag through haptics, sound, and visual feedback.
Unfortunately, ultra-wideband technology is restricted in some countries and regions. Thus, if Apple AirTag Precision Finding is not working on your iPhone, make sure that the technology is not blocked in your country or region.
Besides, make sure you have enabled Precise Location Access for Find My.
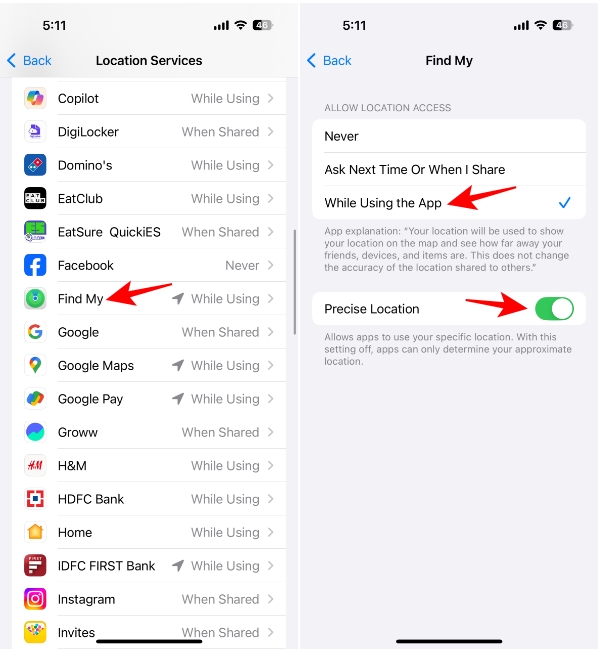
- To do that, open the Settings app.
- Then, head over to Privacy & Security > Location Services.
- Scroll down and navigate to Find My.
- Now, choose While Using the App and turn on the Precise Location toggle as well.

Method 10: Update Software on Your iPhone or iPad
If AirTag continues to malfunction, it would be wise to go for a software update. Well, considering that Apple keeps rolling out software updates with a series of performance enhancements and bug fixes, it could help you with AirTag connectivity issues.
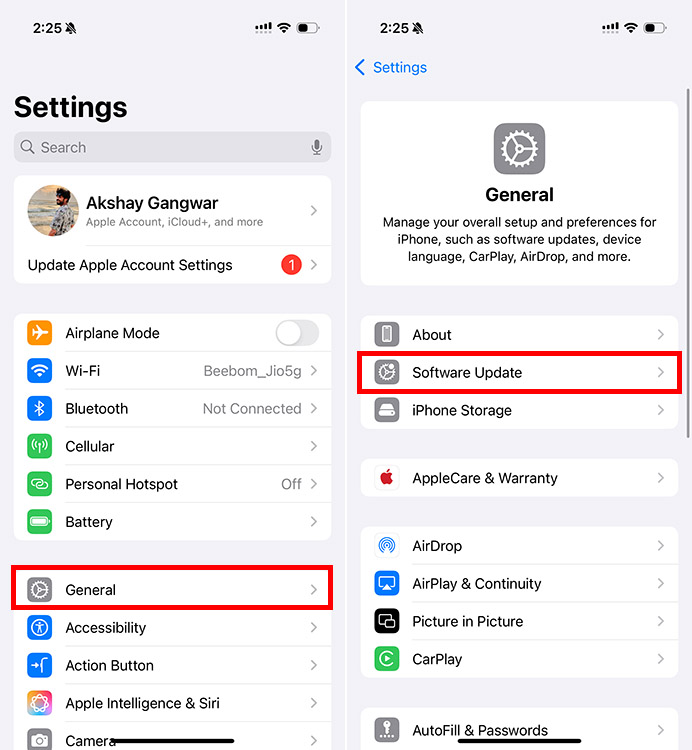
- Open the Settings app on your iPhone or iPad and go to General > Software Update.
- If there is any update available, download and install it.

Method 11: Reset Network Settings
For the AirTag to work as expected, Wi-Fi, cellular data, and Bluetooth must function properly. If they are facing issues, the item tracker will have a hard time connecting or working as intended. So, if you are still struggling to fix the AirTag not working issue, try resetting the network settings.
- Navigate to the Settings app on your iPhone or iPad and tap on General.
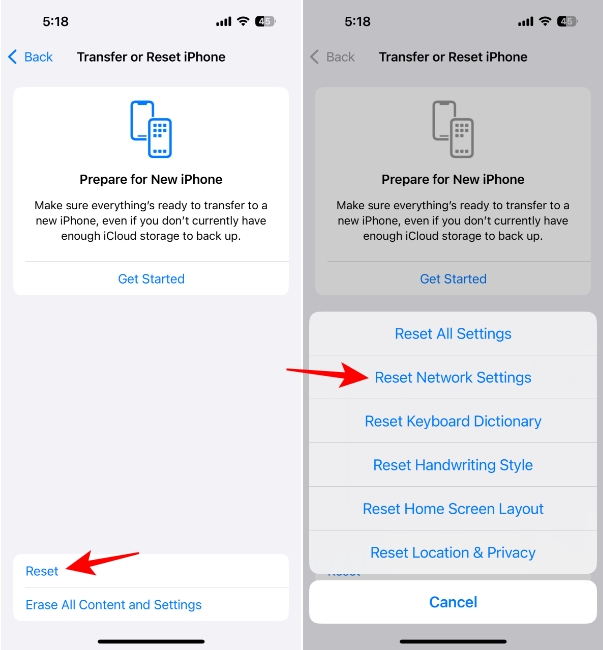
- Now, scroll down to the bottom and tap on Transfer or Reset iPhone.
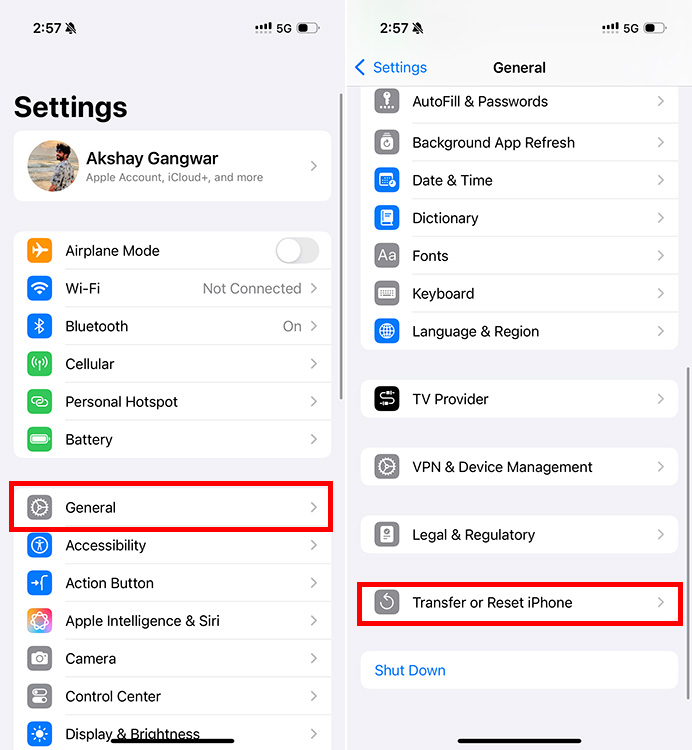
- Then, tap on Reset.
- Next, select Reset Network Settings from the options that appear.
- Enter your device passcode and hit Reset Network Settings again. That should fix any miscellaneous network-related issues, which in turn could help fix issues with AirTag not working or connecting to your device.
Well, that’s pretty much it! Hopefully, your AirTag has once again started to work normally. As I said above, network-related problems are usually the prime suspects, so fixing them resolves the most common AirTag issues. Besides, resetting the AirTag is also quite reliable in sorting out the problem if your AirTag is not working or connecting to your iPhone.
By the way, which one of these tips has helped you troubleshoot your item tracker? Do share your thoughts with us in the comments below. If nothing has worked for you, it would be wise to contact Apple Support at the earliest, as there could be hardware damage.


