How to Install Windows 10 on a Chromebook

We recently wrote two in-depth guides on how to install Chrome OS on PC and how to dual-boot Chrome OS and Windows 10 on a single machine. This was an effort to bring Chrome OS to users who have been using Windows for years. While people love the lightweight OS and snappy performance, it doesn’t take much time for users to realize the lack of Windows apps that they dearly loved.

Besides that, there are Chromebook users who want to install Windows 10 for native app support. So if you want to install Windows 10 on a Chromebook then you have come to the right place. In this article, we show you how to run Windows 10 on a Chromebook using a virtual machine. So without any delay, let’s get started.

Run Windows 10 on a Chromebook (2022)

Here, we have mentioned quick links so that you can navigate to various sections easily. I would strongly recommend you to go through all the points so that you can understand how we are going to run Windows 10 on a Chromebook.

Yes, the steps are lengthy but believe me, it’s the safest and probably the easiest way to run Windows 10 on a Chromebook. As we are going to use a virtual machine, there is no need to fiddle with system partition or anything.

Requirements

1. A powerful Chromebook featuring at least an Intel i3, i5, or i7 processor. If you have 4GB RAM (8GB would be nice) and 64GB storage then you are good to go. More the merrier.

2. A Windows 10 or Windows 7 ISO image. You can download a fresh copy of Windows 10 for free from here.

3. Linux support on your Chromebook. School Chromebooks tend to not have Linux support, but recently Google brought support for Linux containers on a few Chromebooks. So go ahead and check if you have Linux support. (Settings -> Linux (Beta) on the left menu -> Turn on).

Should You Install Windows 10 or Windows 7 on a Chromebook?

Before moving to the steps, you must know which Windows version would be a better pick for your Chromebook. To smoothly run Windows on a Chromebook, your Chromebook should have KVM support (Kernel-based Virtual Machine).

It allows your Chromebook to take full advantage of hardware acceleration using the built-in virtualization technology. I have mentioned the steps in the next section to find KVM support on Chromebooks.

If you don’t have KVM support then there is nothing to worry about. You can, of course, run Windows but the performance won’t be that good. In that case, I would recommend you to use Windows 7 as it’s bloat-free and much faster than Windows 10.

https://twitter.com/MaceMoneta/status/1289370308084813826

According to Chrome Unboxed, newly-launched Chromebooks (based on Hatch baseboard) are coming with built-in KVM support. The following are some of the Hatch-based Chromebooks available in the market. If you own any of these Chromebooks then the Windows performance will be much better and you can go ahead and install Windows 10 on your Chromebook.

  • IdeaPad Flex 5i
  • HP Chromebook x360 14c
  • HP Pro c640 Chromebook
  • ASUS Chromebook Flip C436FA
  • HP Elite c1030 Chromebook
  • Acer Chromebook 712 [C871]
  • Acer Chromebook Spin 713 (CP713-2W)
  • Samsung Galaxy Chromebook

So the bottom line is that if you have KVM support, go with Windows 10 and if your Chromebook does not support KVM then pick Windows 7. It’s not that non-KVM Chromebooks can’t run Windows 10, but it won’t be usable for even day to day task. And the installation process will take a much longer time.

Install Windows 10 on a Chromebook

Before we move forward, I want to clarify my specs so that you get a good idea about running a Windows 10 virtual machine on a Chromebook. I am using HP Chromebook x360 Core i5 8th Gen. It comes with 8 GB of RAM and 64 GB of storage. I have allotted 30GB to Linux disk space and my Chromebook does not support KVM. On the OS side, I am running Chrome OS Beta (86.0.4240.49). I am pretty sure this will work even on the Stable channel.

1. First of all, set up Linux on your Chromebook. Make sure to provide at least 25-35GB storage to Linux. If you have already set up Linux then you can increase the Linux disk size from Settings -> Linux (Beta) on the left menu -> Linux -> Disk Size. Here, increase the size to at least 25GB. If you are installing Windows 10 then increase the disk space to at least 35GB.

Install Windows 10 on a Chromebook

2. Next, move the ISO image of Windows 10 or Windows 7 in the Linux section of the Files app.

3. Now, open the Linux Terminal and run the below commands one by one to keep your Linux up to date. If you are doing this for the first time then it will take some time.

sudo apt-get update && sudo apt-get upgrade -y

4. Having done that, run the below command to install Virtual Machine Manager on your Chromebook. For ease, just copy and paste the command in the Terminal and hit enter.

sudo apt install qemu-kvm libvirt-clients libvirt-daemon-system bridge-utils virtinst libvirt-daemon virt-manager -y

5. After the installation, open the App Drawer and move to the Linux apps folder. Here, open “Virtual Machine Manager”.

6. Once it’s opened, click on the “Create New Virtual Machine” button.

7. Here, you will find out if your Chromebook has support for KVM or not. For instance, my Chromebook does not support KVM so I should pick Windows 7. However, for this guide, I will be showing you how to install Windows 10 on a non-KVM Chromebook. The steps are almost similar for both operating systems.

Set Up Windows 10 Virtual Machine on a Chromebook

1. Choose “Local install media” and click on “Forward”.

2. Here, click on “Browse“.

3. On the next screen, click on “Browse Local“.

4. Select the Windows 10/7 ISO image that you moved to the Linux files section.

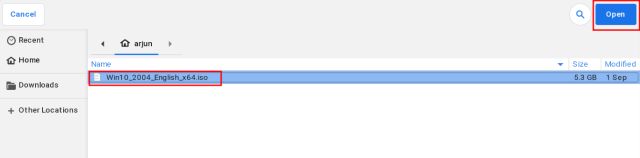
5. Once the selection is done, it will automatically detect the Windows version. For example, here it shows Windows 10. Now, click on “Forward”.

6. If you are installing Windows 7 then it won’t detect the OS automatically. In that case, you will have to first uncheck the Automatic checkbox and type “windows 7” manually. After that, enable the checkbox next to “Include end of life operating systems”. Windows 7 will now show up on the list. Now, just click on “Microsoft Windows 7” and click on the “Forward” button.

7. Here, enter how much memory and CPU cores you want to allot to the Windows virtual machine. I would recommend at least 4GB RAM and 4 cores if you are installing Windows 10. For Windows 7, 2GB RAM and 2 cores would do the job. But again, more the merrier.

8. On the next screen, I have provided 20GB of storage for Windows 10. For Windows 7, you should at least provide 15GB of space. Click on “Forward”.

9. Finally, click on “Finish“.

10. Once you do that, you will be asked to activate the Virtual Network. Click on “Yes“.

Run Windows 10 on a Chromebook

1. Within a few seconds, Windows 10 will boot inside the Virtual Machine (VM). Now, proceed with the installation just like you do on Windows. The best part is that the Windows VM has internet connectivity and sound functionality too.

2. No need to fiddle with anything. Click on “Install Now” and then select the “Custom” option. After that, select the 20GB partition that you allotted and click on “Next”. That’s it.

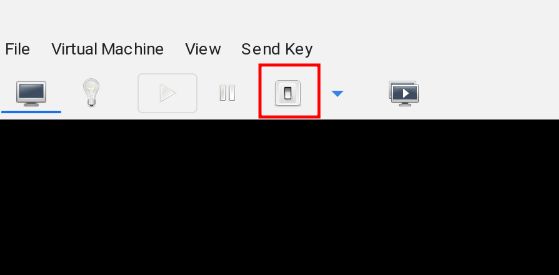
3. Once you successfully boot into Windows 10, you can change the resolution to match your Chromebook’s resolution. For a full-screen operation, click on the “full-screen” button located at the top-right corner.

4. If you want to shut down the Windows VM, click on the “Shut Down” button. If it does not respond then click on File -> Quit. You can also force close the VM through Virtual Machine Manager. Right-click on the VM and click on Shut Down -> Force Off.

5. Now onwards, if you want to start Windows 10 on your Chromebook then you don’t have to go through all the steps. Just open Virtual Machine Manager and click on the “Open” button. After that, click on Virtual Machine -> Run from the top menu. You will directly boot into Windows will all your programs and files intact. No installation needed.

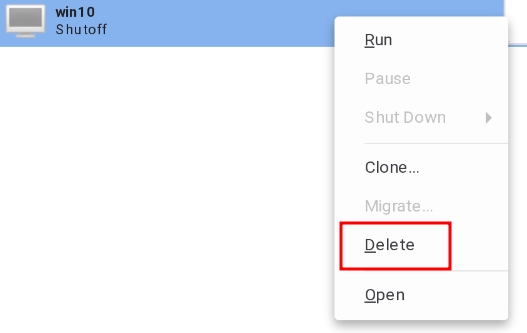
6. And if you want to completely delete Windows from Chromebook and free up space then first shut down the VM and then open Virtual Machine Manager. Now, right-click on it and select “Delete”. Do not worry, this won’t delete anything on your Chromebook as the VM is insulated from the rest of the system.

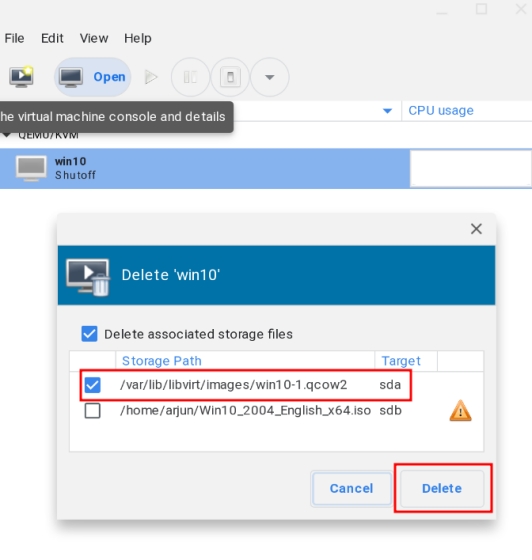
7. On the next page, make sure the “sda” target is checked, and then click on “Delete”. Within a few seconds, the Windows VM will be deleted and your storage will free up.

Use Windows 10 and Chrome OS Side by Side

So that is how you can install Windows 10 on a Chromebook. As I have mentioned above, the steps do look lengthy and complex but believe me, it’s quite easy and you can pull this off if you have a decent understanding of Linux.

Anyway, if you want to use Microsoft Office on a Chromebook without installing Windows 10 then go through our linked guide. Also, you can run any Windows app on Chromebook through Wine. You can even play popular games like Among Us on Chromebook. That is all from our side. If you are facing any issues then do comment down below and let us know. We will surely try to help you out.

Comments 70
  • Dave says:

    followed the steps, get a windows screen then it errors and says no bootable disk found, any suggestions

  • Nalin says:

    Root command /etc/libvirt/qemu.conf :permission denied. What should be done Can anyone guide ? Please help.

    • nonamefound says:

      give the application adminal permission it amy not have acces to your drive

  • Jenish says:

    Whenever I boot up my machine it takes me to the uefi interactive shell. I tried disabling uefi mode then it wont boot then I tried booting up the boot file in the ISO through the shell but it doesn’t work.

  • Jimmy Kelley says:

    “channel checkpoint dump nvram ram save snapshot” getting this message when typing “ls”…what to do?

  • Zae says:

    everything works until step 5. I’m getting no boot device found.

  • Andrew K says:

    it always show this when I try it:
    “Unable to complete install: ‘Unable to set XATTR trusted.libvirt.security.dac on /var/lib/libvirt/qemu/domain-2-win10/master-key.aes: Operation not permitted’

    Traceback (most recent call last):
    File “/usr/share/virt-manager/virtManager/asyncjob.py”, line 65, in cb_wrapper
    callback(asyncjob, *args, **kwargs)
    File “/usr/share/virt-manager/virtManager/createvm.py”, line 2001, in _do_async_install
    installer.start_install(guest, meter=meter)
    File “/usr/share/virt-manager/virtinst/install/installer.py”, line 701, in start_install
    domain = self._create_guest(
    File “/usr/share/virt-manager/virtinst/install/installer.py”, line 649, in _create_guest
    domain = self.conn.createXML(install_xml or final_xml, 0)
    File “/usr/lib/python3/dist-packages/libvirt.py”, line 4366, in createXML
    raise libvirtError(‘virDomainCreateXML() failed’)
    libvirt.libvirtError: Unable to set XATTR trusted.libvirt.security.dac on /var/lib/libvirt/qemu/domain-2-win10/master-key.aes: Operation not permitted”
    can somebody help me on this?

  • Sheesh says:

    Alright. I have the answer everyone’s looking for after like 5 hours of trying and failing haha.

    Step 1: open terminal and type “sudo su”
    That’s going to put you into super user mode and give you root permissions.

    Step 2: you have to navigate to the file that needs to be edited. Type “cd /var/lib/libvirt/qemu”

    Step 3: Type “ls”
    You should a list of files and one of them says qemu.conf
    That’s the on you want!

    Step 4: open the file by typing
    “Sudo nano qemu.conf”
    That nano command will allow you to edit the file.

    Once you type that command another page should display. Use your arrow keys to go all the way down to “remember_user = 1”
    Just delete the hashtag by simply using your keyboard arrows… move the blue box so that it hovers over the first letter of remember and press backspace.
    Change the 1 to a zero (0).

    From there press CTRL S. That saves any edits you did to the file. Press CTRL X. That exits you out of the file without closing your terminal session.

    Restart your system! Try to boot up windows in VM again and see if it works for you. If it doesn’t- it’s most likely the particular configuration of your system or it could be you just don’t have enough storage.

    • ready to cry says:

      do you know what to do if the ” qemu.conf ” isn’t showing up when you try?

      • Anonyme677 says:

        j’ai le même problème j’en peux plus

  • Anonymous says:

    It should be as easy as copying an pasting a command so that we can get into that file that needs to be updated using nano commands, so can anyone tell us non Linux using users in baby terms exactly what we are supposed to type in Linux line by line in order to enter the file that needs to be updated?

  • Damon Salinas says:

    I installed it and it opens just fine except windows is stuck in introduction mode.. all I can do is the few things Cortana directs me to do as far as setting up my email and everything.. as soon as its finished it starts all over again.

  • will says:

    how do we get windows 7 file???

  • rip man says:

    how do you fix Unable to complete install: ‘Unable to set XATTR trusted.libvirt.security.dac on /var/lib/libvirt/qemu/domain-3-vm1/master-key.aes: Operation not permitted’

    Traceback (most recent call last):
    File “/usr/share/virt-manager/virtManager/asyncjob.py”, line 65, in cb_wrapper
    callback(asyncjob, *args, **kwargs)
    File “/usr/share/virt-manager/virtManager/createvm.py”, line 2001, in _do_async_install
    installer.start_install(guest, meter=meter)
    File “/usr/share/virt-manager/virtinst/install/installer.py”, line 701, in start_install
    domain = self._create_guest(
    File “/usr/share/virt-manager/virtinst/install/installer.py”, line 649, in _create_guest
    domain = self.conn.createXML(install_xml or final_xml, 0)
    File “/usr/lib/python3/dist-packages/libvirt.py”, line 4366, in createXML
    raise libvirtError(‘virDomainCreateXML() failed’)
    libvirt.libvirtError: Unable to set XATTR trusted.libvirt.security.dac on /var/lib/libvirt/qemu/domain-3-vm1/master-key.aes: Operation not permitted

  • Chris Calicott says:

    Everything went well until the last step. I got this message, can you help meUnable to complete install: ‘Unable to set XATTR trusted.libvirt.security.dac on /var/lib/libvirt/qemu/domain-1-win7/master-key.aes: Operation not permitted’
    Traceback (most recent call last):
    File “/usr/share/virt-manager/virtManager/asyncjob.py”, line 65, in cb_wrapper
    callback(asyncjob, *args, **kwargs)
    File “/usr/share/virt-manager/virtManager/createvm.py”, line 2001, in _do_async_install
    installer.start_install(guest, meter=meter)
    File “/usr/share/virt-manager/virtinst/install/installer.py”, line 701, in start_install
    domain = self._create_guest(
    File “/usr/share/virt-manager/virtinst/install/installer.py”, line 649, in _create_guest
    domain = self.conn.createXML(install_xml or final_xml, 0)
    File “/usr/lib/python3/dist-packages/libvirt.py”, line 4366, in createXML
    raise libvirtError(‘virDomainCreateXML() failed’)
    libvirt.libvirtError: Unable to set XATTR trusted.libvirt.security.dac on /var/lib/libvirt/qemu/domain-1-win7/master-key.aes: Operation not permitted

    • Shitshow says:

      So did anybody figure this issue out?

      • Patrick says:

        Yes, the qemu.conf file needs to be edited using the terminal and Nano as root user.

        “cd ../../../etc/virtlib”
        “ls” (you should see a file named qemu.conf)
        “sudo nano qemu.conf”

        Remove the # for the “remember user = 1” parameter and change the 1 to a 0. The parameter will show white text when you delete the comment tag. Type cntrl x, type y, and enter to write the changes to the file. Log out and log back in and run the virtual machine manager.
        I have it booting, but it’s running slow as hell. The install looks like it could take 5-6 hours. Let me know if you have any luck.

      • lost and confused says:

        please dumb this down for us

      • ARiel says:

        it’s in /etc/virtlib/qemu.conf
        and the line is remember_owner = 0 (no user, at least in the new versions). It’s worked for me

    • ThePOO says:

      oh wow. 01-31-2022 …. this promlem lives on — someone please fix — and thanks.

    • JAQC says:

      I have the same problem. Have you already solved it?

    • Johe says:

      you need to add a new conection QEMU/KVM and then just press the button CONNECT.. cause the default connection doesn’t work.

    • Johe says:

      you need to add a new conection QEMU/KVM User Session
      and then just press the button CONNECT.. cause the default connection doesn’t work.

  • encrypt says:

    PLEASE HELP, I AM GETTING THIS ERROR MESSAGE AT STEP 10
    Unable to complete install: ‘Unable to set XATTR trusted.libvirt.security.dac on /var/lib/libvirt/qemu/domain-1-win7/master-key.aes: Operation not permitted’

    Traceback (most recent call last):
    File “/usr/share/virt-manager/virtManager/asyncjob.py”, line 65, in cb_wrapper
    callback(asyncjob, *args, **kwargs)
    File “/usr/share/virt-manager/virtManager/createvm.py”, line 2001, in _do_async_install
    installer.start_install(guest, meter=meter)
    File “/usr/share/virt-manager/virtinst/install/installer.py”, line 701, in start_install
    domain = self._create_guest(
    File “/usr/share/virt-manager/virtinst/install/installer.py”, line 649, in _create_guest
    domain = self.conn.createXML(install_xml or final_xml, 0)
    File “/usr/lib/python3/dist-packages/libvirt.py”, line 4366, in createXML
    raise libvirtError(‘virDomainCreateXML() failed’)
    libvirt.libvirtError: Unable to set XATTR trusted.libvirt.security.dac on /var/lib/libvirt/qemu/domain-1-win7/master-key.aes: Operation not permitted

    • Jennie says:

      I ran into exactly the same error! Just curious, do you have developer mode on? I do and just a wild guess if it could be the reason.

      • encrypt says:

        thanks for the reply, yes I do have developer mode on.
        Don’t know what to do now, trying again from the start.

      • Jennie says:

        Tried again with developer mode off and same error… no idea now…

      • Nighthawk68 says:

        Same here! Hope someone will figure this out!

    • JB says:

      In the file /etc/libvirt/qemu.conf
      Uncomment the line “remember_owner = 1” and change it to “remember_owner = 0”

      • please help says:

        how do i access this file?

  • David says:

    Can I run windows 7 on my Acer Chromebook 315, Intel Celeron, 4gb ram, 32gb storage.

Leave a Reply