iPhones are, by definition, restricted to sync with iTunes. That is, unless you jailbreak them. While I personally have no issue with this, the fact remains that Apple has, for some reason, not put out an iTunes client for Linux distros. This can be a huge headache for iPhone users who want to use a Linux desktop, because it’s not possible to sync iPhones with Linux distros like Ubuntu. So, if you’re wondering how you can use an iPhone with Linux, here is a complete guide that might help you:
Understanding the Problem
The main problem, with using an iPhone with a Linux system, is the fact that you just can’t sync it. iTunes is the only software that a non-jailbroken iPhone will sync with, and it is not available for any Linux platforms, yet. There are a number of libraries such as “libimobiledevice” that tried to let users sync iPhones with Linux, but not only is it a hassle to get it running, it doesn’t work for iOS 10. So if you have an iPhone, and you’re using a Linux system as your daily driver, you’re kind of out of luck.
How about some Wine
Wine (which is a recursive acronym for Wine Is Not an Emulator) is a compatibility layer application that can allow a user to run Windows apps on a Linux system (most of the time). So my first attempt at using an iPhone with Linux was to run iTunes with Wine. I used PlayOnLinux as the front-end for the software, and then I found out, that Wine will not allow for USB passthrough, so there’s no way that an iPhone will sync with it. You could still use iTunes for everything else, including managing your iCloud Music Library, but if it doesn’t sync with an iPhone, there’s really no use for it. Which brings us to a workaround of sorts.
OwnCloud and XAMPP for Transferring Files Between Linux and iPhone
The first problem that we’ll tackle, is somehow enabling the transfer of files, and documents between an iPhone and a Linux desktop. To do this, you can use something like OwnCloud, along with XAMPP on your Linux system.
- OwnCloud is a self-hosted cloud server that you can access on your iPhone. It comes with a free plan, and is pretty much the best way to be able to transfer documents between your iPhone and a Linux desktop. However, OwnCloud requires a server to run on, in the first place, which is where XAMPP steps in.
- XAMPP is an easy way to get a LAMP server running on your Linux, Mac, or Windows system. Just be careful that you install a version of XAMPP running at least PHP 5.4, because OwnCloud will not work on anything below that.
Now that we’ve cleared all that out, let’s get started with installing OwnCloud, and XAMPP on our system. I’m using a machine running Ubuntu 16.10 Yakkety Yak to do this, and the process should be similar for most other systems.
Installing XAMPP on Ubuntu 16.10
We’ll install XAMPP first, and set up a folder where we can keep the OwnCloud files. To do this, just follow the steps below:
- Download the XAMPP installer from the official website. It will be in the form of a .run file.

- Once you’ve downloaded it, launch the Terminal, and cd into the Downloads directory with the “cd Downloads” command. If you downloaded the installer to a different directory, just use the name of that directory in place of “Downloads”. Also, make sure you use proper capitalization, or the command will fail.

- Here, we’ll first give the installer permissions to execute. In the Terminal, run the command “chmod +x xampp-linux-x64-5.6.28-1-installer.run“.

Note: The name of the installer may be different. Just use the exact name of the installer. You can type “chmod +x xampp”, and press the “tab” key to autocomplete the name.
- Now, we will execute the installer, with root permissions using the command “sudo ./xampp-linux-x64-5.6.28-1-installer.run“. You will be asked for your password. Type it in (it will not be displayed, even as asterisks), and hit Enter.

- The installer will then run, and you simply have to follow the instructions in the installer to install XAMPP on your system. It is installed in the “/opt/” directory.

Creating a Folder to Place the OwnCloud Files for XAMPP
Now that XAMPP is installed, we need a folder we can place the OwnCloud files, so that XAMPP can run it. There’s a folder called htdocs, where you can place the websites that you want XAMPP to be able to run, and it is present at “/opt/lampp/htdocs”. We’ll not place the OwnCloud files inside the “opt” directory, though. Just follow the steps below:
- In Terminal, navigate to the home folder with “cd ~“, or just “cd“.

- Now, make a folder called “public_html” here, with the command “mkdir public_html“.
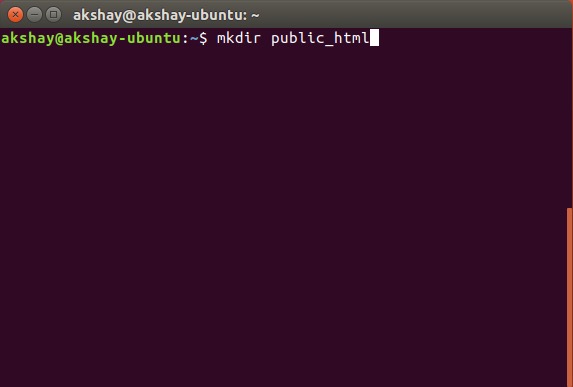
- Next, we will give read/write access to everyone for the “public_html” folder with the command “sudo chmod 777 -R public_html“.

- Now, use the command “cd /opt/lampp/htdocs“, to navigate into the htdocs folder.

- Here, just run the command “sudo ln -s /home/username/public_html ./username“. Replace “username” with your Username in Linux. In my case, the username is “akshay”, so the command I’m using is “sudo ln -s /home/akshay/public_html ./akshay”.

Your “public_html” folder is now ready to host files for XAMPP to run. Let’s install OwnCloud now.
Installing OwnCloud on Ubuntu 16.10
- Download the ZIP file for OwnCloud from their official website.

- Extract this into the “public_html” folder you created while setting up XAMPP.
Running OwnCloud on XAMPP in Ubuntu 16.10
You can now run OwnCloud on your Ubuntu 16.10 system, with XAMPP. Just follow the steps below:
- In Terminal, run the command “sudo /opt/lampp/lampp start“. This will start the XAMPP server on your system.

- Now, in your browser, just navigate to “http://localhost/username/owncloud”. Replace “username” with your username. In my case the address is “http://localhost/akshay/owncloud“.

- You will be presented with a screen where you’ll have to create your admin username, and password. Simply choose whatever you want to use as your login credentials.

Note: If you encounter an error that OwnCloud could not write data, just launch Terminal, and run the command “sudo chmod 777 /home/username/public_html/owncloud”. Replace “username” with your username.
- Once you sign in, you’ll be taken to the main OwnCloud interface. This is where you can upload, delete, and otherwise manage all your files.

Connecting to OwnCloud from iPhone
So you’ve uploaded all the files you want to be able to access on your iPhone, to your OwnCloud server. There’s still the matter of actually connecting your iPhone to OwnCloud before you can actually transfer files between the devices. To do this, you’ll have to allow the config file for OwnCloud to allow access using the IP address of your computer.
Editing the OwnCloud config File
Editing the OwnCloud config is easy, just follow the steps below:
- In Terminal, navigate to the OwnCloud config folder, using “cd /home/username/public_html/owncloud/config“.

- Here, run the command “sudo nano config.php“. This will open up the config file inside Terminal, ready to be edited.

- Simply locate the line that says “trusted_domains“. You will see “localhost” already added there. Create a new line after “localhost”, and type the IP address of your computer inside single quotes. The edited “trusted_domains” section should look something like this:
[php]’trusted_domains’ =>
array (
‘localhost’,
‘192.168.2.236’,
),[/php]

Connecting iPhone to OwnCloud
Connecting your iPhone to your OwnCloud server is easy, and can be done in one of two ways. We’ll discuss both of them here, and you can use the one that suits you better.
1. Connecting from iPhone to OwnCloud with Safari
To connect your iPhone to your OwnCloud server, just follow the steps below:
- Launch Safari on your iPhone, and in the address bar, navigate to “http://ipaddress/username/owncloud/“. Obviously, replace “ipaddress” with the IP address of your computer, and “username” with your username.

- You will be presented with a login screen. Use the credentials you created while setting up OwnCloud to log in. Once you do this, you will be shown all the files and folders present on your OwnCloud server. You can browse the files, and download any files that you want.

2. Connecting from iPhone to OwnCloud with a WebDAV client
OwnCloud supports WebDAV to transfer files, and if you have an app (like Documents 5 by Readdle), that can connect to WebDAV servers, you can easily access your OwnCloud server with it. There are quite a number of iPhone file managers that support WebDAV, and you can use any one of them to connect to OwnCloud. I’m using Documents 5.
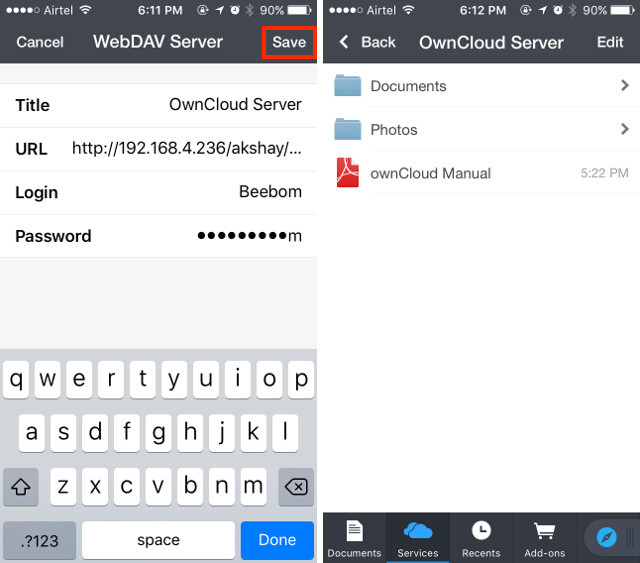
- Launch Documents 5 on your iPhone, and tap on the icon that says “Services“. Here, tap on “Add Account“.

- Choose “WebDAV Server” from the list, and enter a name for the server, along with the URL “http://ipaddress/username/owncloud/remote.php/webdav/“. Enter your OwnCloud username and password, as well.

- Once you’re done, just tap on “Save“, and Documents will connect to your OwnCloud server. You will then be able to view (and download) all the files available on your OwnCloud server.
Note: If you use DHCP (you probably do), chances are, your computer’s IP address will keep changing, and you will have to manually edit the config file everytime it happens. It’s better if you assign a static IP address to your computer, so you only have to edit the config file once.
Google Play Music to Manage Music between Linux and iPhone
Since we’re out of luck with iTunes on Linux, we’ll have to turn to other options. One of these options is Google Play Music. The music service will allow you to upload your music to the cloud, and you can access on your iPhone with the official Google Play Music app. With this, we’re completely bidding adieu to iTunes. So, let’s see how to get this done.
Using Google Music Manager to Upload Music on Google Play Music
The first thing we’ll have to do, before accessing our music on our iPhone, is uploading our music library on the Google Play Music website. To do this, we’ll need to install Google Music Manager. This can be done easily by following the steps given below:
- Download the Google Music Manager client from the official website. It is downloaded a s .deb package in Ubuntu, and will directly open in the Software Center, and you can install it.
- From your Application launcher, look for Google Music Manager, and launch it.

- Follow the steps to get Music Manager set up, and running. Once everything is done, your music library will be automatically uploaded to your Google Play Music library.

- Once your songs have uploaded (it may take time, depending on the size of your library), you can launch the Google Play Music app on your iPhone (download), and sign in with your Google account. You’ll find your music right there.

In the future, you just have to put your new music files in your Music folder in Linux, and Google Music Manager will automatically upload it to the Google Play Music library, so you can access it on your iPhone, and any other device you have Google Play Music installed on.
SEE ALSO: How to Install Linux on Chromebook (Guide)
Use your iOS device with Linux with these services
You can manage everything on your iPhone or even iPad with Linux, using the services I have mentioned in this article. Plus, all of these services have a free tier available that you can use. Google Play Music offers a free plan that will let you upload up to 50,000 songs on the cloud, and OwnCloud allows you to host your own server, which means that you don’t need to pay them anything. Obviously, this is nowhere as easy as using iTunes to sync an iPhone – a process that just works – but, this is the closest you can come to using an iPhone with Linux.
As always, do share your thoughts on using an iPhone with Linux, and if you have any queries, do let us know in the comments section below.