
Playing Minecraft on Android isn’t as simple as Minecraft Java or Bedrock Edition on PC. Adding to that, there is the dicey situation to sync Minecraft worlds on Android whenever you get a new phone or tablet. Addressing this concern of Minecraft players, we will detail a special Android app that has been spotted online recently. It helps you sync your favorite Minecraft worlds between different devices on Android. As for PC players, you can already use Mods in Minecraft or find simpler methods for this task. But even for Android, just using your Google Drive might cut the deal. So without any further ado, boot up your devices, and let’s sync Minecraft worlds on Android.
Sync Minecraft Worlds Across Android Devices (2021)
This syncing method will only work on the official Minecraft app (Paid, $7.49 and with in-app purchases) on Android. Beware of the fake Minecraft apps that you might come across on the Play Store. The app we are going to use for this simple tutorial is called Bedrock. It has a straightforward purpose of syncing your Minecraft worlds across different devices. With that said, let’s dive right in!
Step 1: Save Minecraft Worlds on Your Android Device
By default, Minecraft on Android saves your world in the cloud. So, before we start syncing existing worlds, we need to ensure that we have them saved on your device. So let’s check out the steps:
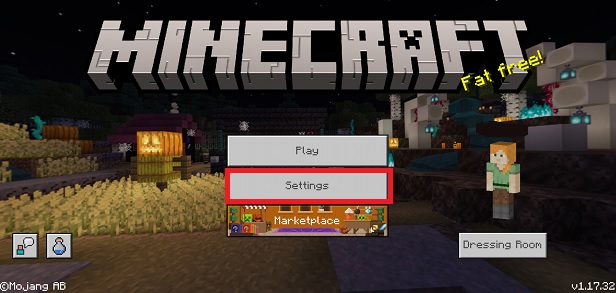
1. Open the Minecraft app and choose the “Settings” option from the home screen. It’s present below the “Play” button.

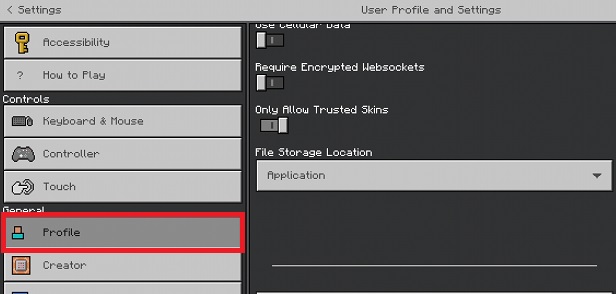
2. Here, on the left pane, you will see a “Profile” option under the General section. Tapping on it will open the profile settings on the right pane.

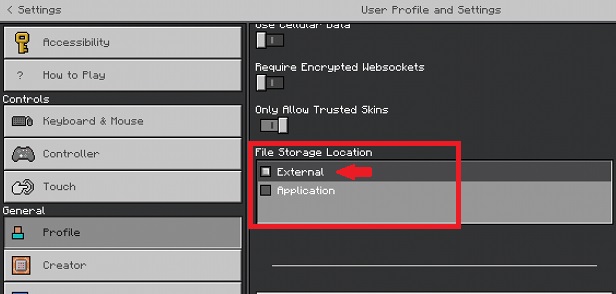
3. On the profile settings page, scroll down until you find the “File Storage Location” option. By default, you will see that the Application option is selected. Tap on it and choose the “External” option. Doing so will highlight it in the drop-down menu and ensure all your new and existing worlds are saved on your Android phone.
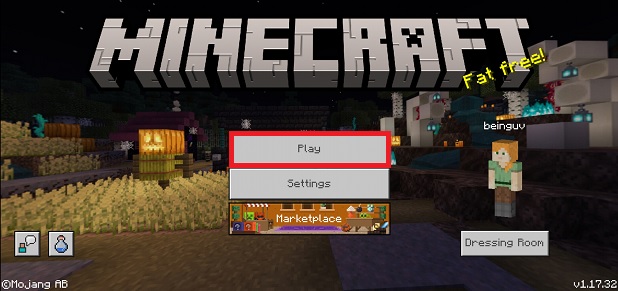
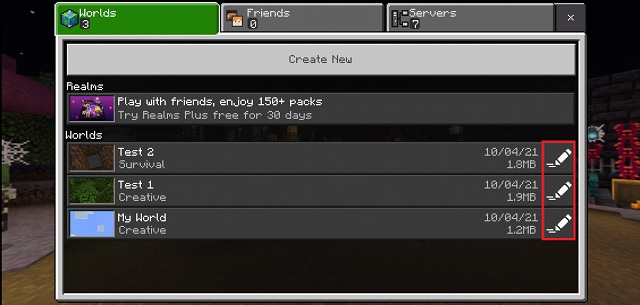
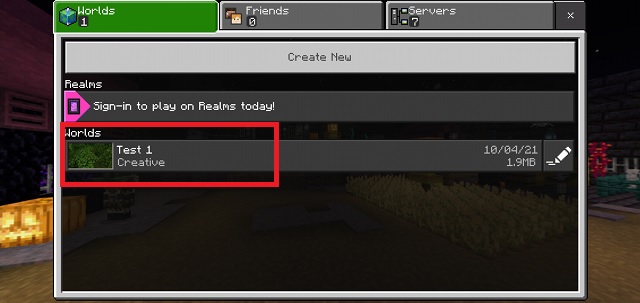
4. In case you have some worlds created and saved in the Application location, we need to move them to your device’s local storage. To do so, go and tap the “Play” option on the home screen.

5. Here, you will see your list of worlds that are still stored on the Minecraft app. Click on the edit (pencil) button on the right side of your world’s name.

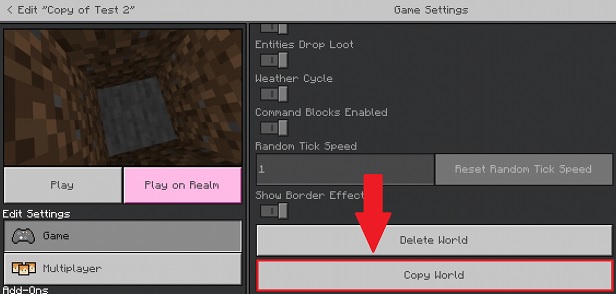
6. Next, in the menu that appears, look for the “Copy World” option on the right pane. You will find it under the “Delete World” option. Tap on it to create a copy of your world, which is a new copy that will be saved on your device. Now, this Minecraft World will be available to sync from one Android device to another.
Step 2: Download & Set up the Bedrock App
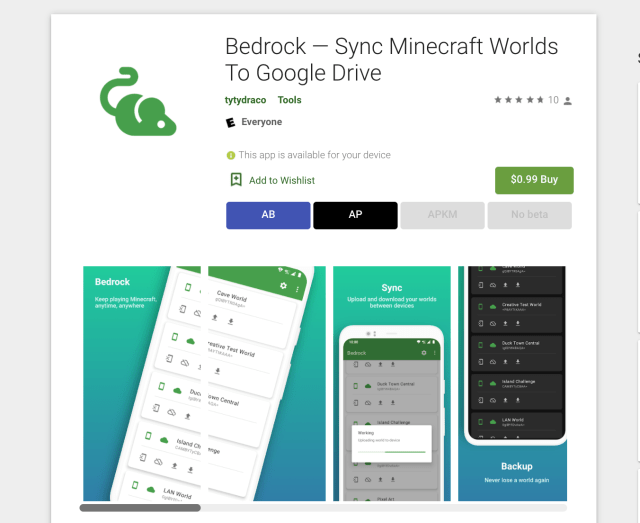
Released in 2021, Bedrock is a paid app that’s available on Android. This app lets you sync Minecraft worlds on your Android device using Google Drive. So let’s download it and get down to business.
1. Use the following link and download the Bedrock app from the Play Store. It costs $0.99 and is less than 3 MB in size. So, it shouldn’t take more than a couple of minutes to purchase and install the app.

2. Now, open the Bedrock app and it will ask you to connect your Google account. You can continue by tapping the “tick button” in the bottom right corner.

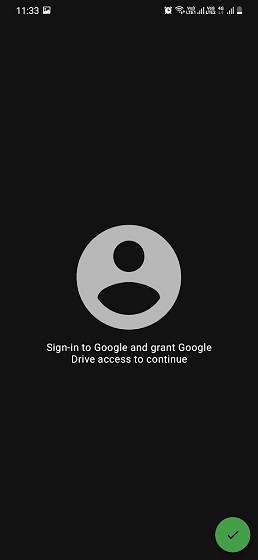
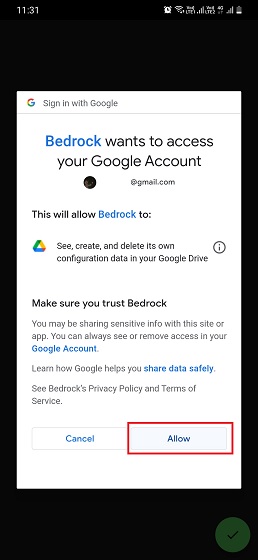
3. Then, you will have to give Bedrock access to read your data on Google Drive. You can remove the app access from your Google account later on. To give it access, tap the “Allow” button on the bottom right corner of the pop-up.
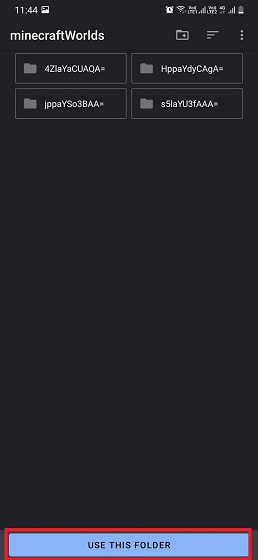
4. Now, the app will ask for permission to access a folder. It is where all your Minecraft worlds are saved. Just tap the “tick button” at the bottom right corner. Then, you will have to locate and select the folder where you have saved your Minecraft worlds on Android. Navigate to the folder location below to find your Minecraft worlds:
/sdcard/games/com.mojang/minecraftWorlds
5. Then, clicking on the “Use This Folder” button will select it, and you are now ready to sync Minecraft Worlds across Android devices.
Step 3: Upload Your Minecraft Worlds to Google Drive
Once you select the folder where your favorite worlds are located, the app will load all of your Minecraft worlds and offer you a plethora of options. Now, all we need to do is upload these Minecraft Worlds to Google Drive. To learn how that works, follow the steps below:
1. From the list of Minecraft worlds, choose the one you want to sync. Then, click on the upload button, indicated by an upwards arrow.
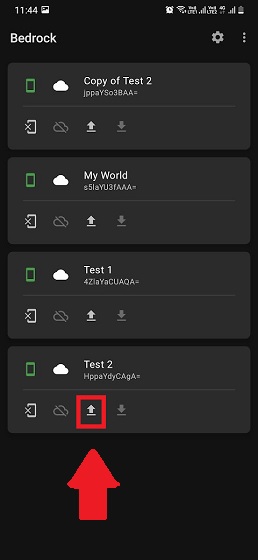
2. Now, all you need to do is wait for it to process and automatically upload your Minecraft world to your Google Drive cloud storage. After a successful upload, you will see an active download button next to the upload button. It’s denoted using a downwards-facing arrow.
Step 4: Sync Minecraft Worlds on Different Android Devices
Now, repeat the download & set up the Bedrock App process on your second Android device. Make sure you use the same Google account to log into the app for the syncing process to work flawlessly. Also, using the same Google account on different devices will mean that you won’t have to purchase the app multiple times. Then, open up the app and you can follow the steps below to sync your worlds on Android devices.
Note: Remember that the Minecraft app version should be the same on both Android devices.
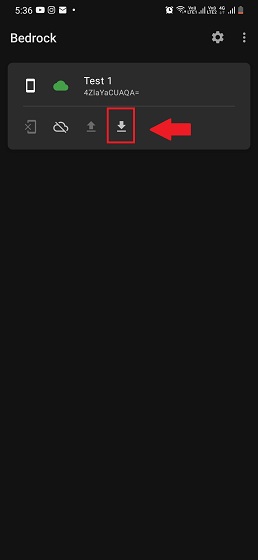
1. Assuming you have already selected the folder like before (shown in Step 3), the Bedrock app will sync with Google Drive to show all the available worlds uploaded to the cloud. The list can include worlds you already have on that device as well. But only the worlds on Google Drive will have an active download button.
2. Click on the Download button and wait for the Bedrock app to sync your Minecraft worlds on Android. The download button is the one indicated by a downwards arrow. The app will ask for confirmation in a pop-up window, where you need to select the “Yes” option.
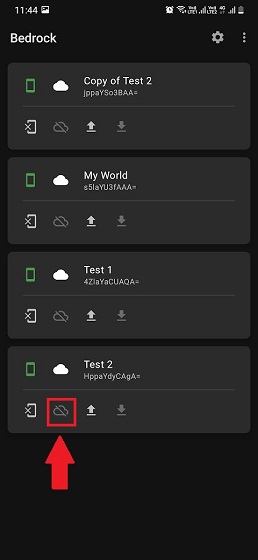
2. If you someday want to delete one of your synced worlds, you can do so in the game itself. And if you want to delete the synced world from Google Drive, you can tap the faded cloud icon next to the upload button. It will erase the Minecraft world from Google Drive.
3. Once you are satisfied with the syncing process, you can load up Minecraft and notice the said world is now available on your new device. Many players can also use this app to backup their Minecraft worlds.

Sync Minecraft Worlds on Android with This Handy App!
Now, all you need to do is download the Bedrock app and get to work. You can now sync your Minecraft worlds on Android easily, without having to lose any progress or start over again on a new device. This method works on any Android device that can run the game. Moreover, if you are just getting started with the game, learning to make a Crafting table will be a lifesaver. Bedrock app runs online, so make sure you prevent this Android app from using data in the background. And if you feel stuck at any step of the process, feel free to reach out with your query in the comments section below, and we will help you out. Now, enjoy the ease of syncing Minecraft worlds on Android right away!


