Microsoft has rolled out the Windows 11 preview build to the Insiders with a myriad of cool new features and upgrades over its predecessor. However, the OS retains some of its old quirks from Windows 10. One of those is automatic updates that irk power users to no end. What’s worse is that just like Windows 10, Microsoft doesn’t even provide a straightforward way to stop or turn off the automatic updates in Windows 11. So if you are looking to put an end to this nuisance, we will teach you how to prevent Windows 11 updates from downloading and installing automatically.
Stop Automatic Updates on Windows 11: A Detailed Guide (2021)
Microsoft may not offer a one-click solution to stop auto-updates in Windows 11, but you can disable automatic updates using a few nifty tricks. So today, we will tackle the auto-update issue in Windows 11 and check out all the ways you can stop automatic updates on Microsoft’s latest desktop OS.
Note: This article details the process of disabling auto-updates in Windows 11. If you are a Windows 10 user, check out our guide on how to stop automatic updates on Windows 10.
Method 1: Pause Auto-updates in Windows 11
One of the easiest ways to prevent automatic Windows updates is to use the “Pause updates” option. However, as you can tell from the name, this is not a permanent solution as it will only pause auto-updates for 7 days and not stop it altogether. Still, it can come in handy in certain situations, so here’s how to pause Windows 11 updates for a week:
- To pause Windows 11 automatic updates, go to “Settings -> Windows Update” and click on “Pause for 1 week“.

Your computer will no longer download updates automatically for the next seven days. You can, of course, manually update your PC any time during this period.
Method 2: Set Up Metered Connection
Another nifty trick to disable automatic Windows 11 updates is to designate your Wi-Fi or Ethernet connection as metered. Windows 11 does not automatically download updates over metered connections, meaning you can restrict automatic updates on your system this way. Here’s how you do it:
- Open Settings (use Windows key + I shortcut) and go to “Network and Internet” from the left sidebar. You will now see the network (Wi-Fi or Ethernet) your PC is connected to. Click on “Properties” for your current connection.

- On the next page, switch on the “Metered connection” toggle.

- By default, Windows does not auto-download updates over metered connections. To ensure that the setting hasn’t somehow changed on your device, go to “Settings -> Windows Update -> Advanced Options“. Here, make sure the “Download over metered connections” option is switched off.

You can set multiple connections in Windows 11 as metered, thereby making it possible to stop automatic updates for all practical purposes. Of course, you can manually download and install updates over metered connections any time you want.
Method 3: Disable Windows 11 Update Service
One way to stop Windows 11 automatic updates over any type of internet connection is by disabling the Windows Update service. To do that, follow the steps below:
- Open the “Run” dialog box (use Windows key + R shortcut), type
services.mscin the text field, and hit Enter.

- On the Services window, scroll down to the bottom and double-click on “Windows Update“. This will open the Windows Update properties window.

- On the properties window, open the “General” tab if you are not there already there. Now, select “Disabled” from the drop-down menu next to “Startup type” and click on “OK” or “Apply” to save the update settings.

That’s it. Your Windows 11 device will no longer update automatically. And if you ever want to re-enable automatic updates on your Windows 11 PC, retrace your path and select “Automatic” from the “Startup type” drop-down menu.
Method 4: Stop Windows 11 Automatic Updates Using Registry Editor
Note: Making changes to the Registry could mess up your Windows installation, so pay attention to what you’re doing. You should also enable and create a System Restore point before proceeding any further. The linked article uses Windows 10 for the demo, but the method remains the same on Windows 11.
To permanently stop automatic updates in Windows 11 using a registry hack, follow the steps below:
- First, open the Windows Registry Editor on your computer. To do that, search for “Regedit” (without quotes) in Windows Search and click on the first result.

- In the Registry Editor window, use the left sidebar to navigate to the following location:
HKEY_LOCAL_MACHINE\SOFTWARE\Policies\Microsoft\Windows. - Then, check if a key called WindowsUpdate already exists in the Windows folder. If yes, go to the next step. If not, create a new key here and name it “WindowsUpdate”. To create a key, right-click on the Windows folder and then select “New > Key“.

- If the WindowsUpdate key was already present, you might find a key called “AU” in that folder. If it’s not there, create a new key under WindowsUpdate and call it AU. In either case, create a new DWORD (32-bit value) under the AU key.
- To do that, right-click on AU on the left sidebar and select “New > DWORD (32-bit value)“. Name this entry “NoAutoUpdate” (without quotes).

- Finally, double-click on the newly-created DWORD and change its value from 0 to 1. Click OK to save the changes.

The change will come into effect once you restart your PC. Once you do that, automatic updates will be disabled on your Windows 11 computer for good.
Method 5: Disable Windows 11 Automatic Updates Using Group Policy
Note: Group Policy Editor is not officially available in Windows 11 Home. However, you can still enable Group Policy Editor on Windows 11 Home by following this guide. The method described in the linked article was originally devised for Windows 10, but it works perfectly well in Windows 11.
- First, open the Local Group Policy Editor on your computer. To do that, open the “Run” dialog box (Windows key + R shortcut). Now type in
gpedit.mscand hit Enter to open the Group Policy Editor.

- In the Group Policy Editor window, move to the following path using the left sidebar:
Computer Configuration > Administrative Templates > Windows Components > Windows Update > Manage end user experience. - Next, in the right pane, double-click on the entry that says “Configure Windows Updates“.

- On the automatic updates configuration page, select “Disabled” and click on “OK” or “Apply” to save your preference. That should now turn off automatic updates on your Windows 11 PC.

Note: When the status for this policy is set to “Disabled”, any available updates must be downloaded and installed manually.
Method 6: Use Windows Update Blocker Utility
Alongside the built-in tools, you can also use a third-party freeware called Windows Update Blocker to stop automatic Windows updates on Windows 11. Originally coded for Windows 10, the portable program works perfectly for Windows 11 as well. It offers a one-click solution to block Windows updates and is, by far, the most convenient option. Here’s how you can use the Windows Update Blocker utility to disable or turn off automatic updates on Windows 11:
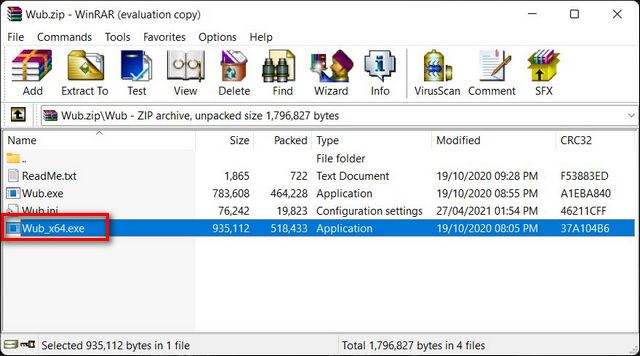
- Download and extract Windows Update Blocker (Free) on your Windows 11 PC. Then, double-click on the Wub.exe or Wub_x64.exe file on 64-bit systems to run it.
Note: You will need a file archiver tool like WinRAR, WinZip, or 7Zip to extract the WUB file. These are all free-to-use, and the last one is also an open-source program (FOSS).
- Once the app loads up, select the “Disable Updates” option, check “Protect Services Settings”, and click on “Apply Now” to save the new Windows update settings.

- The service status icon will then turn red to show that you have successfully blocked the Windows Update service.

You can re-enable automatic updates in Windows 11 by selecting “Enable Updates” and clicking on “Apply Now” in this third-party utility.
Disable Auto-Updates on Your Windows 11 Computer
Automatic updates are a massive pain for Windows users. That’s not only because the update consumes huge amounts of data on connections not meant for excessive data consumption, but also because it takes away choice from users. Hopefully, our detailed guide here helped you disable or stop automatic updates on your Windows 11 computer for good. Once you are done tackling auto-updates, check out some of our other Windows 11 tutorials. You can learn how to switch back to a Windows 10-style Start Menu design on your Win 11 installation and how to change the default browser in Windows 11.