
When the Oculus Quest 2 launched, it turned a lot of heads. Boasting an improved design and solid hardware, the Quest 2 has been loved by virtual reality users the world over. Many companies have realized the potential of VR, and Apple is also reportedly coming with an Apple VR headset very soon. However, because of limited availability around the world, the Oculus Quest 2 was initially only accessible to a few users. But with Facebook rebranding itself as Meta, things have started to change, and participation in the metaverse is growing at a breakneck pace. So, if you have recently bought an Oculus (or Meta) Quest 2, you must be equal parts excited and confused about setting it up and using it. Well, you are at the right place since this guide is made to serve just that purpose. Follow along as we teach you how to set up your new Oculus Quest 2 and explain the basic functionality.
How to Set up and Use Oculus (Meta) Quest 2 (2022)
This guide will cover all the essential aspects of setting up and using the Oculus Quest 2 from the beginning. However, if you are joining us after already having completed a step or two, use the table below to find your bearings.
Things You Should Do Before Setting up Oculus Quest 2
Since this is the first time you will be setting up the Oculus Quest 2, there are a few things you should have beforehand to make your experience flawless. Make sure you do the following before you proceed any further.
1. Download the Oculus App
As part of setting up the Oculus Quest 2, you will be required to pair it to your phone for the full process. This will be done through the official Oculus app. Before you get stuck midway with that, we recommend downloading, installing, and signing in to the Oculus app so the pairing process is easy for you. Don’t worry as the app is free to use and keep. You can use your Facebook account to sign into the app.
Get Oculus for Android (Free)
Get Oculus for iOS (Free, in-app Purchases)
2. Turn on Bluetooth on Your Phone
Connecting the Oculus Quest 2 to your mobile will also require a Bluetooth connection. Make sure to turn it on before you begin.
3. Fully Charge the Quest 2
The Quest 2 comes with around 40% battery charged out of the box. While that is enough for the initial set-up, your device might find itself running low on juice after downloading the software updates. Make sure to charge up your Oculus Quest 2 to 100% before you proceed.
4. Find a Comfortable Place to Sit in
The setup instructions will require you to be seated for a few safety videos and necessary steps. Before you begin, find a roomy and comfortable spot to sit in. Make sure both your hands have ample room to move around without bumping into anything.
Unboxing the Oculus Quest 2
Now that you’re aware of everything that you require, let’s get down to opening the Quest 2 itself. Make sure to place it on a wide desk so you have ample room for the box itself. Now let’s begin unboxing it. Follow the steps below to open up the box.
1. Pull the outer sleeve away from the box by simply sliding it off. If it doesn’t budge, you can push the box out of it by holding the sleeve itself.
2. Slowly lift up the cardboard lid and you will have your Oculus Quest 2 waiting for you inside along with other accessories.

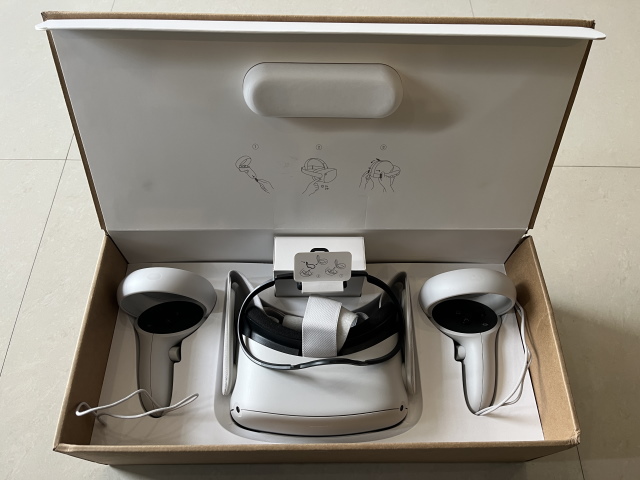
You should find the following items inside the box:
- Oculus Quest 2 headset
- Two Controllers with battery blocking tags
- A glass spacer
- A small box with charging equipment and manuals
- A silicone cover (newer models only)
If you find that you’re missing any of the important stuff, best to have this set returned and ask for a replacement.
Prepping the Hardware
If you haven’t already charged your Oculus Quest 2, now’s the time to do so. You’ll find the charging equipment in the small box in the middle. Make sure to give it some time before you unplug the headset. Next, we will need to power up the controllers to make them work. Since they already come installed with batteries, all you need to do is pull the black straps from the bottom to turn them on.
Now with everything ready, let’s start the show.
Setting It Up
Note: Since Facebook does not allow image or video capture during the set up process, you won’t find any images here. However, don’t worry as the text below will tell you everything you need to know.
Follow the steps below to continue setting up your Oculus Quest 2. Make sure to read these points before you proceed as you’re about to get lost in another reality very soon.
1. Put on your Quest 2 headset and grab the left and right controllers.
2. Press and hold the power button for two seconds until you see a white O logo. The button will be on the right side of the headset.
3. The next screen will ask you to connect your controllers. Simply squeeze the triggers of both controllers to do so. You will now see them inside the VR space. Go ahead and move them around to test out the tracking.
4. Select your desired language from the menu and press ‘Continue‘.
5. You will now be required to connect to a Wi-Fi network to continue the setting up process. Using the controllers, choose and connect to a Wi-Fi network. You will be able to enter the password using by pressing the trigger button on either controller.
6. Watch the safety video and acknowledge the safety notice by clicking the Acknowledge button using your controller.
7. Your headset will now restart and download and install updates. While that happens, you will need to pair the Oculus Quest 2 with the app you downloaded before.
8. To do that, simply open the Oculus app and it will detect and connect your headset automatically. If that doesn’t happen, simply enter the pairing code you see on the headset.
Creating a Guardian Boundary
Oculus Quest 2 manages to save you from running into objects by creating a virtual Guardian Boundary. If at any point you step out of this area, the headset’s camera kick in and the gameplay stops. We will now create a Guardian Boundary for the Oculus Quest 2 to continue setting it up. Simply follow the steps below.
1. The first step is confirming the floor level. If the virtual grid is not already on the floor, touch the controller on the ground to place it there. Once done, press Confirm.
2. The next step requires you to create a play area. Using your controller, draw a wide play area that is clear of any objects or obstructions. The Oculus Quest 2 recommends a play area of at least 6.5ft X 6.5ft (2M X 2M) for the best experience.
Note: Alternatively, you can switch to a Stationary Boundary which only requires you to sit in a chair. However, be aware that it will limit your movement.
3. Once you’ve drawn your area, make sure it’s free of any objects and press Confirm to proceed.

And you’re all done! Your Oculus Quest 2 has now been set up and is ready to go! Let’s move on to familiarizing ourselves with the main menu and how it looks.
Oculus Quest 2 : Welcome to VR
Welcome to your very own virtual space provided by the Oculus Quest 2. You must now find yourself in a cozy virtual home. While the view is certainly something to take in, let’s first check out the handy menu that is before you. Called the Universal Menu, this little bar is your one-stop shop to all the settings and exploration in the Quest 2. You can access the entire explore menu, play games, socialize with friends, and even make your way to the nitty-gritty using this Universal Menu. Let’s dive a bit deeper into it.


1. Quick Settings Menu
The Quick Settings true to its name provides access to the quick settings on the Oculus Quest 2. You connect to various Wi-Fi networks, redraw your play area, adjust the volume and brightness and even send bug reports. If a user wants to get to the main settings, there’s the option for that too.
2. Notifications
The notification menu houses all the notifications the Oculus Quest 2 receives. From in-app notifications to more specific ones from the device, it has it all. You can even check the progress of any ongoing downloads if you wish.
3. Social Profile
Pressing your little image on the Universal Menu opens up the social profile. While appearing little barebones, the social menu in Oculus Quest 2 has its fair share of options. You create an Oculus avatar with more personalization. The social menu also houses privacy and advertisement-related settings. Privacy Settings redirect to settings like your friends on Oculus, who can see your activity etc. AD Preferences on the other hand take you to the Facebook website where you can choose the type of ads you see on the headset.
4. Explore Menu
The Explore menu is a separate menu made to make you get more out of your Quest 2. Consider this menu an assortment of content that ranges from VR games and virtual environments to other immersive experiences like being in popular destinations and watching documentaries. You can even explore more content from the games you have already played. The menu also houses your friend’s activities so you’re always up to date with them. Like something in the menu but afraid it will go away? Simply save it and the Saved tab will store it for you.
5. The Store
The Oculus Store will be the destination for folks looking to purchase content for the Quest 2. With games divided into more than a dozen categories, there is something for everyone. You can choose to purchase games that range from simple gunplay to good old sword or lightsaber combat. The separate Featured and Top Charts tabs are always kept up to date and have some of the most amazing VR games we have played. Much like the saved menu above, you can Wishlist a game and it will be stored on a separate tab for you. Go ahead and open up the Oculus store for a nice selection.
6. Messenger
And obviously, since the Oculus Quest 2 is by Facebook/Meta, you can sign into Messenger and talk with your friends there. Simply click the button, enter the Oculus pin you set in the app and you’re there. You can even switch to Oculus chat to talk with any friends you must have made there.
7. Sharing Menu
The Sharing Menu is Quest 2’s platform to share the content that you experience out with other people. The Cast feature can be used to cast your screen to compatible TVs. You can even take screenshots and record videos to keep for later. While we didn’t find a lot of options to send these media across, you can use Messenger or FB groups to share them so that is still something.
8. Camera Roll
Only present when browsing through captured screenshots or videos, the Camera Roll menu is a media browser. You can switch back and forth through the media, forward it and even delete it if you wish.
9. Apps
Much like the app drawer in phones, the App menu contains all the apps you have purchased or downloaded on your Quest 2. You can quickly install any of the apps you see on the screen by squeezing the trigger. The Apps menu also contains the Oculus browser that works amazingly well. Users too lazy to click a lot of buttons can even make their way to the Explore tab from here if they wish.
How to Adjust the Oculus Quest 2 Headset
Now is the time to check the clarity of the headset to ensure you see the screen clearly. Getting that tailored fit will also be important in ensuring your Quest 2 experience is amazing. Follow the steps below to adjust the headset perfectly.
1. Grab the two side sliders placed on the Quest 2’s strap. These sliders are responsible for the overall tightness of the Quest 2. Simply pull them away from each other to tighten and towards to loosen the fit. Make sure you reach that perfect fit before you continue.
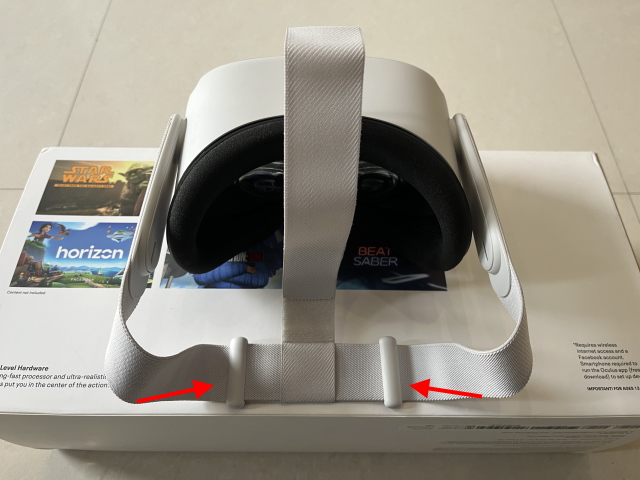
2. Once done, grab the top velcro strap to adjust the top headset pressure and view. To adjust, simply open the velcro strap from the bottom and then pull it up to tighten or down to loosen the fit. Do make sure the fit is not too tight to avoid a headache.

3. Lastly, adjust your Interpupilary distance (IPD distance) by moving the lenses away or near each other using your thumbs. You can choose from three different pre-sets that will be marked with numbers. The Oculus Quest 2 provides three different settings for IPD adjustments which are 58, 63, and 68mm. Adjust the IPD distance if the view inside appears blurry. If it’s perfect on the first try, leave it be.

Tips on Using the Oculus Quest 2
Now that we have finished setting up our Oculus Quest 2, let’s go over some helpful tips you should keep in mind while using it. Make sure to commit these to memory to make your VR experience all the better.
1. Charge Your Headset Regularly
The Oculus Quest 2 has a battery life that will last you around three hours. However, in the words of gamers, these are rookie numbers. Make sure to charge your Oculus Quest 2 regularly and preferably an hour before playing. This will make sure your VR headset is never out of juice and you won’t be pulled out of the experience. And yes, you can use your Oculus Quest 2 while it’s charging.
2. Keep a Cap on Your Playtime
While we realize it’s easy to get sucked in that amazing headset, do keep in mind your usage. Since your eyes will be staring at screens placed mere centimeters away, the strain on them will be higher than ever. Try to keep your Oculus Quest 2 usage to an hour at the max when playing. This short-term habit will save your eyes discomfort and blurry vision in the long term.
3. Remember the Glass Spacer
If you’re someone who wears prescription glasses, then d0 remember to attach the glass spacer before you put on the headset. Not doing that may lead to Quest 2’s lenses to become scratched by coming in contact with your glasses. You can easily put on the spacer by removing the foam cover and locking the spacer in place. Once done, simply replace the foam cover back and you’re good to go.
4. Set a Proper Guardian Boundary
Much like your IPD, the Guardian Boundary is also something that can be changed regularly. While the Oculus Quest 2 will remember the last one you set, the places where you play might change from time to time. For those times and more, remember to change your Guardian Boundary accordingly. And if you don’t have a roomy place to play in, simply sit in a chair and switch to a stationary boundary. You can change your boundary in a jiffy from the Quick Settings.
5. Mind the Volume Level
Hammering the health and safety point home one last time, the level of volume you keep is equally important. The Quest 2 uses positional audio and it can get quite loud when amped up. Be sure to keep the headset’s volume at a reasonable level for an experience that will be fun and won’t deafen you at the same time.
Easily Set Up and Use the Oculus Quest 2
We hope you encountered no problems while setting up your Oculus Quest 2. Once you’re ready to explore your headset, give these Best Virtual Reality apps a try to jumpstart your journey. Which games and apps do you have in mind for your Oculus Quest 2? Tell us about your list in the comments below.


