For mature parenting, enhanced parental controls with smart activity tracking are inevitable. With whom your child interacts, what sort of content they watch and listen to, and to whom they contact when faced with personal issues play a vital role in shaping the little world of your kid. Unless you know what the child is fond of and how they spend their time while being away from your eyes, you will never know which way they are going. When it comes to mastering the art of parenting, striking a fine balance is key. This is where a robust parental control tool like Screen Time can make your task quite simple thanks to intuitive insights and better command. So, if you are ready to unlock the full potential of this parenting tool, let me show you how to set up parental controls on your iPhone and iPad.
Set Up Parental Controls on iPhone and iPad (2022)
Fortunately for parents, Apple provides a plethora of parental control features on iPhone and iPad. However, that also means that this thorough guide is pretty long. If you’re just looking for help on a particular aspect of parental control, we’d recommend you use the table of contents below to skip ahead to the relevant section.
What Makes Screen Time Stand Out As a Parental Control Tool?
Probably the best part about Apple Screen Time is the deep integration with iDevices such as iPhone, iPad, and Mac. With the seamless iCloud syncing, it lets you keep a track of the activity of your child from any linked device. What’s more, you can set up downtime to allow only selected apps during a specific time and set daily time limits for different app categories to ward off overkilling and also get rid of smartphone addiction.
If you want to further enhance parental controls, you can set up communication limits to stop your child from communicating with unknown people and also put a blanket ban on obscene images through the kid’s Messages safety feature. Couple these efficient features with the ability to block explicit movies, TV shows, music, podcasts, books, and even disable bad language for Siri, and Screen Time seems to have checked off all the essential boxes.
Create a Child Account for Enhanced Parental Control on iOS/iPadOS
To get started, create a child account so that you can manage Screen Time for your child with the desired flexibility.
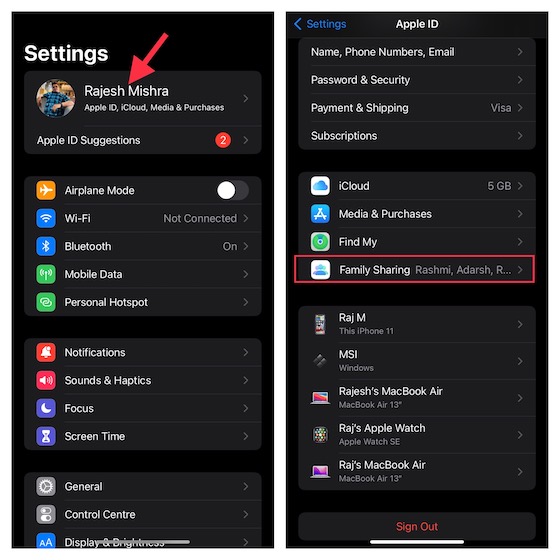
1. Open Settings app on your device -> Apple ID banner (aka your profile) -> Family Sharing.
2. Now, tap Screen Time and then tap Create a Child Account. After that, follow the instructions to create an account for your child.

Set Up Screen Time for Kids on iPhone and iPad
Screen Time for a child’s iPhone allows you to set up additional parental controls. So, be sure to set up and customize Screen Time for your kid.
1. On your child’s iOS/iPadOS device, navigate to the Settings app -> Screen Time > Turn on Screen Time.

2. Now, tap Continue and then choose “This is My Child’s iPhone/iPad.

3. On the downtime screen, you can set a schedule for time away from the screen. Based on your needs, you can allow access to essential apps along with calls and messages on your iPhone. Note that your child will require your permission to have more screen time. Customize the start and end time and then hit Set Downtime.

4. Next up, set daily time limits for app categories such as games, social, entertainment, creativity, and more. After a time limit has been reached, it will require your permission to allow more time. Tap Show All Categories to reveal all the categories and then choose the desired categories. After that, tap Time Amount and set the time limit. Then, tap Set App Limit.

5. Now, customize content and privacy settings as per your liking. For example, you can block shady websites, restrict explicit content in App Store, iTunes, and Apple Music. Even better, Screen Time also allows you to make it mandatory to require your permission to make changes to the privacy settings. Hit Continue to proceed.

6. Up next, create a Screen Time passcode which is required to allow for more time, and also make changes to the Screen Time settings. Enter a Screen Time passcode and Apple ID password so that you will be able to reset/recover your Screen Time passcode. Then, hit OK to finish.

That’s pretty much done! You have set up and customized Screen Time for your child. Depending on your needs, you can make the necessary changes by going to the Settings app -> Screen Time.
Customize Downtime on iPhone and iPad
Screen Time features a dedicated section for Downtime which lets you allow only the selected apps and phone calls to be available on the device during a specific time. A downtime reminder shows up five minutes before the downtime comes into effect. Do note that it will apply to all the devices signed in to iCloud with Share Across Devices enabled.
1. Open the Settings app on your iPhone -> Screen Time -> Downtime.
2. Now, turn on the toggle next to Schedule. After that, customize the days and time duration for downtime. Besides, you also have the option to block the device at downtime.

Set Up and Customize App Limits on iOS and iPadOS
For enhanced flexibility, Screen Time allows you to separately set up and customize daily time limits for app categories on your iPhone and iPad. Bear in mind that app limits will apply to all your devices synced with the same iCloud account with Share Across Devices enabled. An alert will show up on the screen five minutes before the limit is reached.
1. Open the Settings app -> Screen Time -> App Limits and then tap Add Limit.

2. When you select an category, you will get access to all the apps belonging to that specific category. Then, choose all the apps that you want to limit. Notably, it lets you limit website usage as well. To do so, tap Websites -> Add Website and then enter the URL of the site for which you want to limit usage. Then, tap Next.

3. Next up, set the time duration. You can tap Customize Days and then tweak the time duration based on days. After that, block the app when the limit expires.

Manage Apps Available During Downtime on iPhone
To ensure you are able to restrict contacts (limits apply to Phone, FaceTime, Messages, and iCloud Contacts) and manage apps available during downtime with ease, Screen Time has a separate section named Always Allowed. So, if you ever want to disallow any app or limit who can contact your child during downtime, you can make the needed changes without any hassle.
1. Launch Settings app on your device -> Screen Time -> Always Allowed.

2. Now, tap Contacts and then either allow everyone to communicate with your child or let only specific contacts communicate.

3. To allow any app to be available during downtime, tap the “+” button to the left of it. If you want to disallow an app, tap the “-” button to the left of a specific app and hit Remove.

Block Websites in Safari and Chrome on iPhone and iPad
If you no longer want your child to visit certain websites or just wish to put all the malicious websites on a black list to ensure your kid do not visit them, Screen Time can live up to your task. The restriction will apply to not only the stock browser “Safari” but also third-party browsers such as Chrome and Firefox.
1. Head into the Settings app on your iPhone/iPad -> Screen Time -> Content & Privacy Restrictions. Turn on the switch next to Content & Privacy Restrictions and tap Content Restrictions. After that, enter your Screen Time passcode.

2. Now, tap Web Content and select Limit Adult Websites. Under the Never Allow section, tap Add Website. Then, enter the address of the website that you want to block and hit Done.

We have created a detailed guide about how to block websites in Safari on iPhone, iPad, and Mac. So, do not forget to check out the guide, if you need more help.
Disable Explicit Language for Siri on iPhone and iPad
Interestingly, you can also restrict Siri from using band language while communicating with your child.
1. Go to the Settings app -> Screen Time -> Content & Privacy Restrictions. Enable the toggle for Content & Privacy Restrictions and tap Content Restrictions. Then, enter your Screen Time passcode.
2. Under the Siri section, tap Explicit Language and choose Don’t Allow.

Set Up Communication Limits to Prevent Your Child from Communicating with Strangers
To prevent your child from communicating with unknown people, you should set communication limits on your iPhone. This restriction will apply to Phone, FaceTime, Messages, and iCloud Contacts.
1. Launch Settings app on your iOS device -> Screen Time. Under the Family section, tap your child’s name and choose Communication Limits.

2. Now, tap During Screen Time and enter your Screen Time passcode.

3. Up next, you have three options to choose from:
- Contacts Only: Choose it to allow one-to-one and group communication with people in your contacts.
- Contacts & Groups with at least one contact: Select to allow one-to-one conversations only with people who are in your contacts and group conversations, including at least one person in your contacts.
- Everyone: It lets you allow communication with everyone, including unknown numbers.
To prevent your child from communicating with unknown numbers, choose Contacts Only or Contacts & Groups with at least one contact. Once you have selected the desired option, tap the back button at the top left corner of the screen.

Note:
- It’s worth pointing out that changes to communication limits don’t apply to child’s device until their software is compatible.
- The communication limits also require iCloud Contacts to be enabled on the device (Settings app -> profile -> iCloud -> Contacts).
4. Tap During Downtime and then enter your Screen Time passcode. After that, you can allow communication with only specific contacts or contacts & groups with at least one contact. Then, tap the back button.

5. In the end, you can allow/disallow contact editing and manage your child’s contacts remotely.

Enable Communication Safety Feature for Messages App
If you want to protect your child from being exposed to explicit/nude photos, you should enable the Communication Safety feature for the Messages app. When this feature is enabled, the messaging app keeps a track of the images that are sent/received. And if the app ever detects that the child receives or is attempting to send obscene photos, it automatically blurs the images to safeguard your child.
Additionally, the kid’s communication safety feature provides the needed guidance and age-appropriate resources to help your child make a safer choice. Moreover, it also enables them to contact a person they trust for advice.
In the wake of privacy concerns related to the communication safety feature, Apple has stressed that it doesn’t have access to any of the photos in the Messages app. Furthermore, the tech giant has also stated that the entire photo scanning is done on-device to verify if a photo has nudity. To ensure the privacy of your child doesn’t get compromised, the messaging app retains end-to-end encryption.
Note:
- Apple’s all-new Communication Safety feature requires iOS 15.2/iPadOS 15.2 or later and is currently available only in the U.S. The Cupertino giant is likely to expand it to other regions over time.
1. Head into the Settings app -> Screen Time. Under the Family section, tap your child’s name.

2. Now, tap Communication Safety and then turn on the toggle next to Check for Sensitive Photos.
Hide Built-In Apps on Your iPhone and iPad Using Screen Time
Screen Time offers a straightforward way to hide some built-in apps like camera and App Store on your iPhone. Better still, you can also use this feature to coneal certain features like AirDrop, Siri & Dictation, and CarPlay.
1. Open the Settings app on your iOS device -> Screen Time. Now, scroll down to the bottom and tap Content & Privacy Restrictions. Make sure that the toggle next to Content & Privacy Restrictions is turned on.

2. Tap Allowed Apps. Now, you should see a list of built-in apps including Podcasts, Wallet, News, Camera, Safari, Mail, FaceTime, Health, Fitness, and iTunes Store.
Besides, the list also includes Siri & Dictation, AirDrop, SharePlay, and CarPlay. Turn off the toggles next to the apps and features you want to hide and then close out of the setting.

Hide Apps Based on Ratings on iPhone and iPad
If you looking for a better way to hide apps on your iPhone, make the most of the rating-based method to keep certain apps under wraps.
1. Launch the Settings app on your iOS device -> Screen Time -> Content & Privacy Restrictions. Now turn on the toggle for Content & Privacy Restrictions. After that, tap Content Restrictions.
2. Next, tap the “Apps” option and then select the rating for which you want to hide apps on your iOS device. If you want to hide all the apps except a few essential apps, choose Don’t Allow.

Restrict iTunes & App Store Purchases on iPhone and iPad
To stop your kid from installing, deleting and making in-app purchases without your permission, you can restrict iTunes and App Store purchases.
1. Head over to Settings app -> Screen Time -> Content & Privacy Restrictions and turn on the toggle. Then, tap iTunes & App Store Purchases.

2. Under the Store Purchases & Redownloads section, you have three options:
- Installing Apps: Tap it and then choose to disallow installing apps on your iPhone.
- Deleting Apps: Tap it and then select Don’t Allow to prevent your child from deleting apps on your iOS device.
- In-app Purchases: Tap it and then choose Don’t Allow to prevent your child from making in-app purchases on your iPhone.

3. Under the Required Password section, choose Always Require to make it mandatory to enter the password for additional purchases.

Restrict Movies, TV Shows, Podcasts, Books, and App Clips on iOS
To keep obscene movies, TV shows, books, podcasts, and app clips away, you can restrict store content and allow only ‘Clean’ content on your child’s iPhone/iPad.
1. Navigate to the Settings app -> Screen Time -> Content & Privacy Restrictions -> turn on the toggle for Content & Privacy Restrictions and then tap Content Restrictions.
2. Under the Allowed Store Content section, you should see several options including Music, Podcasts, TV Shows, Books, App Clips, and more. Now, head into each category and then customize the setting as per your need.

Restrict Game Center on Your iPhone and iPad
Screen Time lets you restrict Game Center so that you can stop your kid from taking part in multiplayer games, adding friends or even indulging in private messaging.
1. Head over to the Settings app -> Screen Time -> Content & Privacy Restrictions -> turn on the toggle for Content & Privacy Restrictions and then tap Content Restrictions.
2. Scroll down to the Game Center section and then customize the setting to your heart’s liking.

Customize Privacy Settings
Whether you are a privacy-centric person or want to boost the privacy of your kid, you would appreciate having the flexibility to customize privacy settings right from one spot.
1. Launch Settings app -> Screen Time -> Content & Privacy Restrictions.
2. Now, scroll down to the Privacy section and then tap the specific categories like Location Services, Contacts, Calendars, Photos, Share My Location, Bluetooth Sharing, etc. Then, make the necessary changes.

Disallow Passcode and Account Changes on iPhone and iPad
No longer want your child to change passcode/account or tweak the background app activities without your permission? Don’t worry, Screen Time has got you covered.
1. Open the Settings app -> Screen Time -> Content & Privacy Restrictions.
2. Now, scroll down to the Allow Changes section. After that, go to the specific section like Passcode Changes, Account Changes, Mobile Data Changes, Driving Focus, etc, and then disallow changes.

Use Parental Controls on iPhone and iPad
There you have it! So, that’s how you can take advantage of Screen Time to set up and use parental control on your iOS or iPadOS device. Slowly but steadily, Apple has built a power parental control tool. Hence, you no longer need to rely on third-party parental control apps to keep an eye on your kid and also restrict his/her device usage. That said, what do you have to say about Screen Time and recent improvements it has got. As always, we would appreciate your valuable thoughts in the comments section below.