One of the key things to keep in mind when purchasing a new PC or laptop is to check it’s upgradability options. Does your computer have additional RAM slots, PCIe SSD slots, or an HDD bay? Having the option to add extra memory down the road will help you futureproof the computer and enhance the performance based on your workload. While checking the number of RAM slots through the traditional method involves opening up the system, there are software-based ways to do this as well. In this article, we have detailed six ways to check available RAM slots in Windows 11.
Check Available RAM Slots in Windows 11 (2022)
In this article, we have included 6 different methods to check available RAM slots in Windows 11. You can check the memory slots through built-in tools like the Task Manager, Command Prompt, third-party software, and by physically disassembling the PC. You can expand the table below and read about the method you wish to try out.
Use Windows 11 Task Manager to Find Available RAM Slots
1. Use the Windows 11 keyboard shortcut “Ctrl+Shift+Esc” to open the Task Manager. Then, switch to the “Performance” tab from the left sidebar.

2. You will now see the used RAM slots in the “Slots used” section. For example, this Windows 11 laptop that I’m using has a total of two RAM slots, of which one is currently in use.

Check RAM Slots in Windows 11 with Command Prompt
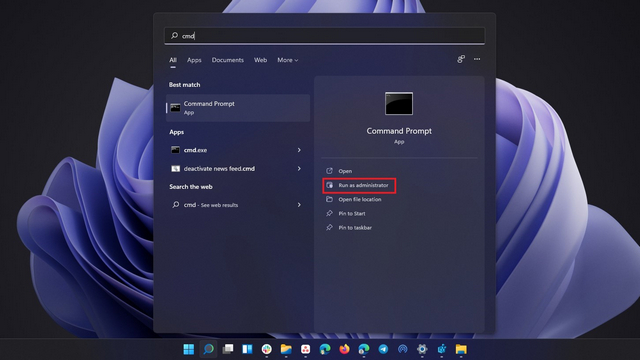
1. First, press the Windows key and type “Command Prompt” in the Windows Search bar. Then, choose “Run as administrator” to open a Command Prompt window with elevated admin privileges.
2. To check the total number of RAM slots through Command Prompt, run the following command:
wmic Memphysical get MemoryDevices

3. As you can see, my Windows 11 laptop has two memory slots. To view the current RAM slot that’s in use, use the command below:
wmic MemoryChip get BankLabel, DeviceLocator, Capacity

Find Windows 11 PC RAM Slots with PowerShell
1. You can also find available RAM slots using PowerShell. To get started, run the command below in an elevated PowerShell window (i.e. open Powershell with admin permission):
Get-WmiObject -Class "Win32_PhysicalMemoryArray"

2. You can find the active RAM slot on your PC using the command below:
Get-WmiObject -Class "Win32_PhysicalMemory" | Format-Table BankLabel

Find Available RAM Slots in Windows 11 with CPU-Z
Apart from monitoring the CPU temperature, CPU-Z is a third-party program that lets you view the available RAM slots as well as the RAM type in Windows 11. It’s an excellent free program for finding all kinds of hardware information about your PC. Here is how to use it.
1. Go ahead and download CPU-Z from the link here. Download the latest Classic version.
2. Next, install the program and open it. Move to the “Memory” tab to find information about your installed RAM, including the memory type and size.

3. To find the available RAM slots, move to the “SPD” tab at the top. Here, under the “Memory slot selection” option, click on the drop-down menu. Depending on the available RAM slots, it will show the entries in the drop-down menu. For example — I have 4 memory slots, of which only one is being used right now.

Find Information About Installed RAM on Windows 11
While the above methods let you check the available memory slots, you can take advantage of the System Information utility available in Windows 11 if you want to find information about the installed RAM. Here are the steps you need to follow.
1. Press the Windows key and type “system information” in the search bar. Now, open “System Information“.

2. In the System Information window, click on”System Summary” in the left sidebar. Scroll down in the right pane, and you will find the total installed physical memory (RAM), along with how much is usable and how much virtual memory is available. This is how you can find complete information about your installed memory.

Physically Check RAM Slots on Your Windows 11 PC
If you want to verify the available RAM slots on your Windows 11 PC, you need to open up your case and check the memory slots physically. As shown in Figure (1) below, you will find the DIMM slots, where RAM is installed, on the motherboard. Check how many such slots are available on the motherboard in your PC. Generally, most motherboards come with two RAM slots, but advanced and expensive boards can offer up to 4-8 RAM slots as well.

On laptops, there are small strips for plugging the RAM, as shown in Figure (2) below. So this is how you can physically check available RAM slots on your laptop or PC.

Check and Upgrade RAM on Your Windows 11 PC
So, those are the steps involved to check the available RAM slots on Windows 11. If you are facing any RAM-related issues on your PC, feel free to take a look at our article detailing how to fix memory issues on Windows 11. We also have a separate guide focusing on tips to speed up Windows 11 and enhance system performance.