Losing all of your important data is no less than a nightmare, so you should know how to back up your iPhone and stay free from any future headaches. It will give you peace of mind that no matter whether your iPhone is lost, stolen, gets damaged, or you have to perform a factory reset, you can always restore your iPhone data. Also, if you’re upgrading your iPhone, a backup lets you transfer data from your old iPhone to the new iPhone. In this article, we’ve explained various methods to backup an iPhone. You can choose the best iPhone backup option or even use multiple options to backup personal data on your iPhone. Without any ado, let’s get started.
Note: To back up your iPhone, make sure you‘re connected to a stable Wi-Fi network.
1. Backup iPhone to iCloud
The first way is to back up your iPhone data to iCloud. It’s a reliable online cloud service by Apple that lets you back up the most important data on your iPhone, including photos, videos, files, text messages, app data, files, and settings. You can backup your iPhone to iCloud automatically or manually. This iCloud backup can also be used to recover deleted messages on iPhone. It’s worth knowing that iCloud offers a total of 2TB of storage per Apple ID, out of which the first 5GB is free. You can buy additional iCloud storage or subscribe to Apple One. Here are the steps to backup iPhone to iCloud:
1. Connect your iPhone to a stable Wi-Fi network.
2. Open Settings > [Your Name] and tap iCloud.
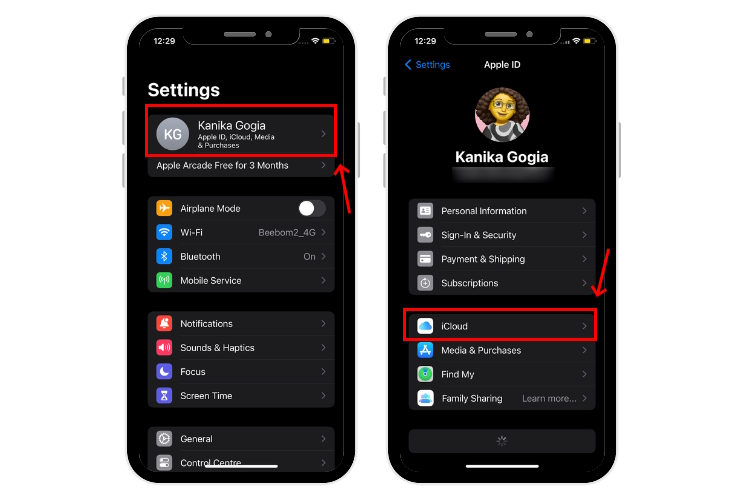
3. Tap iCloud Backup > Back Up This iPhone. Your iPhone will be automatically backed up with iCloud backup when it’s plugged into a power source with Wi-Fi connected and screen locked.
4. To manually backup your iPhone to iCloud, tap on Back Up Now. Make sure you’re connected to the Wi-Fi until the process is completed. You’ll see the date & time of your last backup.

5. If you see an alert saying there is not enough iCloud storage available, you’ll have to upgrade your iCloud storage. For this, head to iCloud > Manage Account Storage > Change Storage Plan > Upgrade to iCloud+.

To view your iCloud backups, head to Settings > [Your Name] > iCloud > Manage Account Storage > Backups. You’ll see a list of backups along with the device name. If you want to back up WhatsApp on your iPhone or any other specific app and skip the rest, you can tap the backup name, keep the slider ON for WhatsApp (or any other app), and toggle off the rest. If you wish to delete your iPhone backup, tap the device name and choose Turn Off and Delete from iCloud.

2. Backup iPhone to Mac
If you don’t have enough iCloud storage space, you can back up your iPhone to Mac using Finder. This iPhone backup method is free of cost and there’s no restriction on the storage space, as long as your storage drive on your Mac can handle it. Unarguably, it’s a super-easy and secure way to create a complete backup of your iPhone.
1. Connect your iPhone to your Mac with a compatible cable.
2. Open Finder on your Mac and select your iPhone from the sidebar. If your Mac is running macOS Mojave 10.14 or earlier, open iTunes.
3. Click General from the top of the window and select “Back up all of the data on your iPhone to this Mac.”

4. To encrypt and password protect your iPhone backup, select “Encrypt local backup”.
5. Finally, click Back Up Now to backup your iPhone to Mac. To view the list of backups, click Manage Backups. If you wish to delete an older iPhone backup, click on the backup name and choose Delete Backup.
3. Backup iPhone to Computer or Windows Laptop
Just like the Finder app helps you back up iOS devices on Mac, the iTunes app lets you backup iPhone to Windows PC. So, if you’ve got a Windows computer or laptop with a large hard drive, you should use that mighty space to back up your iPhone with iTunes.
1. Connect your iPhone to the computer with the original or verified charging cable.
2. Download and open the latest version of the iTunes app. If you’re connecting your iPhone to your laptop for the first time, you’ll be asked to Trust This Computer or enter your iPhone’s passcode. Click the iPhone icon.

3. Choose Summary from the left sidebar and click Back Up Now. If you want to encrypt your backups, check the “Encrypt local backup” option. Then, type a password and click Set Password.

To view your iPhone backups on computer, click Edit > Preferences > Devices. You’ll see a list of backups, with the encrypted ones having a lock icon.
4. Backup iPhone to Google Drive
If you’ve run out of iCloud storage or don’t have a computer, you can also back up your iPhone using third-party cloud services. The most popular ones include Google Drive, Microsoft OneDrive, Dropbox. One of the main advantages of using a cloud storage for iPhone backup is that you can upload your photos and videos, and access them any time using an internet connection, even if you’re not using your own device.
We’ll show you how to backup your iPhone with Google Drive. In addition to photos & videos, it lets you backup contacts on iPhone and save your Calendar events as well. Google Drive lets you back up and restore data right on your iPhone. Here are the steps to back up iPhone contacts, calendar, and photos to Google Drive:
Note: Before you proceed, you should have a Google account and a stable internet connection.
1. Download and open the Google Drive app (Free) on your iPhone and tap Sign In.
2. Once you’ve signed in, tap the three horizontal lines from the top-left corner and tap Settings.

3. Tap Backup and choose the START BACKUP option (present on bottom-right) to back up your iPhone.
4. Google Drive will request you to access your contacts, calendar, and photos. Choose Allow to grant the necessary permissions and you’ll see a screen saying Backup in progress. Make sure to keep the Google Drive app open with the screen turned ON to complete your iPhone backup.

5. Back up iPhone Photos to Google Photos
You can backup iPhone photos using Google Photos. Compared to iCloud, Google Photos offers a total storage space of up to 15GB, which is the combined storage shared by other services in the Google One subscription. When you back up your photos & videos to Google Photos, they will remain in Google Photos even if you delete them from your iPhone. It’s one of the easiest and most convenient ways to recover deleted photos on an iPhone.
1. Go to the App Store and download the Google Photos app (Free) on your iPhone.
2. Then, open the app and sign in to your Gmail account.
3. From the top-right corner, choose your profile photo or initials. Tap Google Photos Settings > Backup and turn the slider ON for Backup.

4. You can also choose the Upload size. If you wish to backup iPhone photos without any change in quality, tap Original Quality. If you want to backup more photos and are okay if the quality is reduced slightly, choose Storage Server.
5. Your iPhone photos and videos will be backed up automatically, as long as your device is connected to a Wi-Fi network. You can also choose to backup your iPhone using Mobile Data. Just toggle the options under When to back up section.
6. To see the status of your iPhone backup, tap your Profile and you’ll see the status under the Backup option.