
User Account Control (UAC) in Windows is meant to be a safety net to prevent apps from making unwanted changes in the system. While it can be helpful for novice users, it can also be a massive annoyance for advanced users, which is why many seek to disable it on their computers. So if you find the popups bothersome and want to turn off User Account Control (UAC) warnings on your Windows 10 computer, read on. Because here, we will show you how to change, disable, or enable User Account Control (UAC) messages in Windows 10.
Enable or Disable User Account Control in Windows 10
In this guide, we will describe four different ways in which to change or disable User Account Control on your Windows 10 computer, including from the Control Panel, the Registry Editor, the Local Group Policy Editor and the command line (Command Prompt). We will also tell you about what is UAC and the arguments for and against disabling it on your PC. So without further ado, let’s check out how you can change or turn off User Account Control (UAC) prompts on your Windows 10 PC.
What is User Account Control (UAC) in Windows?
User Account Control is a component of the Windows security system. It is meant to stop potential malware attacks by preventing apps from making unwanted changes on the computer. When a software tries to make changes to the file system or the Windows Registry, Windows 10 shows an UAC confirmation dialog. The user then needs to manually confirm that they are intentionally making that change.
The feature provides a special security environment with limited access rights for your user account, but any particular process (like an app installation or settings changes) can be elevated to full access on a case-by-case basis. User Account Control is enabled by default, but users can disable it with a few simple clicks.
Why Should User Account Control (UAC) be Disabled?
While UAC provides an additional layer of security for novice users, the constant nagging and the warning prompts at the most ill-opportune moments can often hamper workflow for advanced users. Even then, for most users, the default settings are best left untouched. However, many folks just find it easier to turn off the popup messages on their computer to be able to work normally. So if you’re one of them, here’s how you can turn off User Account Control (UAC) and get rid of its annoying warnings on Windows 10.
Method 1: Via Control panel
- Open Control Panel (Search for ‘Control’ in the Windows Search Bar). On the top-right corner, change the View to ‘Small Icons’ and click on ‘Security and Maintenance’.


- On the next page, click on ‘Change User Account Control settings’.

Note: You can also get here directly by searching for “uac” (without quotes) in the Windows Search Bar.
- On the UAC settings page, move the slider to the bottom (Never Notify). Click on ‘OK’ and confirm when asked.


This is the easiest way to change the User Account Control (UAC) settings on your Windows 10 computer.
Method 2: Via Registry Editor (Regedit)
You can also easily enable or disable (turn on or turn off) User Account Control using the Windows Registry Editor (Regedit). Here’s how you do it:
- Open the Windows Registry Editor. For that, search for “regedit” in the Windows Search Bar and click on the first result.


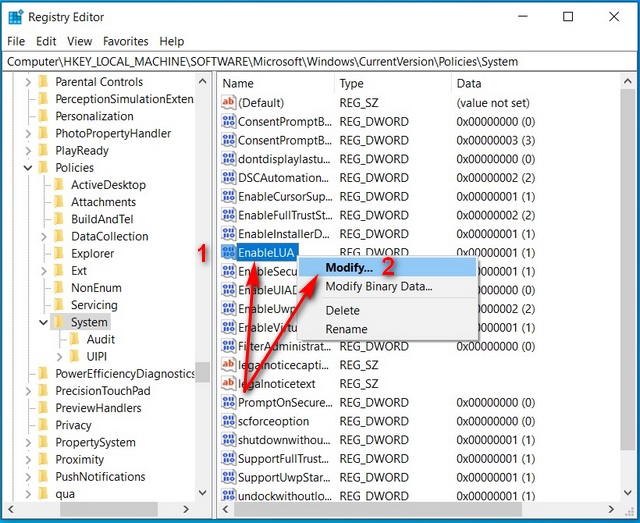
- Using the left pane of the Registry Editor window, navigate to the following key:
HKEY_LOCAL_MACHINE\SOFTWARE\Microsoft\Windows\CurrentVersion\Policies\System. In the right pane, find “EnableLUA”. Right-click on it and choose ‘Modify’.

- Finally, change the DWORD value to 0. Restart your computer.
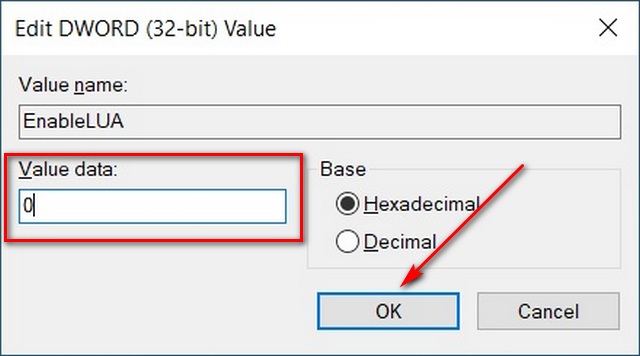

Note: You might have to create a DWORD value if there isn’t one already.
That’s it. You now know how to turn off User Account Control (UAC) on your Windows 10 computer using Regedit.
Method 3: Via Local Group Policy Editor
You can also enable or disable User Account warnings in Windows 10 using the Local Group Policy Editor. Here’s how you do it:
Note: The Local Group Policy Editor is only available in the Windows 10 Pro, Enterprise and Education editions.
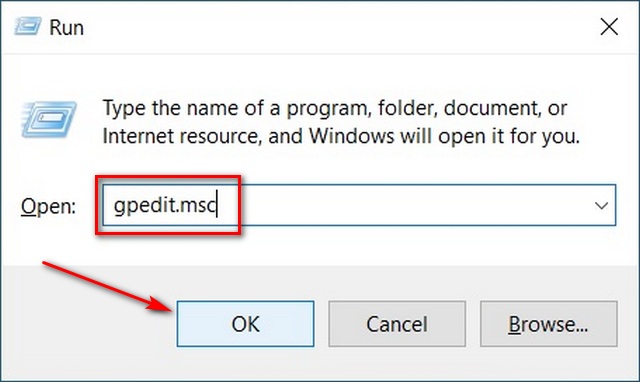
- Open Local Group Policy Editor on your computer. To do that, firstly search for ‘Run’ in the Windows Search Bar and choose the Run option from the results.


- In the Run box, type in
gpedit.mscand press Enter or click on ‘OK’ to open the Local Group Policy Editor.

- In the Group Policy Editor window, navigate to
Computer Configuration > Windows Settings > Security Settings > Local Policies > Security Optionsusing the left pane. Now scroll down to the bottom and find the following entry: “User Account Control: Run all administrators in Admin Approval Mode”.


- Double-click on it and in the popup window, choose ‘Disabled’. Finally, click on ‘OK’ at the bottom.


You can now easily enable or disable (turn on or off) User Account Control (UAC) in Windows 10 using the Group Policy Editor.
Method 4: Via Command Prompt
You can also enable or disable User Account Policy in Windows 10 using the command line (command Prompt). Here’s how you do it:
- Open the command Prompt as administrator. For that, search for ‘cmd’ in the Windows Search Bar and click on ‘Run as Administrator’ as seen below.


- Now enter the following command and press Enter:
reg.exe ADD HKLM\SOFTWARE\Microsoft\Windows\CurrentVersion\Policies\System /v EnableLUA /t REG_DWORD /d 0 /f. Reboot your computer.


That’s it. You now know how to disable User Account Control (UAC) on your Windows 10 computer using command line.
Note: Click on the link to learn more Command Prompt tips for Windows 10.
Get Rid of Annoying Warnings on Your PC to Improve Workflow
While getting rid of the UAC warning prompts certainly reduces annoyance, it could be potentially dangerous for some users. So unless you know what you’re doing, it is best left on its default setting. However, if you have made up your mind to make the change, now you know not one or two, but four ways to disable User Account Control on your Windows 10 PC. Meanwhile, since you’re a Windows 10 user, you should also check out some cool Windows 10 tips and tricks, how to use God Mode in Windows 10 and how to use PowerToys on Windows 10 to get the best out of your computer.


