
Kodi is a popular media server application that can not only help you manage your offline media library but also stream online content. What’s surprising to me is that despite being so useful, apart from its dedicated core users, no one seems to know what it does. I mean people who use Kodi sing paeans about it and those who don’t use it know nothing about it. We want to change that perception with this article. Kodi is a free and open-source tool that can organize local media files into a single, cohesive interface. Among many things, Kodi has a powerful media player that can stream a wide range of media formats. And in this article, we are going to tell you everything about it and help you get started with this awesome app.
A Definitive Guide to Kodi (Updated July 2020)
Before we move to the article, I want to outline all the topics that I have covered in this explainer. You can easily move back and forth from the links below.
- What Exactly is Kodi?
- The State of Kodi in 2020
- Install Kodi
- Learning to Use Kodi
- Kodi User Interface
- What is a Kodi Add-on?
- How to Install Addons on Kodi?
- Addons to Watch Movies and TV Shows
- What is Kodi Build?
- How to Use a Kodi Build?
- Install Addon on a Kodi Build
- Going Deep into Settings
- Keyboard Shortcuts
- Frequently Asked Questions
What Exactly is Kodi?
About 10 years back when internet speed was abysmal and online streaming platforms were close to naught, there was a culture of owning physical copies of movies, music, etc. Users preferred to download media content over the internet instead of streaming it because the internet speed sucked.
This meant that they had to maintain a large media collection and organizing and maintaining large libraries of media content like movies, music or images in separate directories was a tiresome exercise.


You had to run through hoops to find the content you wanted to play. Sometimes, the native media player wouldn’t even play it because it didn’t support the media format. Kodi came as a solution to all these problems. It streamlined every single thing and brought the entire media-consumption experience under one roof.
You could just open Kodi and all your local media files were right there, ready to be played in a sleek and accessible interface. So, Kodi basically is a media server application which can not only help you organize and manage your media but also access and play it from any device on your home network.
The State of Kodi in 2020
Kodi has become a powerful media center app. Kodi has gone through many iterations of development and by now, it has amassed many useful features including the ability to stream content, support for different add-ons and repositories, themes support, and more.
Of course, you can still connect your local media library to Kodi and it will organize everything with proper categorization, album art, metadata, synopsis, etc. Further, you can enable subtitles, track your movie, and show progress with Trakt, record Live TV, and much more.


Kodi is an open-source app with huge community support. It’s available on all major platforms including Windows, macOS, Android, Linux, iOS, and host of other devices. There is so much more about Kodi that I can’t fit it in a single paragraph here.
Anyway, if you want to use Kodi then you will have to start with the installation first and that is where we will begin.
Install Kodi
Kodi is available on a multitude of devices including Android, iOS, macOS, Windows, Linux, Fire TV, and more. Since we have already published Kodi installation guides for all these platforms, you can just click on the links below to see how you can install Kodi on your device.
- Install Kodi on Windows and macOS
- Install Kodi on iOS
- Install Kodi on Chromebook
- Install Kodi on Linux
- Install Kodi on Amazon Fire TV Stick
How to Use Kodi
Now that you have gone through Kodi’s installation process, let us proceed with some basic level stuff on how to use Kodi. In this section, I will start with the interface and then go deep into settings and add-ons to explain Kodi’s useful features.
I am using Kodi on a Windows laptop, but the Kodi UI and overall settings are identical on all other platforms. So you can go through the same setup on any of your device.
-
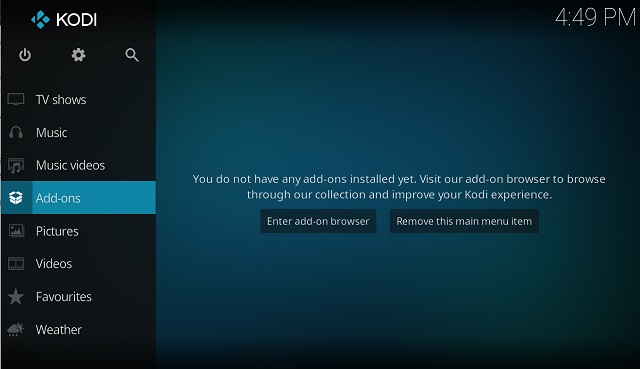
Understanding the Kodi User Interface
To use Kodi, you will have to understand its user interface first. Thankfully, the default Kodi interface is pretty basic and clean. The latest Kodi version is 18.2 (codenamed Leia) and the below screenshots are grabbed from the same version. You have multiple menus on the left side which are categorized based on the type of content.
You can switch between them and access all your local media content with just a click. Initially, you will have to share your local media library with Kodi by clicking on “Enter Files section” under every category. But once you set it up, you will be able to access all your media from Kodi itself.
Note: To go back on Kodi, right-click anywhere on Kodi’s interface or press the Esc key.


Once you have added all the local sources, you can easily play your local media content just like shown in the picture below.


There is a search button on the top which lets you search your local content, add-ons, and directly into streaming services like YouTube.

The power button on the left side lets you exit Kodi, reboot and offers other similar functions.

To make your Kodi home screen visually pleasing, you can add weather information or you can use different Kodi skins which basically overhaul Kodi’s UI.


-
Plunging into the World of Kodi Add-ons
Kodi has something called Kodi Add-ons which are basically apps built for Kodi. They are very similar to Android or iOS apps which can be installed on top of Kodi to bring extra functionality, content, and features. Just like App Store or Play Store, Kodi has an in-built, official repository that hosts thousands of add-ons.

If you don’t have much local content then you can install video add-ons from the official Kodi repository and access cloud-based streaming services. Keep in mind, there are instances where certain contents are geo-restricted so you will need a VPN to get around it. To make things easy for you, we have compiled a list of best Kodi VPNs here.

There are also third-party add-ons that are massively popular among the Kodi community. If you want to install third-party Kodi add-ons, you can check our list of latest Kodi add-ons. Further, if you want add-ons specifically to stream movies, you can check our recommended movie add-ons here.


If you are not satisfied with the official repo, you can also install third-party repositories as well. You can check our list of best third-party repository available for Kodi. The linked article also mentions the steps to install a repository so you don’t have to worry about that.

Warning: Some of the websites hosting the Kodi addons contain tracking pixels. If you don’t want to give away your personal information like IP address, you should use VPNs. Remember to check out our article on the best free VPNs for the same.
-
How to Install Addons on Kodi
1. First of all, move to the “Add-ons” tab and click on the “box” icon.


2. Next, click on “Install from repository” if you want to install the addon from Kodi’s official repository. If you have downloaded the ZIP file then click on “Install from ZIP file” and locate the file on your device. For instance, here I am showing how to install Kodi addons through the official repository.

3. Upon selecting the repository, choose “All repositories” and then move to “Video add-ons“ if you want to watch movies and TV shows. You can also go through other categories.

4. Here, you will find all the video add-ons available on Kodi’s server.

5. Now, go through the list and open an addon of your choice. Finally, click on the “Install” button. After the installation is done, you will find the addon under the “Add-ons” tab. Now go ahead and enjoy movies and TV shows on Kodi.

-
How to Use Kodi Addons to Watch Movies, Shows, Live TV, and More
You just need to follow the steps that we have mentioned above on how to install video addons. From there, you can find many addons for watching movies, TV shows, streaming live TV and more. That said, my personal recommendation would be the Exodus addon as it’s a complete package and brings all kinds of content, be it movies, TV shows, or live TV channels.


You can follow our guide and learn how to install Exodus on Kodi. Apart from that, if you want more Kodi addons for video content then you can head over to our dedicated list of best Kodi addons. Here, you can find top Kodi addons for anime, cartoons, music, sports, and much more.
-
What is Kodi Build?
If you are a beginner then you must be wondering what is Kodi build and how it’s different from Kodi addon. Well, Kodi build is a custom package that comes with a unique skin, some powerful addons for streaming movies and TV shows, utility addons like subtitle manager, maintenance tools, and more.

Unlike the default Kodi which is just barebone, Kodi Build is a total package. After you install a Build, you will not have to individually look for addons or other tools. Everything is there for your need. Some of the popular Kodi Builds are Xanax and Titanium, but my favorite remains Xanax for its amazing UI and library of content. You can find more information from our list of the best Kodi Builds.
-
How to Use a Kodi Build?
1. First off, you need to download the ZIP file of your favorite Kodi Build.
2. Once you have downloaded the ZIP file, open Kodi and switch to the “Add-on” tab. Here, click on the “Install from ZIP File” menu.


3. Now, locate the downloaded ZIP file on your device and click on the “OK” button.


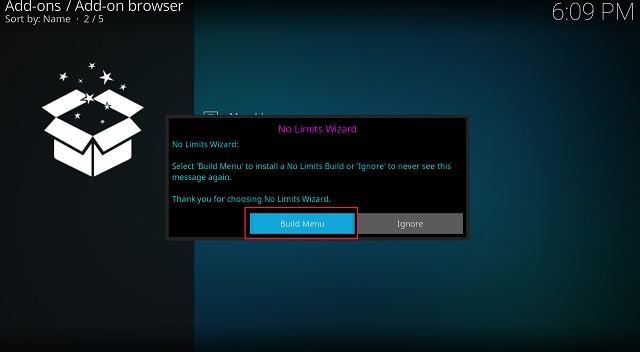
4. After that, the wizard will be installed right away and you will be prompted with a setup menu. Here, choose your preferences and click on the “Continue” button. You can also leave it to default.

5. Finally, click on the “Build Menu” button.

6. Now you will be offered multiple versions of the build. Choose the latest one and proceed ahead.


7. Here, click on “Fresh Install” if you want to start afresh. In case you want to retain your add-ons, repos, and user data from default Kodi then click on “Standard Install”. I would recommend a fresh installation though.


8. The wizard will start downloading the build after a few seconds. Generally, builds are quite heavy so keep patience while it downloads and installs itself.


9. After the installation is complete, force-close Kodi to make the core changes.


10. Finally, re-open Kodi and you will have the Kodi build installed on your device and ready for use.

-
How to Add Addons to a Build?
The process to install an addon on a Build is pretty similar to the one on the default Kodi setup. You just have to move to the “Add-on” tab and from there, you can either choose the ZIP file or download the addon from an online source. Despite being on a third-party build, you will still have access to official Kodi addons so that is great.

Keep in mind, every Kodi Build has a different user interface so the location of menus may change from one skin to another. That said, you will always find the option to install addons under the “Add-ons” tab.
-
Going Deep into Settings
You will seldom need to visit the Settings page. However, if you want to become a pro Kodi user, you must be acquainted with it. You can access the Settings tab from the gear icon on top.

You can open the “System” menu to customize the display and audio settings. Under the Subtitles tab, you can configure subtitles to your preference. Keep in mind that there are different levels of setting available on Kodi based on the user’s expertise. Just click on the “Standard” label at the bottom-left corner to switch between different levels of settings.

-
Shortcuts
While I have mentioned the major features of Kodi, there are still a few useful hacks you should know about. Talking about usefulness, keyboard shortcuts make things a hell lot easier on Kodi.
For example, you can play a video by just pressing the “P” key, stop the playback by pressing the “X” key, and so on. It’s just so easy and effortless. To know all the shortcuts available on Kodi, you can check our top 20 Kodi shortcuts here.
Frequently Asked Questions
Q. Why Don’t I See the Add-on I am Looking For?
Sometimes, an addon is not compatible with the current Kodi version and in that case, the add-on does not show up. You can, however, use the search button under the “Add-ons” tab to universally search for addons from all repositories– official and third-parties included. It’s the easiest way to find hidden Kodi addons.
Q. Why Don’t I See Exodus?
Of late, Exodus has gone through several changes and it’s no longer available on Fusion repository. Currently, a developer named IAC is maintaining the new Exodus addon and you can download the ZIP file from here.
Q.When I Click a Link of a TV Show or Movie, The Link Doesn’t Work or the Video Buffers. Fix?
There are hundreds of video addons on Kodi, but very few servers that offer reliable playback and authentic source. That’s why you need to use a well-sourced addon. Apart from that, you can integrate Real-Debrid with your video addon to get top working links having high-speed servers. In case you are unaware, Real-Debrid is a paid service that hosts tons of media content and offers unrestricted download speed. It will offer you the best source to stream movies which will significantly reduce buffering.
Q. What Is a VPN?
By definition, VPN means virtual private network which is kind of self-explanatory. With VPN turned on, you are connected to a private tunnel where no one can read what you are browsing– not even your ISP, the government, or the VPN provider itself. It basically allows you to hide your identity and browsing activity on the web.
The question of why VPN is essential to Kodi is availability of pirated content on third-party add-ons. Many users don’t want to get caught while streaming pirated content, hence the need of VPN to conceal their identity. Apart from that, many users utilize a VPN to unlock geo-restricted content on Kodi.
Learn Kodi and Never Look Back
So that was our beginner’s guide for Kodi. When everyone is moving to cloud-based streaming services like Netflix and Amazon Prime, Kodi still has its own dedicated base of audience. I believe it’s a far more powerful app if you want to manage content locally on your own. If you have collected years of downloaded content then you should definitely use Kodi to organize everything seamlessly.
It’s going to make your experience so much better with powerful media player, subtitles, add-ons, and a lot more. I hope that this article was able to help you get started with Kodi. If you still have questions, shoot them down in the comments section and we will happily help you out.

