- A villager trading hall can be made using pistons, job site blocks, and a safe house structure.
- Players can use a zombie system to zombify and cure villagers to get better discounts on trades.
- The Hero of the Village title can be gained again to get even better discounts on trades.
Minecraft is one of the most resource-focused sandbox games out there. It needs you to explore an almost limitless world with the hopes of finding useful items. However, what if you could buy or exchange items to get what you want without leaving your base? That’s exactly what a villager trading hall offers. It is the perfect supermarket alternative in Minecraft to take care of your major needs. So, let’s figure out how to make a Minecraft villager trading hall and bid farewell to resource-hunting.
How Does Villager Trading Work in Minecraft
While most of the resource collection in Minecraft is based on exploration, the game also allows you to obtain items via villager trading. If a player approaches select passive Minecraft mobs, they offer certain trades. Then, the players can exchange items with villagers or purchase them using emeralds, the unofficial currency of Minecraft.

Moreover, these trades, like the real world, are somewhat negotiable. Some villagers sell expensive stuff while others can give you a better deal on the same item. Not to forget, the players’ actions can also increase or decrease the price of certain trades. More on that later. First, let’s explore the various types of villagers in Minecraft.
Types of Villager Jobs in Minecraft
While segregating villagers into types, we are not considering villagers from various types of Minecraft villages. Even though they appear distinct, their differences are only visual. Instead, we are focusing on villagers holding a diverse types of jobs. Each job enables the villagers to offer unique trade deals to the players. Some are better, while others are not so good.

Minecraft’s villagers can have the following jobs:
- Armorer
- Butcher
- Cartographer
- Cleric
- Farmer
- Fisherman
- Fletcher
- Leatherworker
- Librarian
- Mason
- Shepherd
- Toolsmith
- Weaponsmith
- Wandering Trader (not a villager job, but provides similar trades)
If you want to dig deeper, you can use our dedicated guide to Minecraft villager jobs and find out everything each one of them has to offer.
How to Change the Job of a Villager
The job of every villager in Minecraft is linked to job site blocks. These are functional blocks that are somehow related to a task that is connected with a particular village job. For example, a composter is a functional block that you can use to create bone meal (fertilizer) in Minecraft. But it is also the job site block for farmer villagers in the game.

So, if you break a composter the farmer villager is connected to, that villager loses their job. Then, they wander around aimlessly until they come across another job site block. You can use this mechanic to change villager jobs, i.e., by breaking or replacing their job site blocks.
Items Required to Make Villager Trading Hall
You need to collect the following items to make a villager trading hall in Minecraft:
- Open Area (preferably 26 blocks in width and 10 blocks in length)
- 13 Sticky Pistons
- 13 Redstone Dust Pieces
- 13 Villagers
- 13 Jobsite Blocks
- 4 Deepslate Brick Stairs (optional)
- 28 Dark Oak Trapdoors
- 27 Polished Deepslate Slabs
- 52 Deepslate Tile Slabs
- 13 Levers
- 3 Ladders
- 26 White Carpets (optional)
- 13 Item Frames (optional)
- 2 Chests
- 1 Zombie
- 13 Splash Potions of Weakness
- 13 Golden Apples
Please note that all the building blocks, including stairs and slabs, should be made out of any wood type. Unless you want the same minimal aesthetics as our trading hall, feel free to modify the design to your liking.
Tutorial to Make a Minecraft Villager Trading Hall
To make it easier to follow, our tutorial has separate sections focusing on one part of the trading hall at once. Just make sure to follow all of them in sequential order.
Villager Area
Let’s begin by creating a safe area for the villagers to stay and trade. Follow these steps to create rooms for the villagers in the trading hall:
- First, find a large open area (at least 26 x 10 blocks) to set up your trading hall.

- Then, dig multiple 2 blocks long and 5-block-deep pits. We suggest you dig at least 13 such pits at a 1-block distance for each villager.
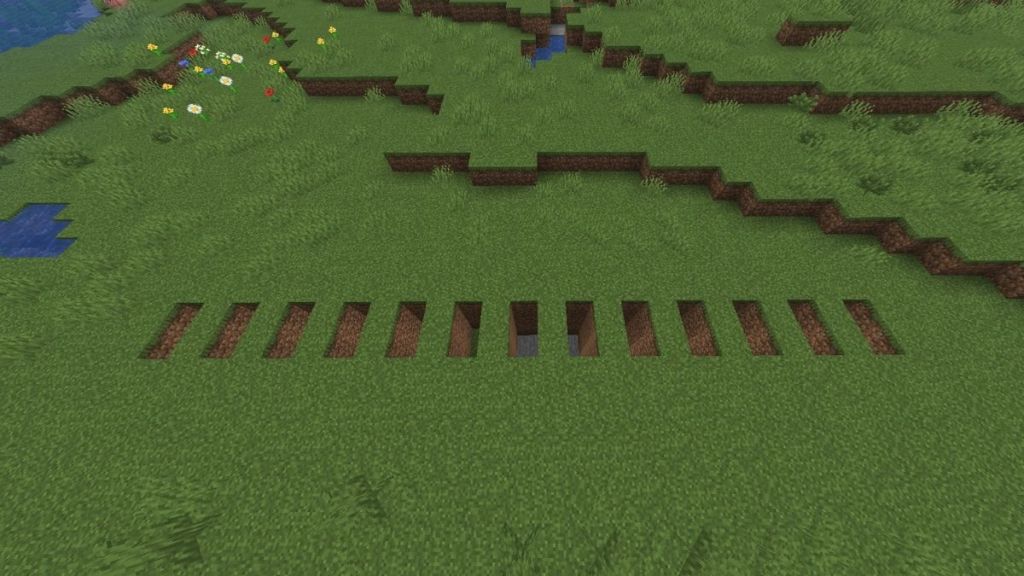
- Next, replace one of the base blocks of the pit with a sticky piston facing upwards and put a piece of Redstone dust on top of the other block.

- After placing the Redstone dust, put the various job site blocks on top of the dust in each cavity. You can replace the block as per your trading requirements later.

Zombification Area
As explained in a later section, you can use zombies to get better trade deals from villagers. But for that, we’ll first need to set up a safe and controllable zombification area. Here’s how to do that.
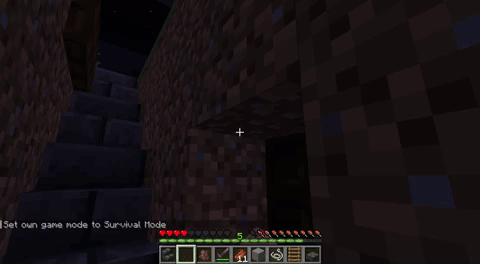
- First, leave a one-block gap and dig a tunnel behind the sticky pistons. This tunnel should be four blocks deep.
- After digging it, you can leave a staircase-like opening next to it. We are using deepslate brick stairs for the same.
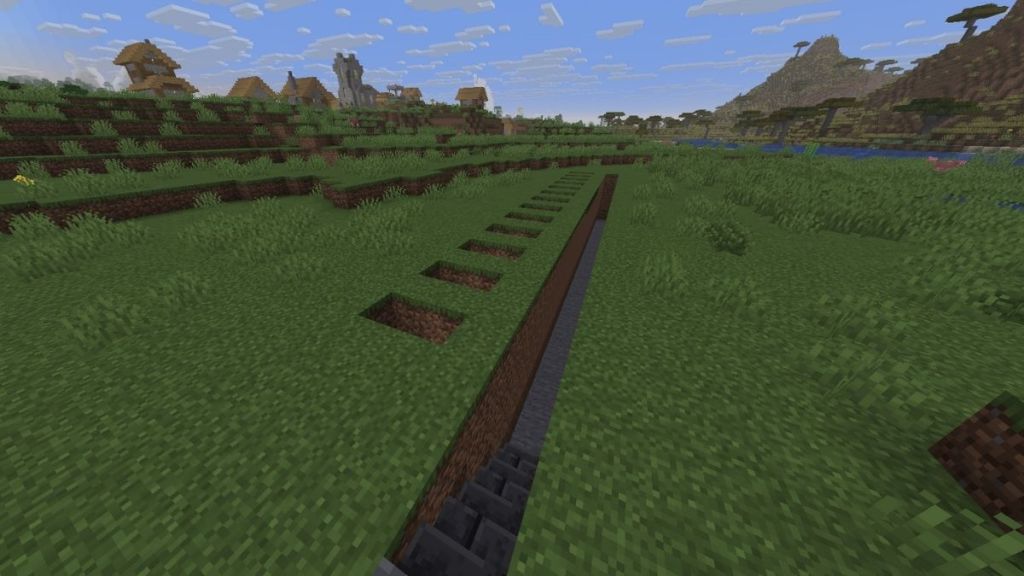
- Then, create a 2-block tall opening by breaking blocks in the tunnel towards all the villager rooms (sticky pistons).

- Then, place a dark oak trapdoor at the top part of each newly created opening. This trapdoor, when closed, should leave the sticky piston inaccessible to players and other mobs of similar height.

- Cover the roof of the tunnel with deepslate slabs (or any other solid blocks) and place two openable dark oak trapdoors on the staircase.

- Finally, open all the trapdoors (on room openings) and get zombies in this tunnel. The easiest way to do it is to make the zombie follow you through one entrance of the tunnel while you get out from a temporary second entrance.
Trading Hall
Once the zombie area is ready, follow the steps below to create the main villager trading hall in Minecraft:
- To begin, create a new tunnel towards the job site blocks at a 1-block gap. This tunnel should be four blocks deep and two blocks wide.
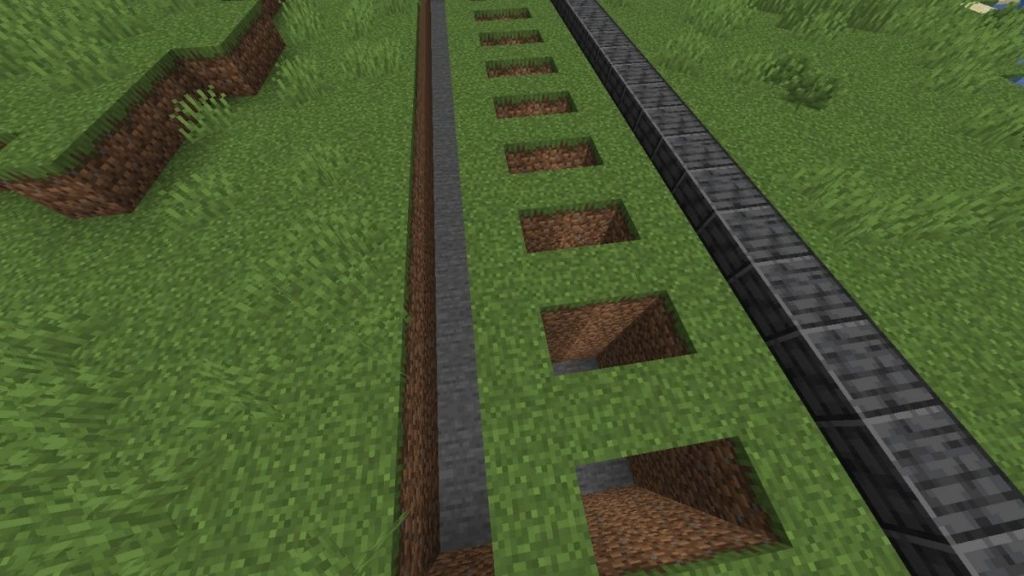
- Then, create a 2-block tall opening towards the job-site blocks in the new tunnel.

- Now, it’s time to get the villagers in their chambers. We suggest you push them into the pit or destroy all existing job site blocks within a 64 blocks area.
- If there are no other job site blocks nearby, the villagers will willingly jump into the pits with job site blocks. When the villager is inside the pit, make sure to create a roof with deepslate tile slabs (or any solid blocks).

- Finally, place a lever next to each of the job site blocks. Activating this will push the villager up and allow them to trade with you.

Decorate the Trading Hall
With the basic functionality in place, it’s time to upgrade the main trading area. So, follow these steps to decorate the trading hall and make it more useful:
- First, cover the empty space on top of villagers’ heads and place a torch on top of the job site block. This will prevent hostile mobs from spawning in their chambers.

- Then, place an item frame on top of each chamber’s entrance and put an item relating to the villager’s job. This will make it easy to identify them. You can also use this time to carpet the floor for aesthetics.

- Next, cover the top of the trading area with deepslate tile slabs (or solid blocks). But make sure to create an entrance using ladders and a trapdoor.

- Lastly, place a couple of chests in the trading area to store your emeralds and other trading goods.

How to Zombify & Cure a Villager
Follow the steps in the section below to get the best trade deals via the zombification of a villager. Here’s how it goes:
- First, make sure there’s a zombie in the tunnel behind the villagers. You can give an item (like armor) to the zombie or use a nametag to avoid it from disappearing.

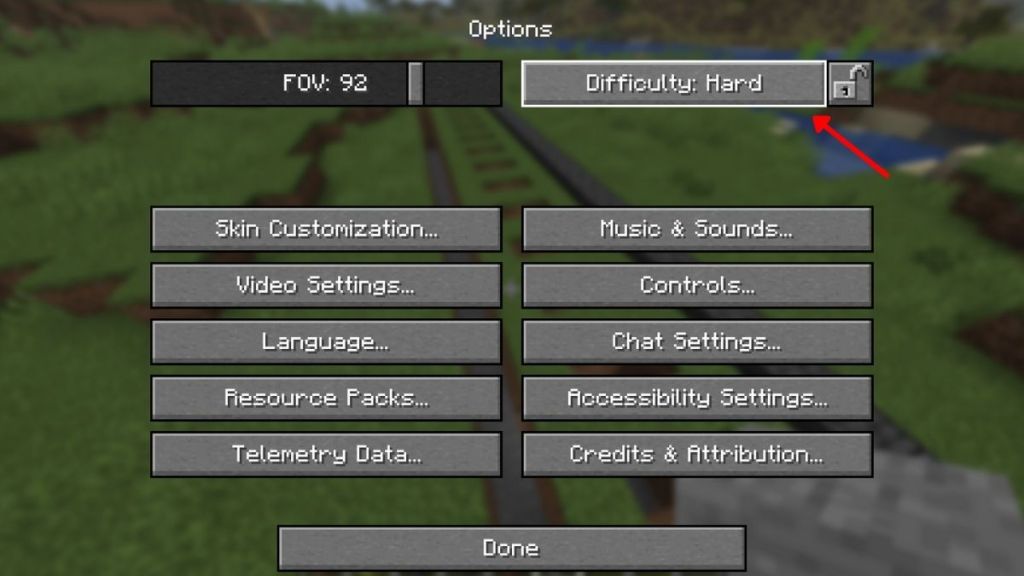
- Then, set your game difficulty to hard from the pause menu. All villagers, when attacked by zombies, turn into zombie villagers in the hard difficulty. (This zombification chance is just 50% in normal mode)
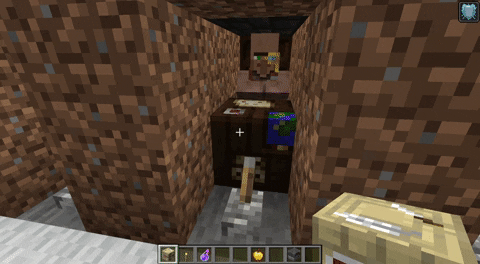
- Finally, turn off the levers to push the villagers down. Then, the zombies will attack them and turn the villagers into zombie villagers.

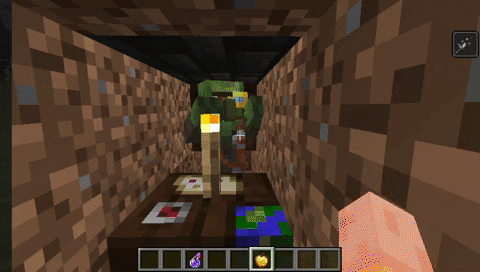
- Once your villagers have been turned into zombie villagers, it’s time to cure them to secure better trade deals. For that, you first need to throw a splash potion of weakness on each of the zombie villagers.
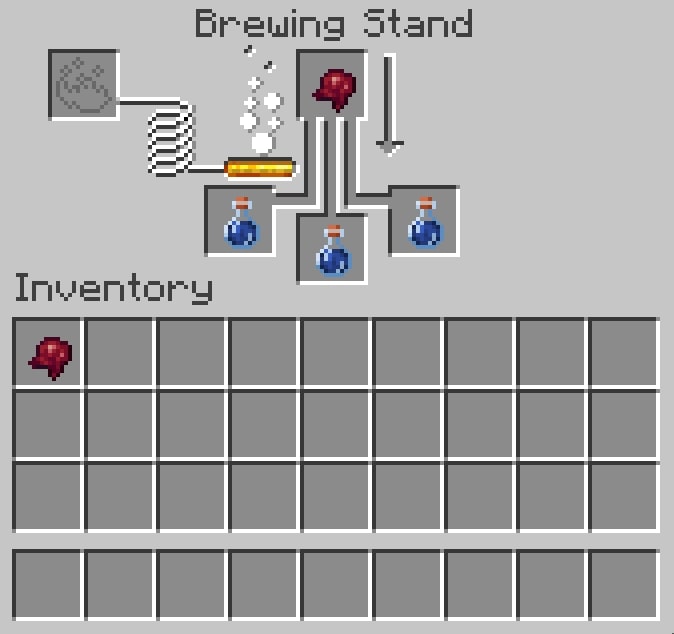
- Then, feed each of them a golden apple to turn them back into regular villagers. The zombie villager will start shaking before the transition happens. If you face any problem, use our dedicated guide to learn how to cure zombie villagers in depth.
How to Replace Villagers Trades
After some trades, it’s natural that a villager can become useless. So, you might want to replace its trades. Here’s how to do it without harming your bargains.
- The easiest way to get new trades is to replace the job site block. You can do it by breaking and placing it multiple times.
- Another way to get new trades is by replacing the villager. But, killing a villager can hamper your overall trades. So, you first need to turn the villager into a zombie and then kill it. Later, you can open the top of its chamber to get a new villager in its place.
Additional Tips for Minecraft Villager Trading Hall
Congratulations on creating your own Minecraft villager trading hall. Now, it’s time to make sure you get the most out of it. So, here are some additional tips for better villager trading:
- Hero of the Village: If you end a pillager raid and protect the villagers, the game gives you a “Hero of the Village” effect. This effect gives you significantly better trades. Though we suggest you completely close off your trading hall before inviting a raid.
- Nitwits: Even though they are rare, Minecraft has nitwit villagers who can’t get any jobs. So if you encounter such a villager, it’s best to get rid of them rather than wasting your time.
- Villages: To make it easier to get resources and villagers, it’s best to make trading halls near villages. Though, make sure to break all job sites in the village to keep your villagers in control. Moreover, you can use our list of the best Minecraft village seeds to save some time.
- Wandering Trader: If you want to diversify your trading options even further, you can wait for a wandering trader to spawn and then trap it in one of the chambers. This mob spawns around the player after random intervals of time.
Whether you want to replace your useless items or have an easy way to collect important ingredients, the Minecraft villager trading hall is here to help. But, even with fantastic trades, it’s still not automatic. So if you are looking to secure good resources without much effort, we suggest you make some of the best Minecraft farms. So, according to you, which villager offers the best deals? Let us know in the comments below!
No, for a simple villager trading hall in Minecraft, you don’t need to place any beds.
Get three beds and two villagers first in Minecraft. Once you give them some food like carrots, potatoes, or bread, the two villagers will breed, and a baby villager will appear.
No, villagers don’t need beds to restock the trades. You can either destroy the job block site and place it again to refresh the trades, or turn a villager into a zombified one and cure it to get a discount on trades.
No villagers don’t despawn in Minecraft, and hence, you don’t need to place any nametags on them.


 Bipradeep Biswas


