The Central Processing Unit (CPU) is the brain of your computer and is a major component in the PC building process. It is responsible for handing instructions from programs and the OS, executing tasks, and telling hardware components what to do. Now, you’re likely ready to build your PC and have bought the CPU, motherboard, GPU, and other components that go inside the case. However, before we install any component in the case, we first need to install the CPU on our motherboard, a process that usually happens outside. That said, the process of installing the CPU is fairly easy. You just have to be careful not to damage the processor, though. Fortunately, for you, we have compiled a straightforward guide on how to install the CPU on your motherboard.
We have detailed the step-by-step process to install the CPU on the motherboard in your PC. In this guide, we also help you correctly align the CPU in the motherboard socket, a step that is otherwise confusing if you don’t know what to look out for, especially as a beginner. That said, let’s start with the prerequisites and then move on to the installation steps.
Things to Remember Before Installing the Processor
Be Cautious While Handling the CPU
You should handle the CPU carefully while doing a PC build. In this guide, whenever we ask you to perform an action that involves picking up the processor, simply pick it up firmly around the corners with your fingers. You must rest it inside the CPU’s clear plastic box while you figure out the various nuances of installing it. Never touch the backside of your CPU (the pins). Also, be careful with the pins on your motherboard and the CPU (if it’s AMD, the CPU will have pins on its backside).
Gather All the Necessary Tools
While this might feel like an obvious prerequisite, remember to organize your workspace with all the various tools necessary to install the CPU. This includes the motherboard manual (to properly align the CPU), thermal paste (which you need after installing the CPU), and the CPU cooler to move forward with your PC build. Also, ensure your workplace is a static-free work environment by grounding yourself. An anti-static wrist bracelet is recommended to avoid electrostatic damage. We won’t be needing a screwdriver for this guide.
Do you need a good thermal paste for your PC build? Read our buyer’s guide on the best thermal paste options available in 2024 here.
Check CPU Compatibility with Motherboard
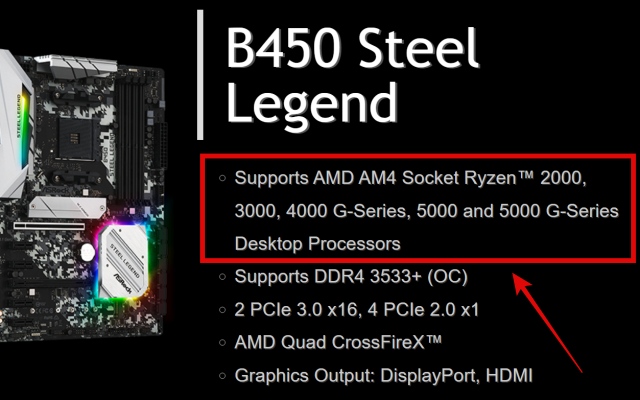
Picking the right motherboard is also an important step. The motherboard model you are using must list your CPU as a compatible model on the website. For example, in the screenshot below, the manufacturer’s website will mention which processor generation and socket type the motherboard supports.
Another important factor is the motherboard’s VRM quality. While a low-end H610/A520 motherboard can physically support a high-end Ryzen 9 or Intel Core i9 processor, it doesn’t necessarily mean that its voltage regulator module can handle that kind of load. Also, to state the obvious, you should avoid using a high-end CPU with a low-end motherboard.
How to Install CPU on the Motherboard
1. As we mentioned above, be careful when you pick up your CPU throughout this installation guide. Start by resting the motherboard on top of its box, which gives you a sturdy base to mount the components on your motherboard.

2. After that, pick up the CPU and keep its plastic box handy (in case you need to put it back in a safe place). Hover the chip in the air on top of the motherboard’s CPU socket. You must look out for an arrow symbol (Δ), present both on the CPU’s bottom left corner and next to the motherboard’s socket.
Once you have aligned the arrow symbols (as demonstrated below), remember that it’s the final orientation to install the CPU on your motherboard, in the next step. Put the CPU back in its plastic box after learning the orientation, and proceed to the next step where we will open the motherboard’s CPU socket area.
Note:
Take your time understanding how the CPU should go in and rest it safely in the box whenever needed. You can also refer to your motherboard manual for a visual cue on how the CPU should look when installed.

3. Now, locate the CPU socket area on your motherboard. Next to it, you will find the retention arm. Press on it firmly and drag it away from the socket. And then, the CPU cover as well as the retention arm should open and go all the way up. If you feel uncomfortable, refer to your motherboard manual’s specific instructions on how to lift your CPU socket’s retention arm.


4. Next, pick up the CPU and lower it gently on top of the motherboard socket, while keeping in mind the final orientation from the second step. The socket should be open, and the retention arm should be up before you perform this step. With the correct orientation, the CPU should simply rest inside the socket, with the pins now in place, and the arrows should be aligned with each other.
Note:
For AMD’s AM4 CPUs, the pins are on the CPU side. As you gradually lower the CPU down to the socket, the pins should go into the socket. The CPU should now rest inside the socket, with both the motherboard socket and the CPU lining up its arrows.

5. Now, reinstate the CPU cover by lowering it down to how it was before. Then, proceed to press down on the retention arm and tuck it into the little groove it was resting in originally. While lowering the retention arm, you may hear some noises, but as long as the orientation is correct, nothing will break.
After installing the processor, the CPU socket cover will come off the motherboard. Keep it safe, as you will need to put it back if your motherboard needs to be serviced under RMA.


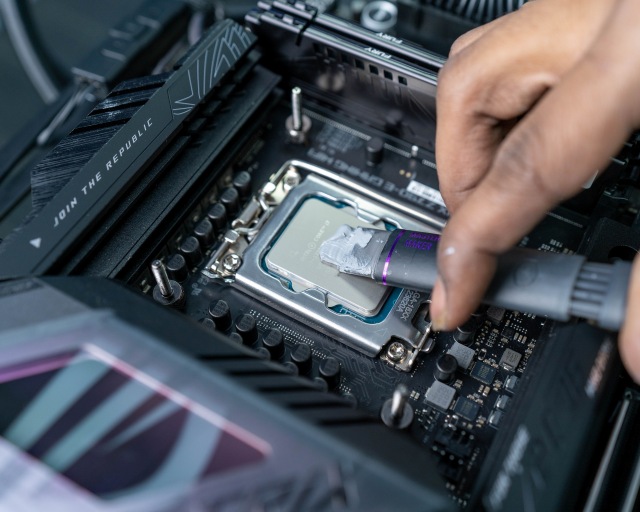
6. Well, you have successfully installed your Intel or AMD CPU on the motherboard. You can now move to the next steps to complete your PC build. Next, apply thermal paste on your CPU, then install the CPU air cooler or liquid cooler to finish the installation process.
That’s all you need to know about installing the CPU on your motherboard. If you are doing this for the first time, you are certainly going to feel nervous about handling one of the most expensive components in your PC build, but there’s no need to stress. While you do need to be careful, you can easily install the processor on your motherboard with this step-by-step guide. If you have any doubts about the installation process, let us know in the comments below. We would help you out right away.
The installation process for AMD’s AM4 socket CPUs (and older ones) is especially different from other processors. That’s because the pins are present on the CPU itself for those generations. For Intel builds, the CPU pins are present on the motherboard instead. With the release of Ryzen 7000 CPUs on the AM5 socket, they have switched to LGA-style CPUs like Intel.
First, confirm if the problem is with your CPU. If there isn’t, and the CPU is in fact compatible, you just need a BIOS update. You can take your motherboard to your vendor and ask them to update the BIOS. If this is not an option, you’ll need to contact Intel or AMD for further options. The only other way is to update the BIOS yourself with an older CPU. Learn how to enter the BIOS on Windows 11 here.
You must replace either the motherboard or the CPU with compatible parts while building your PC. Make sure that before you order parts, they have a return window in case any compatibility issues arise.
Yes, you can remove the existing CPU and follow our step-by-step guide to swap out the processor. Windows 10/11 will automatically adjust to the new components installed. You might get a small boot delay where Windows says ‘Getting Device Drivers’. Also, if your motherboard does not support the new CPU natively, you might need a BIOS Update.
No. Your CPU (as long as it is compatible) will work with your motherboard and boot into Windows normally. The motherboard has a basic set of system drivers already present. The entire process of Windows adjusting to new components, such as your CPU, is automated.


