
- To capture pictures during a FaceTime call, both parties need to enable the FaceTime Live Photos feature.
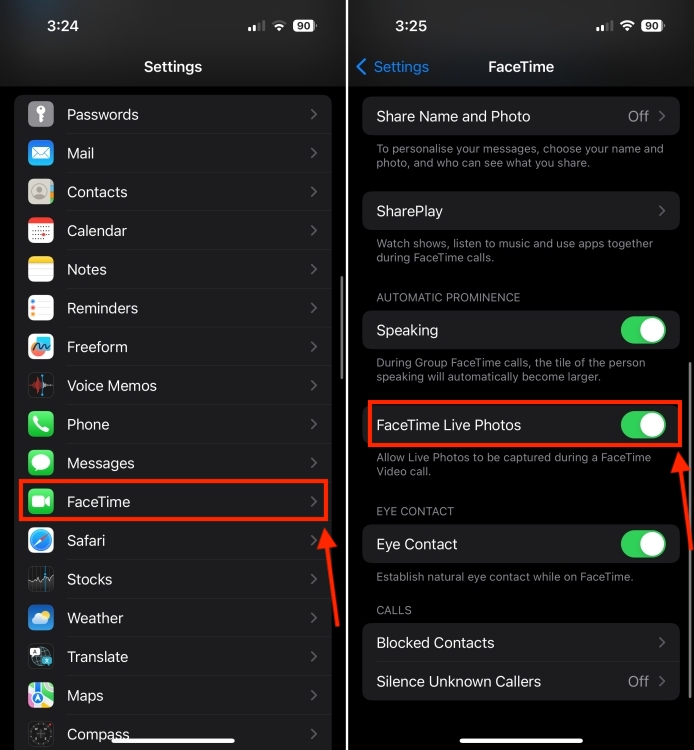
- To enable FaceTime Photos, open Settings -> FaceTime and turn on the FaceTime Live Photos toggle.
- Once enabled, you can tap on the Shutter button to take a picture during the FaceTime video call.
There can be instances when you’re on a FaceTime call with your loved one and you wish to take a picture to capture a special moment. Well, you can take screenshots to capture fun moments of your FaceTime calls. That said, Apple allows you to take Live Photos during FaceTime video calls, which impressively captures audio as well. For this, you have to enable FaceTime Live Photos in the settings. Once you’ve done that, you can quickly take photos during video calls. In this nifty guide, we’ll tell you everything about FaceTime Live Photos. Let’s dig in!
Prerequisites to use FaceTime Live Photos
To capture photos during one-to-one FaceTime video calls, you and the other person should have either of the following:
- An iPhone with iOS 12.1.4 or later
- An iPad with iPadOS 13 or later
- A Mac with macOS 10.13.6 or macOS 10.14.4 or later
To capture photos during group FaceTime calls, the participants need to have one of the following:
- An iPhone with iOS 13 or later
- An iPad with iPadOS 13 or later
- A Mac with macOS 10.15 or later
Besides, you and the other participants should enable Live Photos in FaceTime settings.
How to turn on FaceTime Photos on iPhone & iPad
While you can still capture screenshots during the FaceTime call, it’s impolite and inappropriate to do so without permission.
Bear in mind that the FaceTime Photos feature is enabled by default when you turn on FaceTime. However, if you’re someone like me who often tweaks settings, you might have turned it off for some reason or even done it accidentally.
Here’s how to enable FaceTime Photos on iPhone or iPad:
- Open the Settings app.
- Scroll down and tap on FaceTime.
- Make sure you’ve turned on the FaceTime Live Photos toggle.

- When you do so, you also allow others to capture Live Photos of you.
How to turn on FaceTime Photos on Mac
Just like the iPhone and iPad, it’s super easy to enable FaceTime photos on a Mac. Just follow the below steps and you’re sorted.
- Open the FaceTime app on your Mac. The FaceTime app icon is available right in the Dock.
- From the menu bar at the top of the screen (where you see the small Apple logo), click on FaceTime -> Settings…


- Select the “Allow Live Photos to be captured during video calls” option.


- Make sure to do it beforehand. This option is unavailable during a call.
How to Take Live Photos During FaceTime Calls
Now that you’ve enabled FaceTime Photos on your iPhone, iPad, or Mac, you can take photos during a FaceTime video call. That said, there are a couple of caveats.
- First, the other person should have enabled the FaceTime Photos feature.
- Second, and thankfully, when you capture a photo during the video call, you and the other person will receive a notification that a photo has been captured.
- Third, this feature isn’t available in all the countries and regions.
Once you’re well-versed with these, you can easily take photos during FaceTime calls.
To take Live Photos during one-to-one FaceTime calls, you simply need to press the Shutter button which looks like two white circles, one inside the other. This button appears when you tap on the screen of your iPhone or iPad during the call, or when you select the FaceTime window on a Mac.


To capture a photo during a Group FaceTime group call on your iPhone, select the person’s tile, then tap the Fullscreen button to see the Shutter button. On a Mac, double-click the person you want to take photos of and click the Shutter button.
How to Take FaceTime Photos Without Telling the Other Person
When you take photos during a FaceTime call, it sends a notification to the other person letting them know that you’ve taken a picture. At the moment, there’s no way to avoid sending this notification. However, you can get around by taking a screenshot instead.
To take a screenshot on iPhone, simultaneously press the Volume Up and Side button. On Macs, press Command + Shift + 5 and click on the FaceTime window to capture it. Here are other ways to capture a screenshot on a Mac.
That said, Live Photos are better than taking screenshots. First, there’s a transparency between you and the other person. Second, a Live Photo doesn’t capture the FaceTime user interface, giving you clear pictures. Also, they save a couple of seconds of audio and video before and after you capture the photo.
Where are FaceTime Photos Stored
All the stills, screenshots, or Live Photos you capture during the FaceTime calls are saved in the Photos app. To see your FaceTime photos, open the Photos app on your iPhone or iPad and go to the Library tab at the bottom. Here, you’ll find all the photos. You can browse through the library or scroll to the date when you took the pictures.
If you wish to only view your Live Photos, tap on Albums from the bottom, scroll down, and choose Live Photos album.


That’s how you can enable FaceTime Photos and take pictures during those special video calls. In case FaceTime isn’t working on your iPhone, we’ve listed 17 ways to fix most common FaceTime-related issues.


![How to Sync iPhone and iPad [2025 Guide]](https://static.beebom.com/wp-content/uploads/2024/03/How-To-Sync-iPhone-and-iPad.jpg?w=300&quality=75)


