Among the pool of keyboard apps out there, the one by Google is a very impressive one. Formerly known as Google Keyboard, Gboard is arguably one of the best keyboard apps for Android as well as iOS that you can use. And if you recently bought an Android phone, especially one with stock Android, chances are it already came with Gboard pre-loaded. While you may have realized by now that it is fast and offers some really great features, did you know that there are some really cool tricks for it? Now if you are wondering what they are, here are 12 cool Gboard tips and tricks for Android and iOS that you should know:
Gboard Tips and Tricks for Android and iOS
Note: I tried these tricks on my Moto G3 running Android 7.1.2 and iPhone 6s running iOS 10.3.3. The public release version of Gboard used for these tricks was 6.4.16.162469584-release-armeabi-v7a and the beta one was 6.5.6.166275474-release-armeabi-v7a on Android, while it was 1.8.0 on iOS.
1. Use Google Translate within Gboard (Android only)
There may be times when you want to type messages in some language other than English. For this, Gboard comes with a built-in support for Google Translate that you can use. To know how to do that, here are the steps:
- While in Gboard, tap on the Google’s ‘G’ icon at the top-left of the keyboard. Now you will see several options available. Among them, tap on the Google Translate icon.
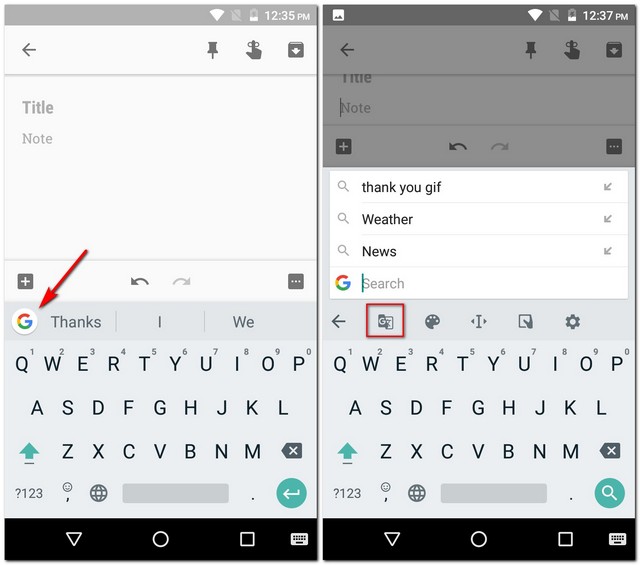
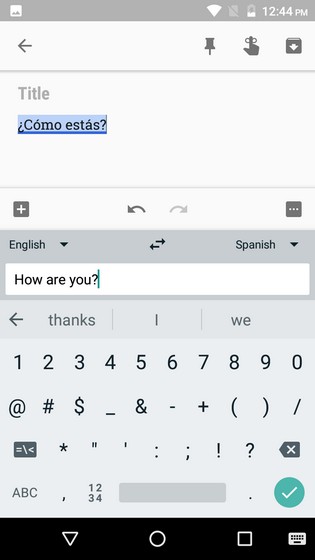
- You will now be able to choose the language to which you want to translate your text. Once selected, whatever text you enter in the translate box would be translated to the specified language.
2. Navigate Text Easily with Gboard (Android only)
Okay, so you’ve written a pretty long message just to find out there were certain typos here and there. Placing your cursor at the exact spot can be a challenge for some people. Thankfully, Gboard has got your back in this domain. In fact, Gboard gives you more than just a single way to do this.
Firstly, you can slide your finger over the spacebar to navigate through text or slide over the delete button to delete it. The second one is the more focused one. For this, follow the steps below:
Note: The spacebar one works on iOS as well, along with sliding your finger using 3D touch anywhere on Gboard.
- While in Gboard, tap on the Google’s ‘G’ icon at the top-left of the keyboard. Now you will see several options available. Here, tap on the icon that looks like the letter ‘I’.
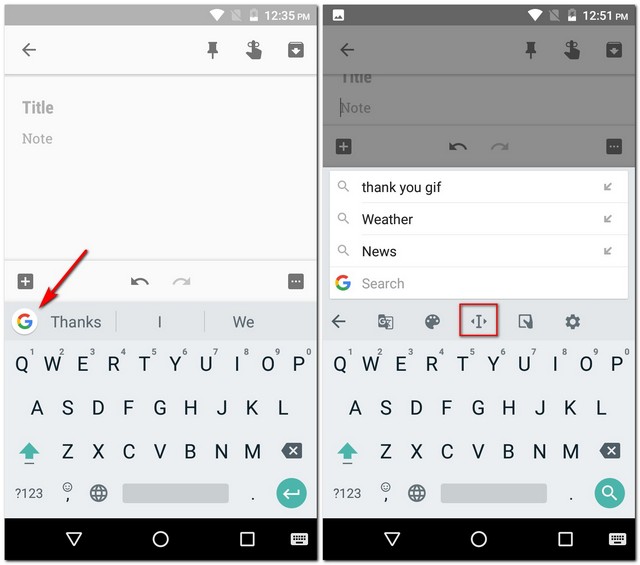
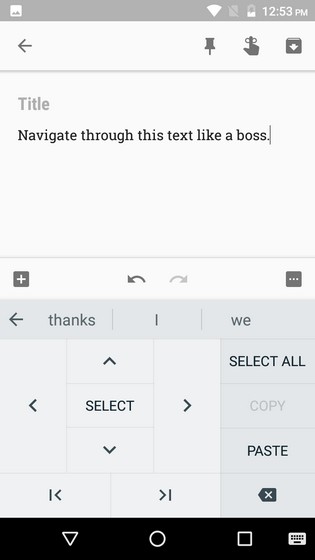
- Now you will see a special layout for navigation. Here, you can navigate across letters, paragraphs, and use clipboard functions like selecting, copying, and pasting.
3. Use Shortcuts in Gboard
We all know that shortcuts make our lives easier. Gboard provides us with some cool shortcuts too. Here are a few of them with the steps for how you can use them.
-
Punctuation Shortcuts in Gboard
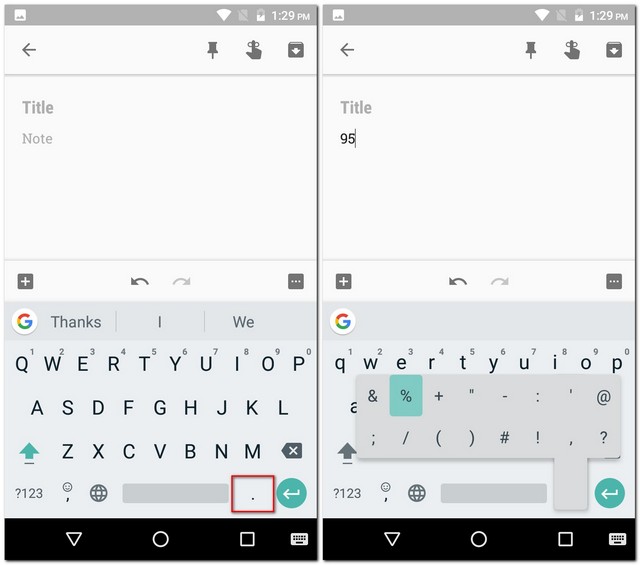
If you have to insert only one punctuation, then this shortcut is a very handy one. Simply long-press on the period key (‘.’) and you will see a list of punctuation marks pop up. You can hover over to any one of them and then lift your finger to insert that.
-
Special Character Shortcuts in Gboard
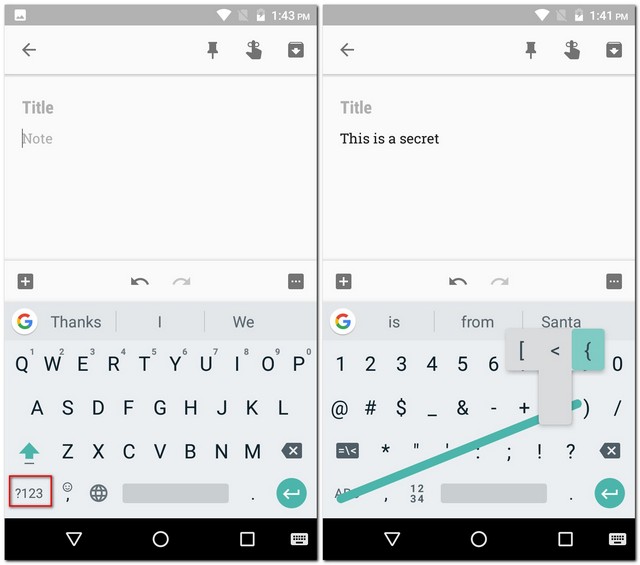
Just like the previous shortcut, if you are looking to insert a special character instead of the punctuation mark, then Gboard has a shortcut for that too. For this, simply tap on the ‘?123’ button at the bottom-left of the keyboard and without lifting up your finger, hover to the special character that you want to insert. Note that hovering over some characters may further show a few more characters for you to choose. Now when you are happy with your selection, simply lift your finger up.
-
Capitalization Shortcuts in Gboard
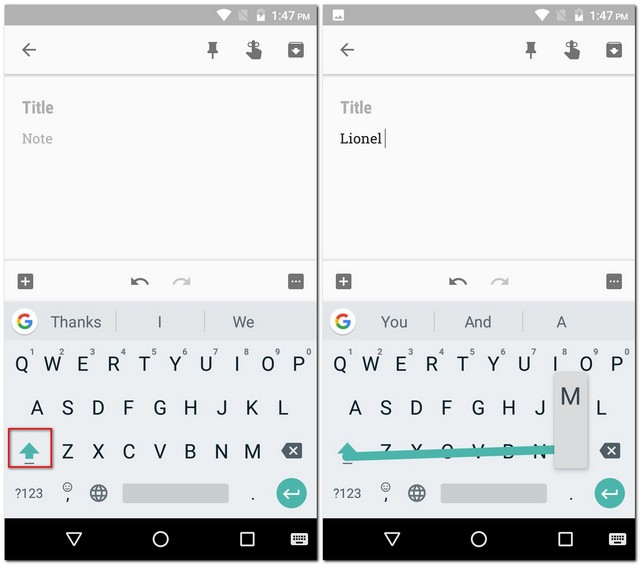
Similar to the previous two shortcuts, a single letter can be capitalized using the same method. Simply tap on the caps key (left of the letter ‘Z’) and then drag your finger to the letter that you want capitalized. Once there, you can lift your finger.
4. Insert Bitmoji, GIFs, Stickers, and Emojis with Gboard
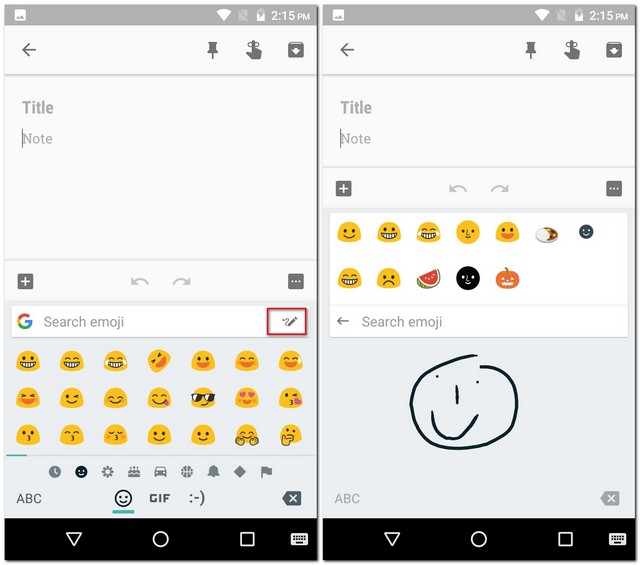
I guess that you will agree with me when I say that there is no easier way to express our emotions than by using emojis. If we are on the same boat, then this trick will be really helpful to you. To use it, open the emoji drawer by long-pressing the comma (‘,’) button. Once there, you can navigate between the different tabs to insert either emojis, GIFs, or emoticons. If you choose to go for emojis or GIFs, then you also get a search bar that you can use to find the exact emoji or GIF that you are looking for.
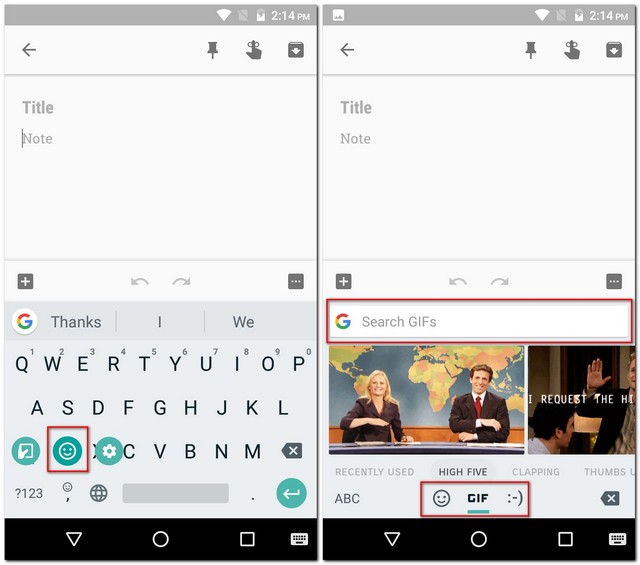
While you are on the emoji tab, you will note that there is a small pen icon on the right-side of the search bar. Tapping on this will allow you to further search for an emoji by drawing it.
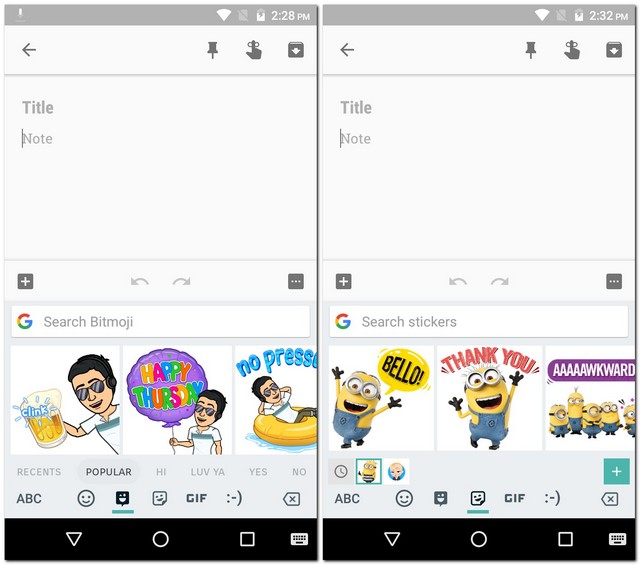
Lastly, if you are a beta tester of Gboard (Android only) and are running version 6.5.x, then you will also have two more tabs – Bitmoji and stickers. Note that you will have to setup a Bitmoji account and install a sticker pack before being able to use the respective features.
5. Use Google Search in Gboard
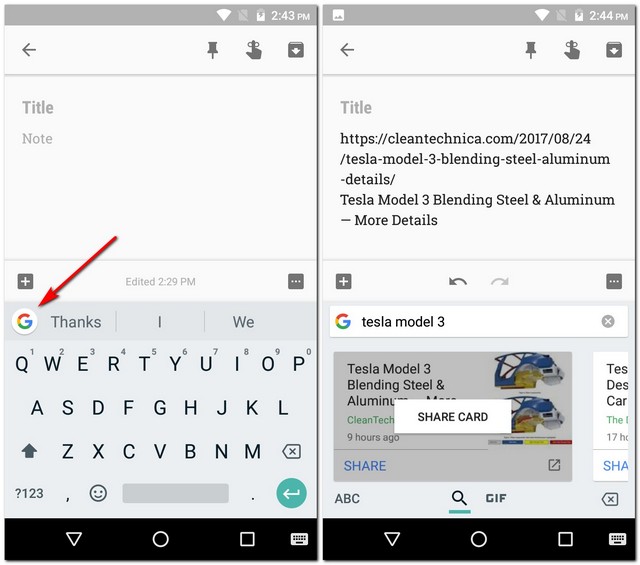
Being a Google product itself, Gboard bridges the gap between you and other Google products to quite an extent. The keyboard app comes with an integrated Google Search that makes searching the web and sharing the results with your friends easier. To use this trick, tap on the Google’s ‘G’ logo on the top-left of the keyboard and search for your query in the space provided. Once you see the results, you can even tap on any one of them to share it with your friends.
6. Use the One-Handed Mode of Gboard (Android only)
If you have a smartphone that has a huge display, for instance, the Galaxy Note 8, then you will find the one-handed mode in Gboard very useful.
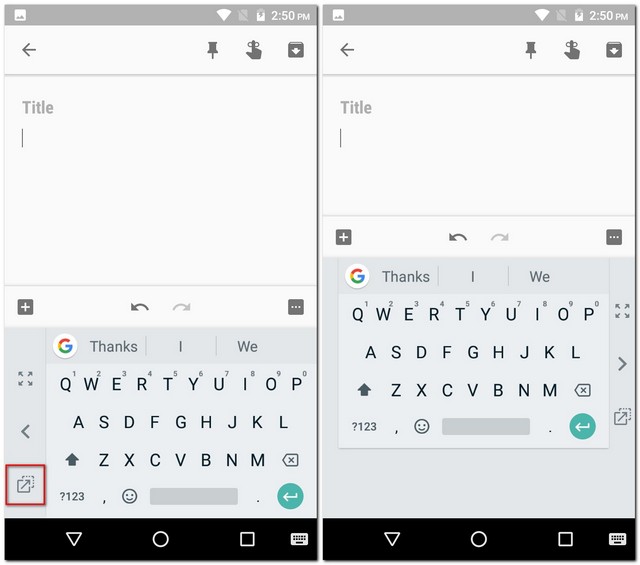
To enable one-handed mode, simply tap on the Google’s ‘G’ icon and select the one-handed mode icon. This will make your keyboard smaller and align it toward one side. You can further change its alignment with a single tap.
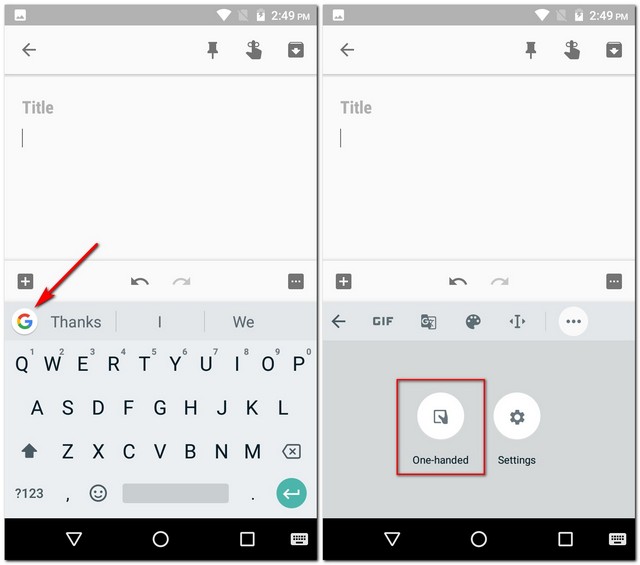
If you still don’t like the positioning of your Gboard, then you can tap on the adjustment icon and drag it to a position you find more suitable. Furthermore, you can even resize the keyboard to your will.
7. Add Custom Phrase Shortcuts in Gboard (Android only)
There are things that you type quite often. For instance, your address or a particular phrase. Well, using this trick, you can add a certain phrase to Gboard’s dictionary and assign a shortcut for it. To know how to do that, follow the steps below.
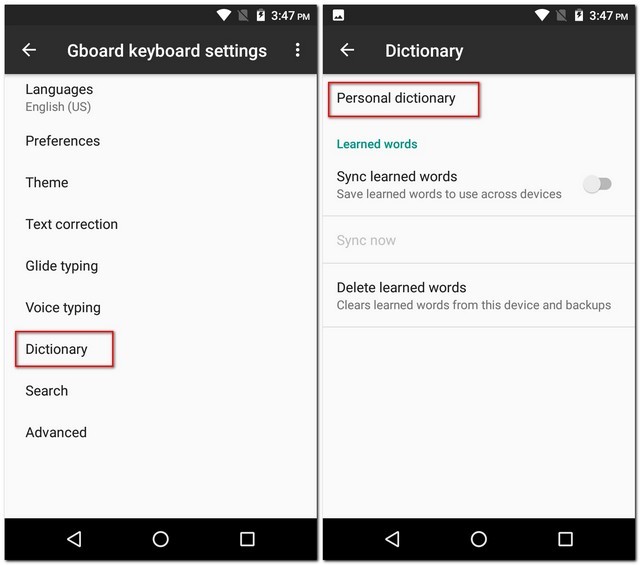
- Firstly, go to Gboard settings. Here, tap on the “Dictionary” option. In the following screen, tap on “Personal dictionary”.
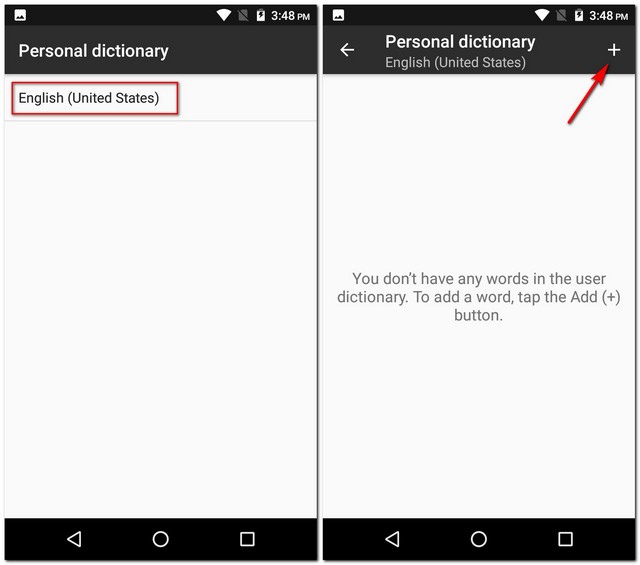
- Now you will see a list of all the dictionaries for the different languages that you have enabled on your phone. In my case, I had only enabled English (United States). Select the language of your choice and then tap on the plus icon (‘+’) on the top-right of the screen.
- This will open a screen with two input fields. In the first one, enter the phrase that you want to add to the dictionary. And in the second one, enter a shortcut for it. Once you are done, simply go back and the changes would be automatically saved.
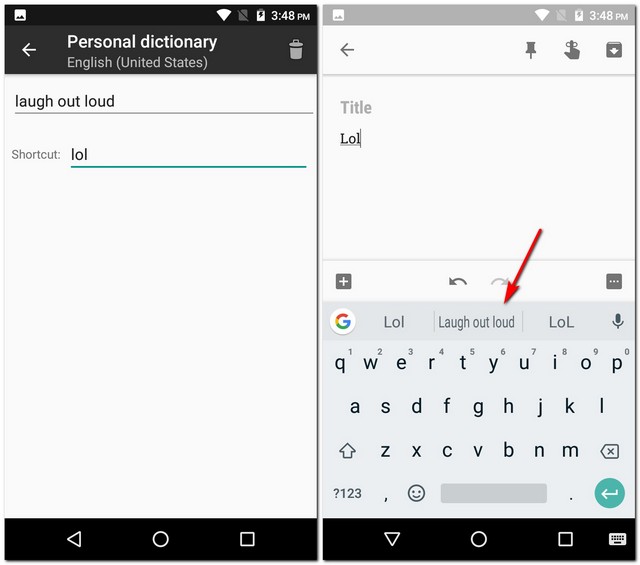
Now when you type the shortcut in any app, Gboard will offer you your custom phrase as a suggestion.
8. Type Fractions in Gboard (Android only)
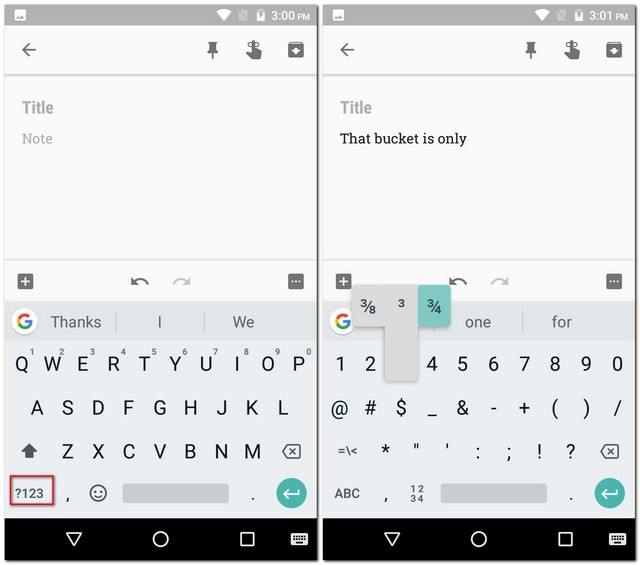
Not all keyboards give us the option to type fractions and Gboard isn’t one of them. To insert fractions, simply tap on the ‘?123’ icon and then long-press any number. You will notice that each number will show different fractions, so you may find the one you’re looking for after some trial and error.
9. Use Dial Pad in Gboard (Android only)
If you have to type a lot of numbers, Gboard has a small trick for you as well. The app allows you to type numbers as you would on a dial pad.
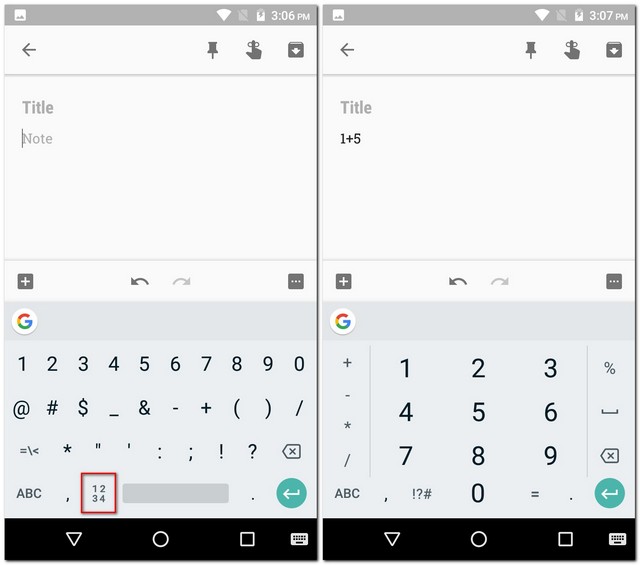
To do this, first tap on the ‘?123’ icon and then on the ‘1234’ icon (to the immediate left of the spacebar). Now you should be able to see the numbers laid out as if on a dial pad. You will also find some basic operations like addition, subtraction, and percentage available at your convenience.
10. Type Using Your Voice with Gboard
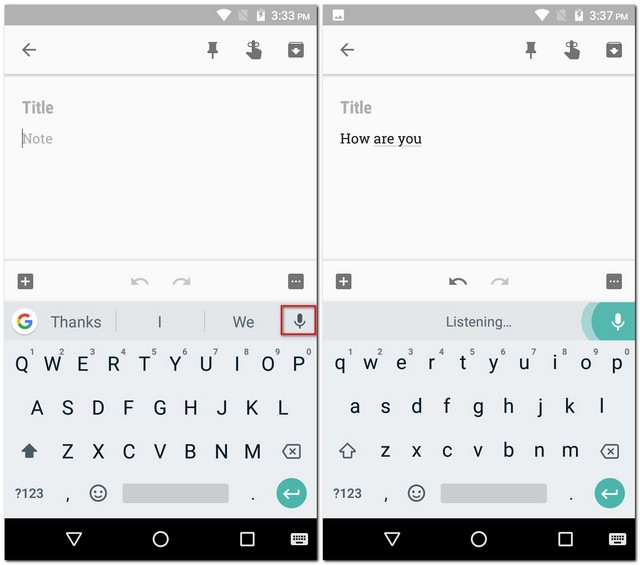
If you are too lazy to type or do not feel like typing, then Gboard allows you to dictate to it whatever you want to type. This feature is derived from Google Text-to-Speech and, as a result, supports 119 languages as of date. To use this, simply tap on the mic icon on the top-right of Gboard and start speaking.
Note: On iOS, you can use this trick by long-pressing the spacebar.
11. Apply Themes to Gboard
With all these great tricks that you can do with Gboard, one thing that you may still find boring is its plain look. However, Gboard offers different themes that you can apply on your keyboard and change its appearance altogether. If you are wondering how to do that, here are the steps:
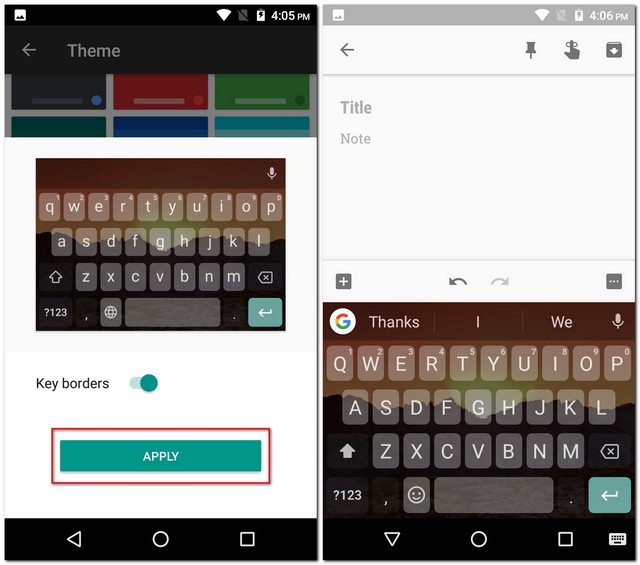
- Firstly, go to Gboard settings. Once there, tap on “Theme”. Now you will see a list of different themes including solid colors and landscapes. You can even choose an image from your gallery by tapping on the icon of “My themes”.
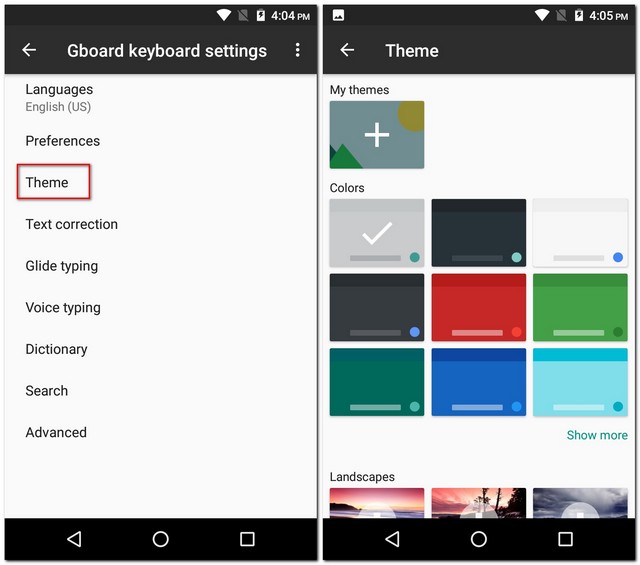
- You can tap on different themes to see a preview of how they will look. Furthermore, you can even choose to add key borders if you prefer. Once you are finally happy with your selection, tap on “Apply” to confirm your selection.
12. Customize Gboard
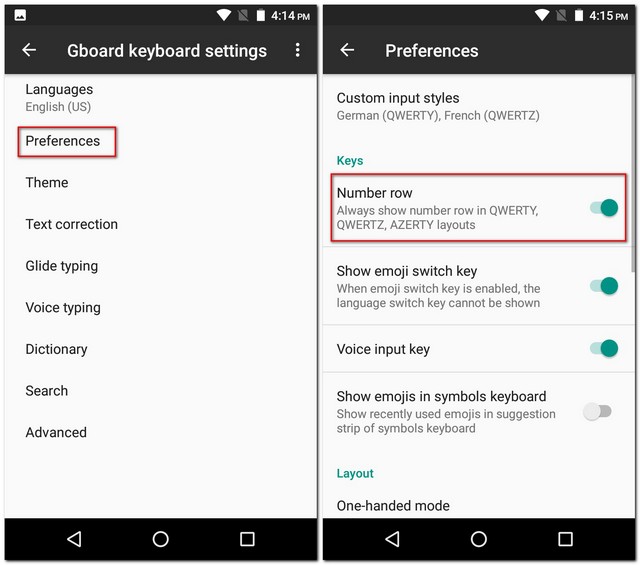
Applying themes is not the only customization option that Gboard offers. If you explore its settings, you can find a handful number of other options as well like changing the position of the emoji switch key, showing emojis in the suggestions strip, turning on/off key press sound and vibration, changing key press delay, text correction settings, glide typing settings, and many more. Moreover, all these settings can be toggled with only a couple of taps. For example, if you wanted to enable the number row on your Gboard, you would go to “Preferences” in Gboard settings and then turn on “Number row”.
Note: The options may vary in the Android and iOS versions of the app.
SEE ALSO: Top 5 Fleksy Keyboard Alternatives You Can Use
Use the Best Gboard Tips and Tricks
Now that you know some cool Gboard tips and tricks that you can use, you have taken one step forward in becoming a keyboard ninja on your Android smartphone or iPhone/iPad. While there are many other tips and tricks for Gboard, these were some of the coolest ones. Apart from them, are there any more cool Gboard tricks that you know of? Do let me know your favorite ones in the comments section below.



Tq to Beebom, you have gave a such a wonderful tips, which is very helpful.
#7 is not exactly correct: Now when you type the shortcut in any app, Gboard will offer you your custom phrase as a suggestion.
NOTE: Personal dictionary shortcuts will not work in apps that disable word suggestions… and wont work for any username and password fields. So.. you are gonna have to remember and type out those passwords.
Boring to read… Can u make these tips as a video?