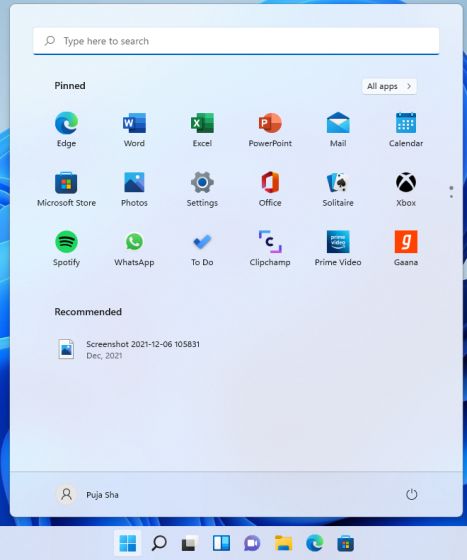
The new Start menu is one of the best features of Windows 11, but for some users, it does not seem to work. Reports suggest that clicking on the Start menu does nothing, and for some users, the Start menu does not appear at all. So to solve this annoying issue, we have come up with this tutorial on how to fix the Start menu in Windows 11. If the Start menu is not working in Windows 11 for you, do not fret. We have covered the best methods in detail to resolve the problem right away. On that note, let’s go through the guide to find a possible solution.
Fix Start Menu Not Working in Windows 11 (2022)
In this guide, we have added 12 different ways to fix the Start menu not working issue in Windows 11. From basic solutions to advanced ones, we have covered everything in this guide. You can expand the table below and check out the solutions at your convenience.
1. Restart Windows Explorer
Windows Explorer is the shell that runs interactive UI elements, including the Start Menu, Taskbar, Action Center, etc. At times, restarting the Windows Explorer fixes the Start menu in Windows 11, so let’s start off with this easy solution. Here is how to do it.
1. Since the Start menu is not working, we need to use Windows 11 keyboard shortcuts to open some important tools. Press “Ctrl + Shift + Esc” to open the Task Manager. If you are opening the Task Manager for the first time, click on “More details” at the bottom.

2. Next, under the “Processes” tab, scroll down and look for “Windows Explorer“. Now, right-click on it and choose “Restart”.
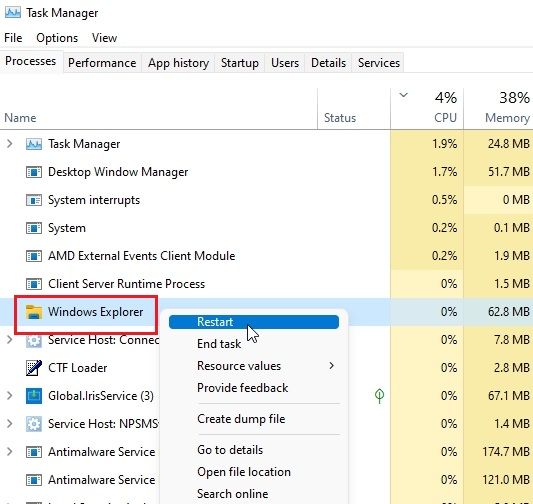
3. After a few seconds, try to open the Start menu, and this time, it should work fine on your Windows 11 PC.
2. Boot to Safe Mode
Sometimes when the Start menu does not work in Windows 11, booting to safe mode solves the issue. Safe mode is basically an isolated environment where no third-party drivers or programs are loaded into memory, offering a clean and secure environment for debugging.
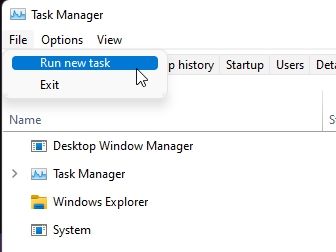
1. Press “Ctrl + Shift + Esc” to open the Task Manager. Here, click on “File” and open “Run new task“.
2. Next, enter msconfig into the text field and hit enter.

3. After that, move to the “Boot” tab and click on “Safe boot” under Boot options. Keep “Minimal” as the default option.
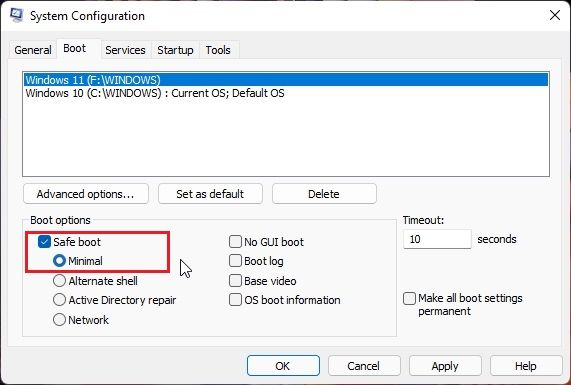
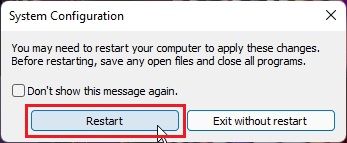
4. Having done that, click on Apply -> OK and choose “Restart“. This will restart your Windows 11 PC to Safe mode instantly.
5. Once you are into Safe mode, try to open the Start menu and see if it works in this environment. If it does, you are good to go.
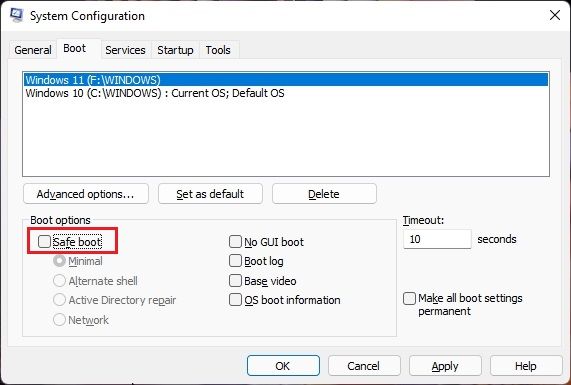
6. Open Task Manager again as we did above and execute msconfig. Go to the “Boot” tab and untick “Safe boot”. Now, restart your PC, and you will be back to your profile, and the Start menu not working problem should be fixed on your Windows 11 computer.
3. Sign Out and Log Back in
If the above methods didn’t work for you, try to sign out of your account and see if that helps fix the Start menu in Windows 11. Many users have reported that signing out seemingly fixes the issue.
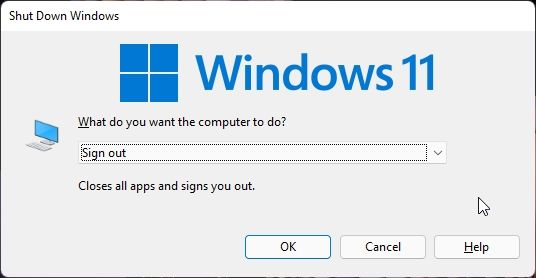
1. Press “Alt + F4” to open the “Shut Down” prompt. Then, choose “Sign out” from the drop-down menu and hit enter. Remember, this will close all your open apps, so save them before signing out.
2. Now, log in again with your PIN or password and check if the Start menu has started working on your Windows 11 PC.
4. Disable ‘Hide the Taskbar’
Someone might have changed the Taskbar settings on your Windows 11 PC, and you might be getting the impression that the Start menu has disappeared. To fix this, you need to disable a setting option, and both the Taskbar and Start menu will be back on Windows 11.
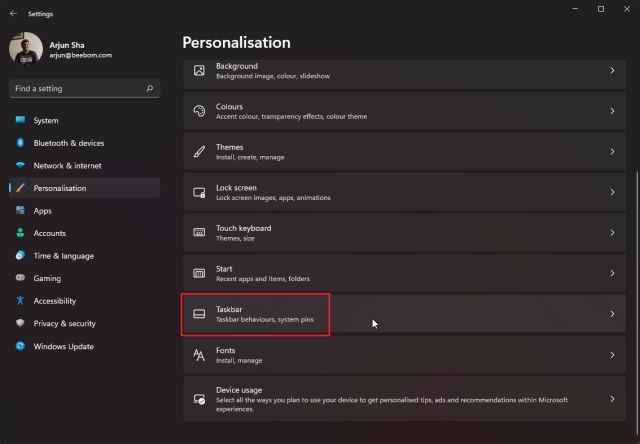
1. Press “Windows + I” simultaneously to open the Windows Settings. Here, move to “Personalization” from the left pane and then open the “Taskbar” settings from the right panel.
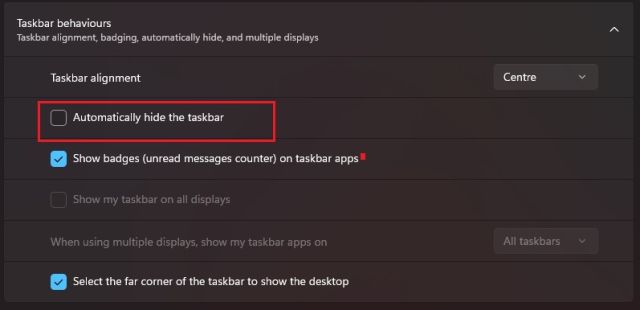
2. Scroll down and expand the “Taskbar behaviors” section and disable the “Automatically hide the taskbar” checkbox. This will bring back the Taskbar, and the Windows 11 Start menu will start working again just like before.
5. Run SFC and DISM Tool
When system components like the Start menu or the Task Manager stop working, you should always fall back to DISM and SFC tools to check your system integrity. Due to system corruption, these kinds of weird issues prop up. So to fix the issue, follow the steps below.
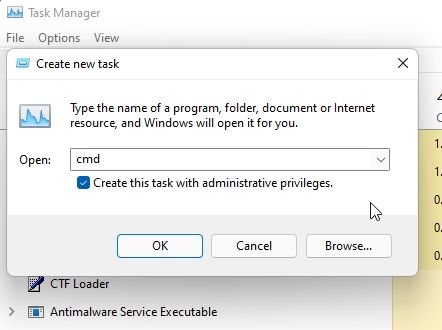
1. If the Start menu is not working on Windows 11, open Task Manager by pressing “Ctrl + Shift + Esc”. Here, click on File -> Run new task.
2. Next, type cmd and enable the checkbox for administrator privilege right below and hit enter.
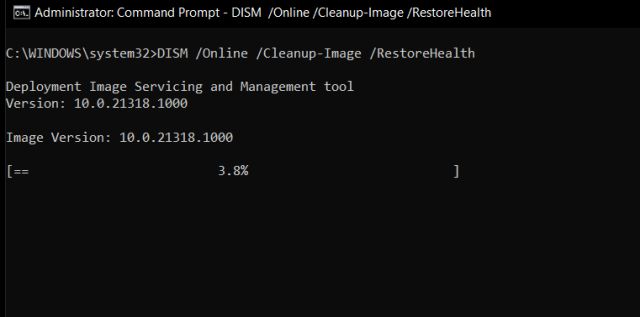
3. A Command Prompt window will open up. Here, type the below command. This will check for all the errors in the system image and fix them with a clean image. Well, this process will take considerable time. If you want more detailed steps, check out our explainer on what is DISM tool is and how to use it.
DISM /Online /Cleanup-Image /RestoreHealth
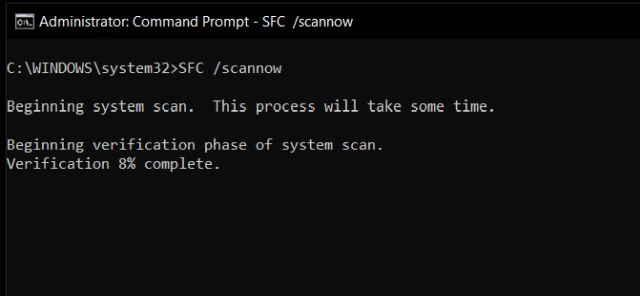
4. After that, run the below command to check if the SFC tool finds any integrity violation within the system. If you don’t get any errors, restart your PC and see if the Start menu not working issue has been resolved on your Windows 11 computer.
SFC /scannow
6. Restore the Default Start Menu
The Windows 11 Start menu comes with its own set of default apps and preferences. Over time, we uninstall some apps and change some settings. However, we can restore the original Start menu with a simple Powershell command to see if this can fix the issue. Simply follow the instructions below:
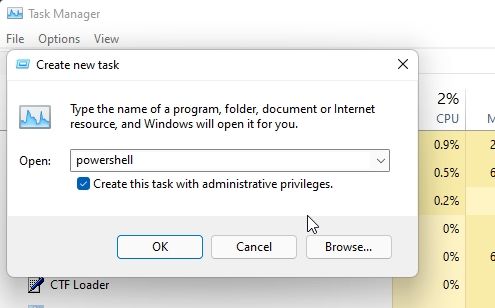
1. Open the Task Manager by using the “Ctrl + Shift + Esc” keyboard shortcut. Here, click on File -> Run new task.
2. Next, type powershell, enable the “Create this task with administrative privileges” checkbox, and hit Enter. This will open PowerShell with elevated admin permission.
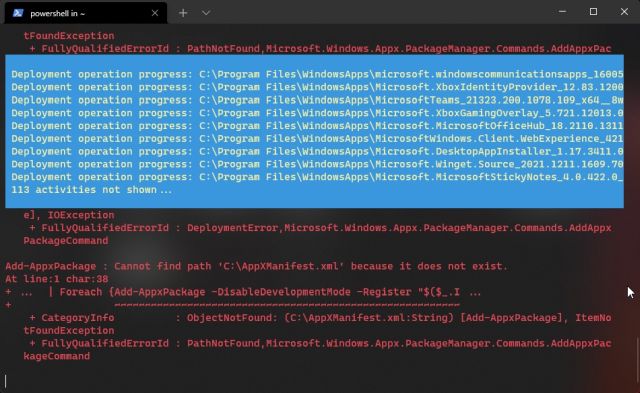
3. Finally, run the below command. This will download lots of files and rebuild the Start menu from scratch. It may throw some errors, but don’t worry, let it complete the process. After that, restart your PC, and the Start menu should work fine on Windows 11.
Get-AppXPackage -AllUsers | Foreach {Add-AppxPackage -DisableDevelopmentMode -Register "$($_.InstallLocation)\AppXManifest.xml"}
7. Restart Start Menu Experience Host
If the Start menu still won’t open in Windows 11, you can try restarting the Start Menu Experience Host. It’s a process responsible for handling the Start menu, including the app list, searches, recommendations, and more. Here is how to go about it.
1. Use the keyboard shortcut “Ctrl + Shift + Esc” to open the Task Manager. Here, move to the “Details” tab.
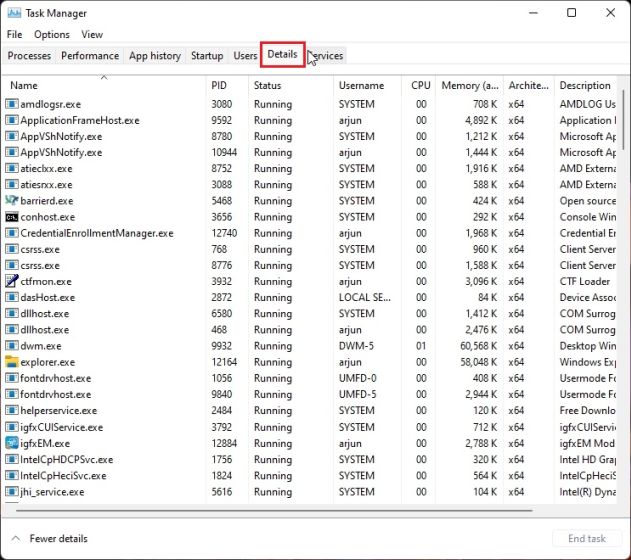
2. Now, scroll down and look for “StartMenuExperienceHost.exe“. Right-click on it and click on “End process tree”. This will end the process and all the associated processes too.
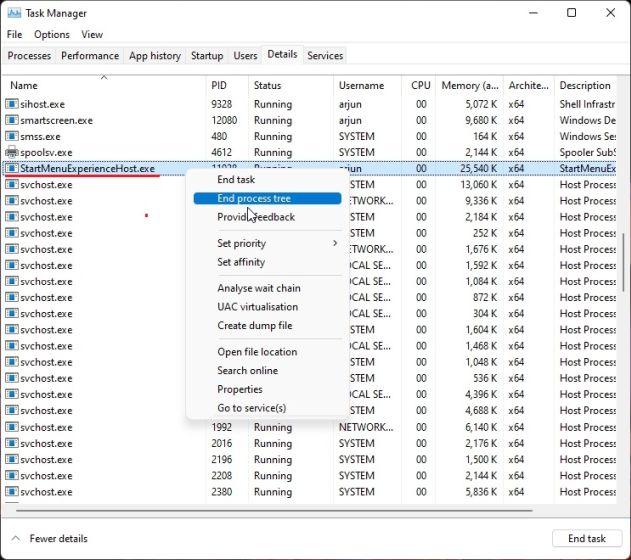
3. Now, give your computer a few seconds, and the process will restart itself. You can restart your PC as well. Now, go ahead and open the Start Menu, and this time, it should work on Windows 11.
8. Rebuild Search Index
As Windows Search is deeply integrated with the Windows 11 Start Menu, it sometimes stops working due to the corrupt search index. In such cases, it becomes important to rebuild the search index from scratch. And this will fix the Start menu not working issue in Windows 11.
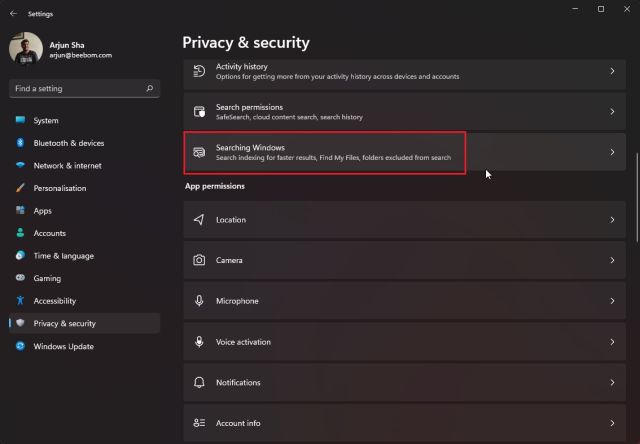
1. Press “Windows + I” to open Windows Settings. Then, move to the “Privacy & security” settings page from the left pane and click on the “Searching Windows” in the right pane.
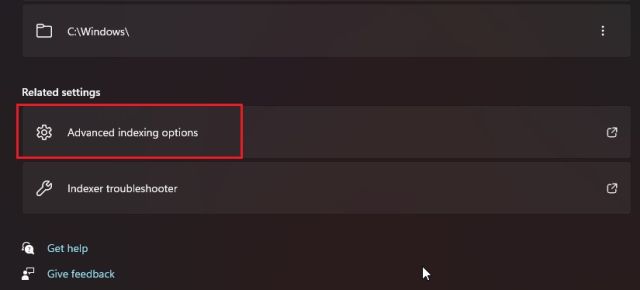
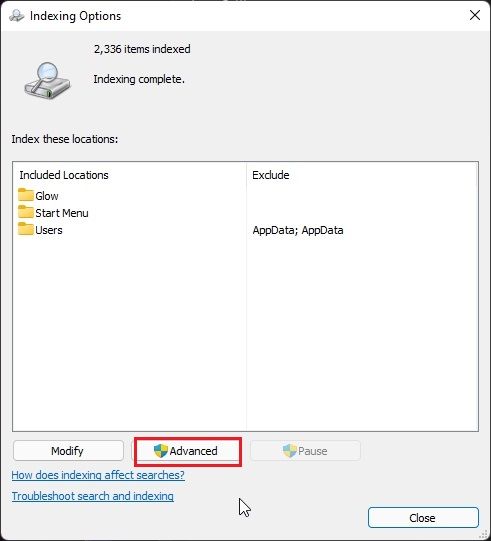
2. Next, scroll down to the bottom and click on “Advanced indexing options“.
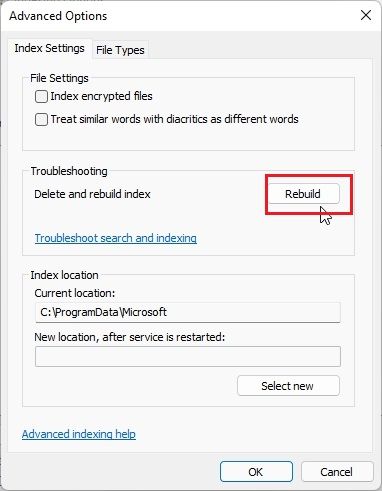
3. In the next window, click on “Advanced“.
4. Finally, click on “Rebuild” under the “Troubleshooting” section, and it will take around 20-25 minutes to complete the process. It may take longer if you have stored lots of files and folders on your PC. Once the process is complete, restart your PC, and you will find that the Start menu has started working on Windows 11.
9. Create a New Local Account
If the Start menu is not working on Windows 11, you should create a new local account as a workaround. Sometimes, creating a new local account and signing into it fixes most of the issues on other user accounts as well. Specifically, the Start menu not working or not opening bug is fixed with a new local account. Here is how this method works:
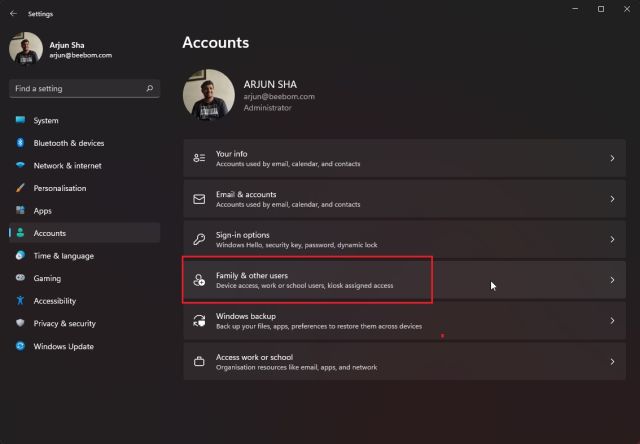
1. Use the “Windows + I” keyboard shortcut to open Windows Settings. Now, navigate to “Accounts” from the left pane and open “Family & other users” in the right-side panel.
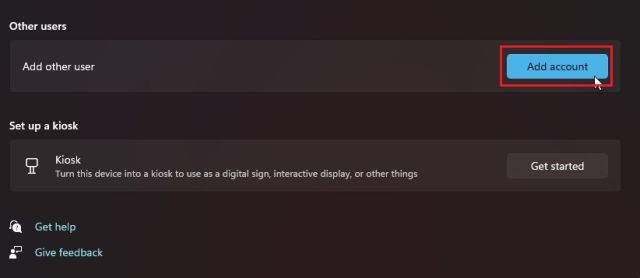
2. Next, click on the “Add account” button under “Other users“.
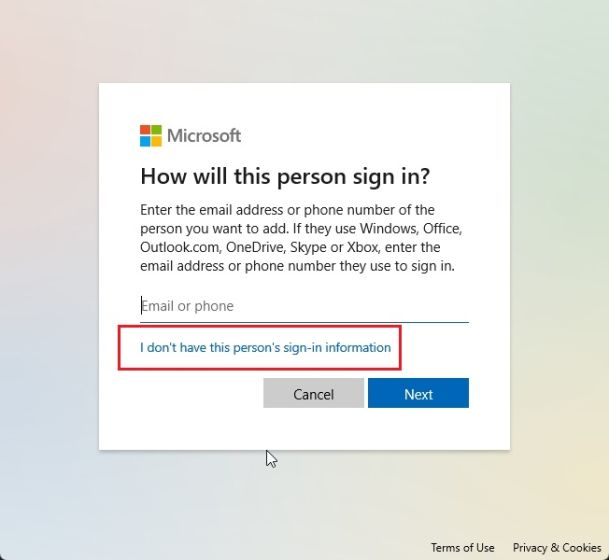
3. Click on “I don’t have this person’s sign-in information” to create a local account.
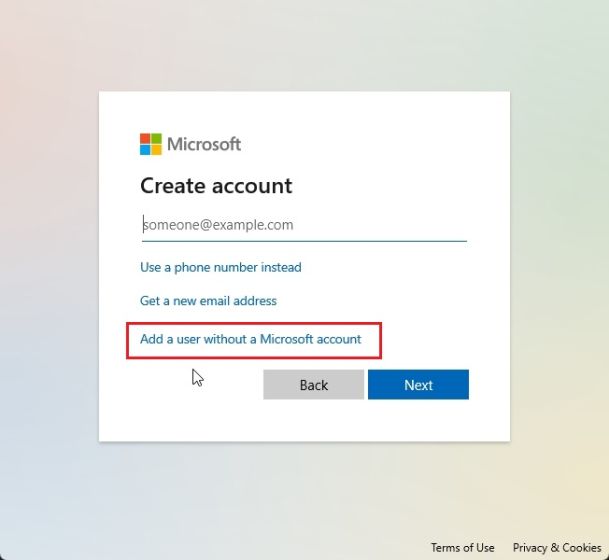
4. After that, click on “Add a user without a Microsoft account“. At this point, Microsoft really wants you to use an online account on Windows 11, but you can steer clear of it.
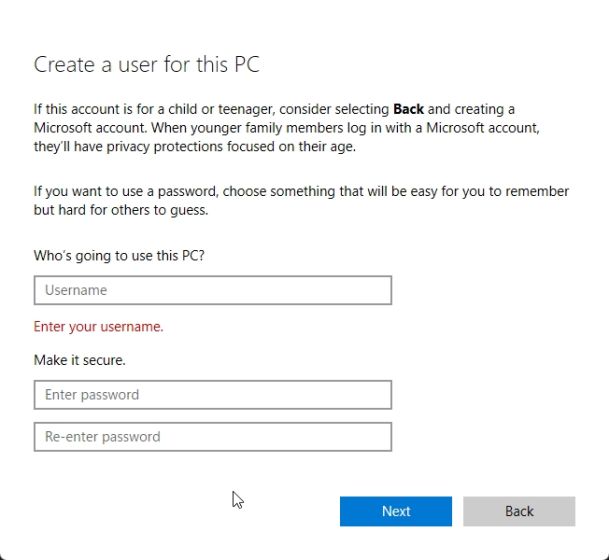
5. Now, enter the name and password for the new local account and click on “Next“. And that’s it. You have successfully set up a new local account on your Windows 11 PC.
6. Finally, switch the user on your Windows 11 PC by pressing “Windows + L” simultaneously. Select the new account, enter the password or PIN, and sign into the local account.
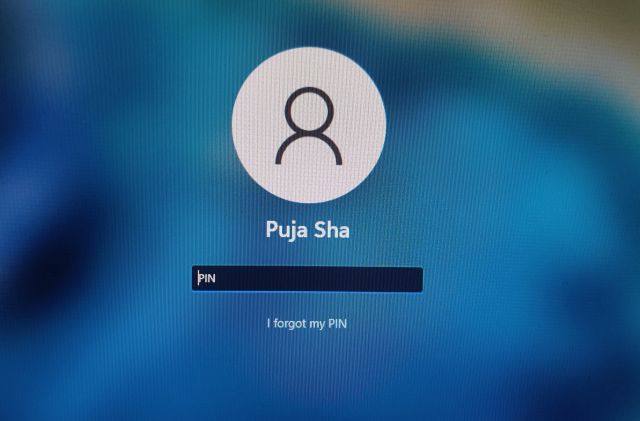
7. Here, open the Start menu, and if it works as intended, you are good to go. Restart your PC and sign in to your original account. This time, the Start menu should start working on your default account on Windows 11.
10. Uninstall Third-party Apps
When Windows 11 was first unveiled, not many liked the centered Taskbar and the flyout design with no support for live tiles and folders in Microsoft’s latest desktop OS. Hence, many third-party apps surfaced to help you ring back the classic Start menu and offer users greater customization options to Windows 11 Start menu. Some popular apps include Start11, StartIsBack, Start Menu X, etc.
In case you have installed any of these third-party apps that replace the original Start menu, uninstall it right away. They could be causing the Start Menu to not work properly. Uninstalling them will most probably fix the Start menu issue on Windows 11. You can open the Run window and execute appwiz.cpl to uninstall the third-party app right away.
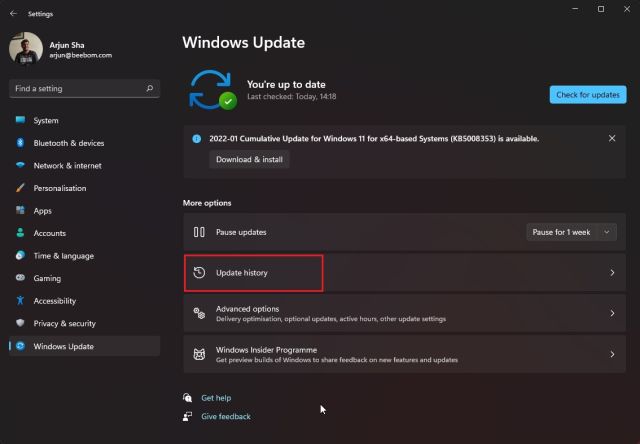
11. Uninstall Last Windows Update
If the Start menu stopped working on your Windows 11 PC after a recent update, you can uninstall the latest update and move to the last working build. This will save a lot of time and hassle for you. So here’s how to do it.
1. Press “Windows + I” to open Windows Settings and move to “Windows Update” from the left pane. Here, click on “Update history” on the right pane.
2. Now, scroll down to the bottom and click on “Uninstall updates“.
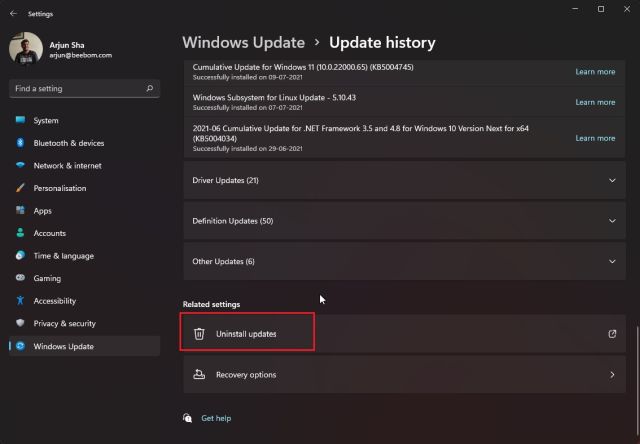
3. A Control Panel window will open up. Now, select the last update for Microsoft Windows (not security update) and hit the “Uninstall” button. That’s it. Now, your PC will revert to the last build with a working Start menu on Windows 11.

12. Reset Windows 11
Finally, if the Start menu is still not working in Windows 11, you will have to reset Windows 11 to the latest Windows 11 version. This will most certainly fix the Start menu on your PC. Microsoft offers a built-in option in Windows 11 to reset the OS to the latest version with all your files intact. It automatically downloads the OS and installs it on your PC without touching your files. Note that you will lose all your programs and files in the C drive, so make a backup before moving ahead.
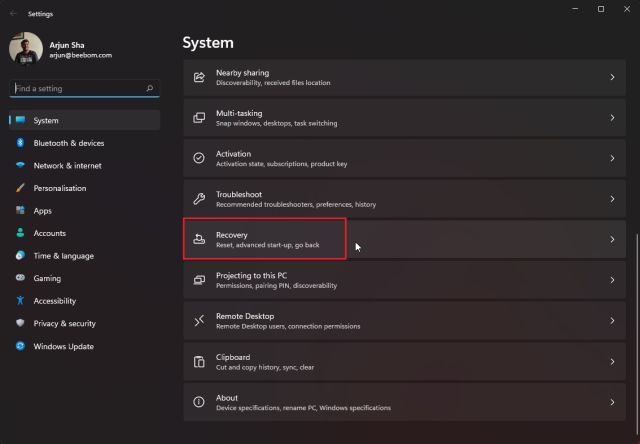
1. Use the Windows 11 keyboard shortcut “Windows + I” to open Windows Settings. Then, move to “System” from the left pane and scroll down to the bottom. Here, you will find an option called “Recovery“. Open it.
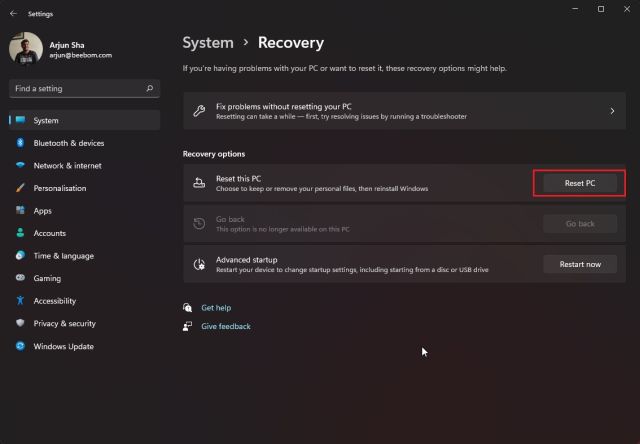
2. Next, click the “Reset PC” button next to the “Reset this PC” option.
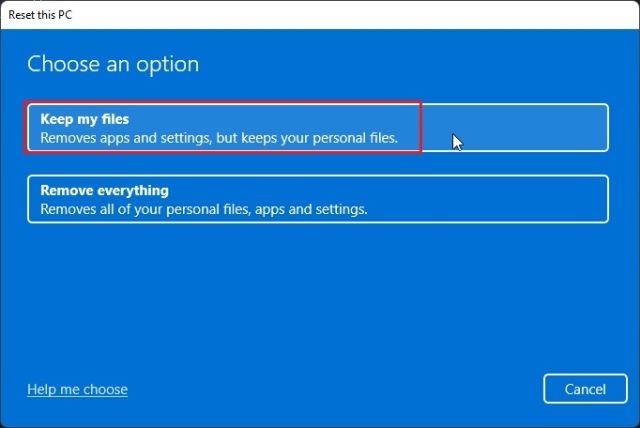
3. After that, select “Keep my files” and follow the on-screen instructions. Your PC will now reset to a clean Windows 11 build with a working Start menu.
Start Menu Won’t Open in Windows 11? Find a Fix Here!
So that is how you can fix your computer if the Start menu is not working in Windows 11. For most users, restarting Windows Explorer should resolve the issue. However, if that does not work, go ahead and try other methods as well. Anyway, that is all from us. In case you are facing the no sound issue on Windows 11, head over to our detailed tutorial and fix that annoying bug as well. Moreover, if you are in search of the best malware removal tool for Windows 11, don’t forget to follow our curated list. Finally, if you have any questions, let us know in the comments section below, and we will help you out.