After months of teasing, the name Oreo was finally unveiled alongside the stable release of Android 8.0. The developer betas for the Android Oreo have been around for a long time, bringing about tons of new features and improvements. Google has also officially started the public rollout of the Android Oreo stable builds for the Pixel, Pixel XL, Nexus 5X, Nexus 6P, Pixel C tablet, and the Nexus player set-top box. While most of the features of Android O are easily accessible, there are some nifty hidden features that you may not be aware of. So, if you’ve got the Android Oreo on your smartphone and wondering how to make the most out of your device, read on, as we bring to you 12 cool Android 8.0 Oreo tricks that you should know about:
1. Enable and Use Picture-in-Picture Mode
One of the biggest inclusions of the Android Oreo is the fact that it supports Picture-In-Picture mode. What this essentially means is that you can video call someone or watch a video on YouTube while checking your email or doing other work in the background. While the PiP mode has already been there on Android TV since Marshmallow, it has now finally made its way to Android Oreo as well. To enable Picture-in-picture mode, follow the steps below:
- Head over to your Android Settings and tap on “Apps & notifications”. Once there, tap on “Advanced” to reveal more options.

- Now, tap on the “Special app access” option. Once there, a new list of special access controls available to various apps will open up. Select “Picture-in-picture” from the list.

- You will now be presented with a list of all the apps that support picture-in-picture. Simply tap on the desired app, and enable the toggle next to “Allow picture-in-picture”.

You can now use the Picture-in-picture mode for the apps that you wish to. For example, video calling someone on WhatsApp will open up the full-screen video call window. Now, you can just tap on the “message” icon to open up the chat menu, and furthermore, do your tasks in the background, while leaving a pop-up window of the video call on the screen in one corner. Nifty, right?

2. Use Autofill Inside Apps
Another great feature of Android Oreo is the inclusion of the Autofill API. You may already be familiar with Google Smart Lock, which basically saves your passwords when you log-in for the first time into a website. It then presents the same credentials to you the next time that you wish to log-in to the website. In Android Oreo, this feature has been extended to work within apps as well. Google will basically save your passwords and offer to easily input them directly the next time you try to log into an app.
When you first log into an app, Google will offer you to save the account credentials. To do so, in the notification for “Save to Autofill with Google”, tap on “Save”.

Now, the next time you try and log into your account, Google will automatically present you with a list of saved credentials. Simply tap on your preferred ID and Google will automatically fill out your details.

Also, Google has allowed third-party apps like LastPass and Dashlane to work inside apps as well, thus simplifying the password management process. To do so, follow the steps below:
- Here, I’ll be demonstrating how to use LastPass Password Manager inside Twitter. The method remains the same for all password managers and all other applications. To begin with, download and install LastPass and head over to the “Accessibility” section. Once there, tap on “LastPass” under “Downloaded Services”, and enable it.

- Next up, open up LastPass and log in with your LastPass account, which has all your saved passwords. In case you don’t have any passwords saved yet, you can add them with the help of the Floating Action Button.
- Now, open up the app that you wish to log into. Once there, similar to the Google’s Autofill service, you will get a suggestion for saved credentials. Simply tap on it to log into your saved account. And that’s it. LastPass will now automatically enter the login credentials you stored in its app onto the login page.

Finally, if you’d ever like to switch between password managers, you can do so by heading over to Settings -> System -> Languages & input -> Advanced -> Autofill service. Here, you can select amongst various Autofill services such as Google Autofill, LastPass, or any other auto-fill service that you may have installed. Alternatively, if you don’t like the feature, you can set it to “None” as well.

3. Do More With The Help of Notification Badges
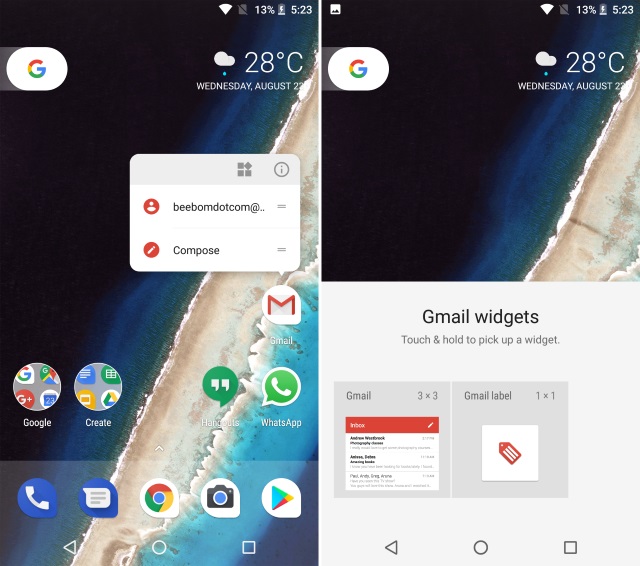
Notification Badges is another new feature that comes with Android Oreo. While you can always view your notifications from the notifications panel, in the case where you have tons of notifications, it can be quite tedious to scroll through to list to find the notification you were looking for. Thanks to Notification Badges, the entire process has been simplified. On Pixel Launcher (or any other supported launcher), whenever an app gets a notification, there will be a notification dot over them. Simply long pressing that icon will reveal the notification badge for that app, which allows the user to view the notification for that app conveniently.

Furthermore, underneath the notification badges is also the list of various app shortcuts, that you can use to carry out various app related tasks that would otherwise require you to open the app. Lastly, if there is a widget available for the selected app, it will be shown in the notification badge as well. You can directly add a widget to the home screen using this button.
4. Take Control of Apps Running in Background
For any mobile user, battery optimization is an important aspect of any operating system. While Android Oreo features tons of battery optimizations, it also gives the user control over what apps should one allow to run in the background. Basically, Android Oreo shows the user what apps are currently running in the background, and allows him/her to effectively force close them. The steps to do so are pretty simple and are as follows:
- Open up the notification panel to reveal the Android System’s notification regarding the list of all apps running in the background. Tap on it to go to the app’s info page.

- Once there, simply tap on “Force Stop” to stop the app from running in the background.

5. Filter App Notifications Using Notification Channels
With Android Oreo comes another new feature, that is Notification Channels. Earlier, the app developer would put in all types of notifications as one collective set, and the user had the option to either disable them entirely or bear them altogether. Thanks to Android Oreo, the notifications are now divided into categories, based on their priority or functioning. The user can now easily disable one category of app notifications while keeping the other one enabled. To do so, follow the steps below:
- In our example, we’ll be using YouTube. Open up your Android Settings, and tap on “Apps and notifications”. Once there, select “App info”.

- Now, a list of all the apps installed on your system will show up. Scroll to the bottom and select “YouTube”. You will now be able to see the various settings related to YouTube. From this screen, select “App notifications”.

- Over here, you’ll now be presented with the various categories of notifications for the YouTube app. You can now choose amongst Download notifications, General notifications, etc. You can enable and disable them according to your preferences.

So, for example, if you were to disable the “Download notifications”, you will not be shown any notifications for downloaded videos from YouTube. That being said, any other notifications, such as notifications for new videos from subscribed channels would still be shown.
6. Smart Text Selection
Over the years, Android has developed a lot, bringing in new features that help the user operate their devices with ease. To ease the process of searching for content, Google has introduced Smart Text Selection with Android Oreo. What this feature allows you to do is select the important text simply by double-tapping over it. This data can be a phone number or an address, or anything that seems relevant.
For example, as shown below, double tapping on some text will automatically select the relevant information from it, in this case, the person’s address. Additionally, Google also displays actions and apps relevant to this text. For example, for someone’s address, the system shows suggestions to locate the address on Google Maps.

7. Search Better with New Android Settings
Android Settings have become much more polished in the past couple of editions. While the Settings sidebar from Android Nougat is gone (R.I.P.), the “Suggestions” feature is still there. Furthermore, Android Settings now have a deeper integrated Search function, that allows you to search any option that may be hidden underneath a couple of layers of menus. The search function in Android Settings allows you to view options that are otherwise hard to find. What’s more is that along with these settings, the search also displays the path of that setting as a subtext, making it easier for you to locate it the next time.

For example, if you search the word “google” on Android Nougat, the search only returns two results for Google voice typing and Google Indic Keyboard. On the other hand, a simple search for “google” on Android Oreo returns multiple results, which include multiple settings to choose from. It also includes settings related to apps that have the word ‘Google’ in them, for example, Google Now Launcher and Google+.

8. Change Icons Shape
Customizability has always been one of the strongest hold points for Android. While the Pixel Launcher is highly regarded as the stock and basic Android Launcher, when coupled with Android Oreo, it also allows the user to change the overall look of the app icons. To do so, follow the steps given below:
- Open up your home screen and hold on an empty space to open up the launcher customizability menu. Select “Settings” from the options at the bottom of your screen.
![]()
- Next up, the settings for Pixel Launcher will now open up. Tap on “Change icon shape” to continue. You’ll now be presented with a list to choose from System default, Square, Rounded square, Squircle, and Teardrop. Select the one according to your liking by simply tapping on it.
![]()
9. Enable Developer Quick Settings
Quick Settings on Android allow for easy toggling and/or access to various functions of the system. Sadly, the features that any developer likes to use such as showing layout bounds, enabling profile GPU rendering, etc., are always hidden inside the Developer options menu within the Android Settings. It can become quite a hectic task to turn them on and off each time you require them. Luckily, Android Oreo makes things easier for developers by creating Developer specific quick settings. To enable them, follow the steps mentioned below:
- Open up the Android Settings, and head over to the “System” section. Once there, tap on “Developer options”.

- Now, scroll down and select “Quick settings developer tiles”. Now, you can enable or disable various developer related tiles such as “Show layout bounds, Profile GPU Rendering, Force RTL layout direction, and Window animation scale”.

- Once enabled, these notifications will now show up in Quick Settings. To add them, tap on the “Edit” button in the bottom corner of your Quick Tiles page. Now, simply drag the developer tiles to the Quick Settings page.

10. Snooze Notifications
Android notifications are great for letting the user know what’s up, but there are times that it might come in the way of what you’re currently doing. Maybe you’re doing something important and you don’t want a certain notification bothering you. But, at the same time, you’re worried that if you swipe it, you’ll completely forget about it. That’s where the Snooze notifications feature of Android Oreo comes in. You can simply snooze your notifications for 15 minutes and continue doing your work. Once the timer runs out, you’ll be presented with the same notification again. Also, if 15 min doesn’t work for you, you can set the timer to 30 minutes, 1 hour, or don’t snooze. To snooze your notifications,
- Once a notification arrives, simply slide the notification to the side just a bit. A new menu will pop up with a clock icon and a settings icon. Tap on the “Clock icon”.

- A timer option will now appear. Simply select the time you wish to snooze your notification for, and then close the notification bar. Your notification should now be snoozed, and will automatically reappear once the timer runs out.

11. Automatically Enable Wi-Fi
Android Oreo also comes with the ability to automatically turn on WiFi when you’re in home or office, where there is a high-quality network available. It comes as a nifty little feature that while conserving battery, also allows you to automatically switch to high-speed networks. To enable this feature, follow the steps below:
- Open up your Android Settings and head over to “Network & Internet”. Once there, tap on “Wi-Fi”, to open the WiFi related settings.

- A list of all your Wi-Fi networks will now appear. Scroll down and select “Wi-Fi preferences”. A new screen will now appear. Just enable to toggle next to “Turn on Wi-Fi automatically”, and you should be good to go.

Your WiFi will now automatically turn back on when near high-quality saved networks, such as your home network.
12. Enable or Disable Notification Dots
Another new feature that comes with Android Oreo is notification dots. These dots show that there is something new in the app that the user should check out. While some users might find that a very useful feature to have (including me), some might just find it in the way. Either way, Android doesn’t take the right of choice away from the user, and hence allows the user to enable/disable the notification dots as per their liking. Additionally, you also have the choice to disable these notification dots globally or per app.
Disable Notification Dots for All Apps
- Open the Pixel Launcher settings by tapping on an empty space on your home screen and then selecting “Settings”. Once there, tap on “Icon Badging”.
![]()
- A new screen for notification settings will now open up. Simply enable or disable the toggle next to “Allow notification dots” to enable or disable the notification dots.

Disable Notification Dots For a Specific App
- Alternatively, if you’d like to simply disable the notification dots for a specific app, simply head over to Settings -> Apps & notifications -> App info. Now, tap on the app that you wish to disable the notification dots for, and in the new screen that opens up, toggle the button next to “Allow notification dot”.

Bonus: Octopus Easter Egg
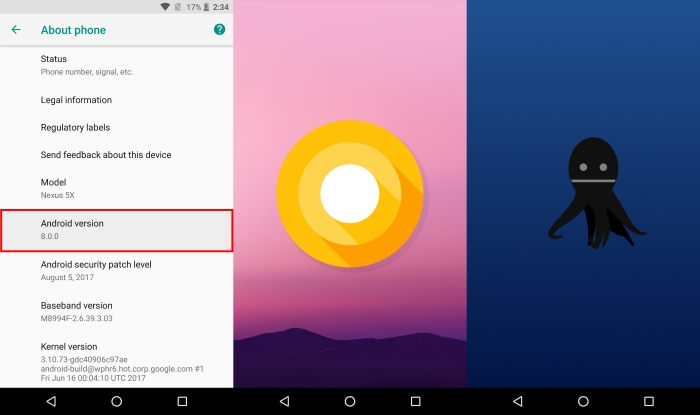
Similar to previous Android releases, Google has hidden a fun easter egg in its Android Oreo release. To find it, head over to Settings -> System -> About Phone. Now, tap on the “Android Version 8.0.0” a couple of times till you see the big yellow Android O symbol pop up on your screen. Now, tap on it a few times and then long press it till the time your device vibrates. An animated octopus will now appear on your screen that you can stretch and drag around. While it may not be as fun as the Android’s version of Flappy Bird, it still is a fun little thing to have on your device.
SEE ALSO: How to Get Android O Features on Any Android Device
Make The Best Out Of Your Device Using These Android Oreo Tricks
Android Oreo is the latest release by Google, and certainly a step in the right direction. Though as always, the general user may not be aware of all the changes that happen behind the scenes, and the functionalities that are added for their ease. As such, our article for tips and tricks for your Android Oreo device should come in handy. Watch this space for more Android Oreo tricks, and make sure to comment any that you find in the comments section below.