we are ecstatic when we buy a new smartphone but moving all your data from your old smartphone to new can be a daunting task and it surely takes all the fun out of it. thankfully, we have a cool new app dubbed cloneit from the same lenovo developers who developed shareit. cloneit brings the ability to transfer 12 types of data ranging from contacts to system settings without the need of a cable, pc or network.
cloneit lets you transfer contacts, sms text messages, mms, call logs, apps, system settings, photos, music and videos. the app wins brownie points for its features and its ease of use. transferring all your data from one android smartphone to another should become very easy, once you start using cloneit. so, here’s how to use cloneit:
note: we tested the cloneit android app (version 1.1.8) with moto g 3rd generation acting as the sender device and a moto e 2nd generation acting as the receiver device.
steps to transfer all your data via cloneit:
- firstly, you need to have the cloneit app installed on your old as well as your new android smartphone.
- once you’ve installed the app on both devices, open cloneit on your older android smartphone and select “sender“.
- the app will then create an open wifi hotspot with the name “dks0-tw90b0cz“. the name on your device might differ but it should be along the same lines.
- now, connect the new android smartphone to the wifi network created.
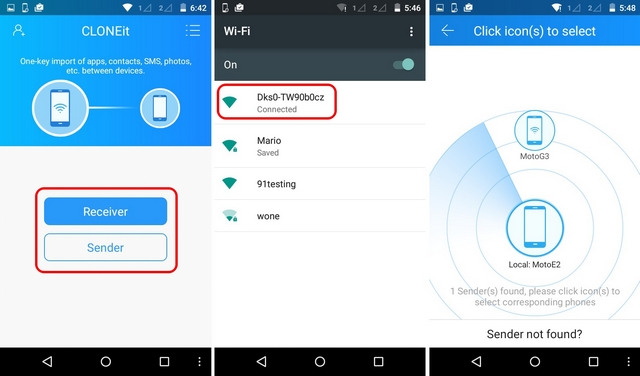
- after the connection is made, open cloneit app on the new device and select “receiver“.
- you will see the sender device when the search begins. select the sender device you want the data from.
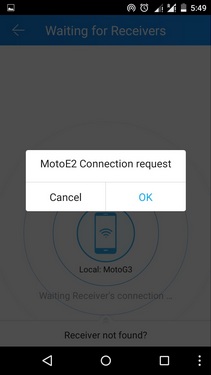
- then, the sender will receive a connection request from the receiver device. tap “ok” to the request on the sender android device.
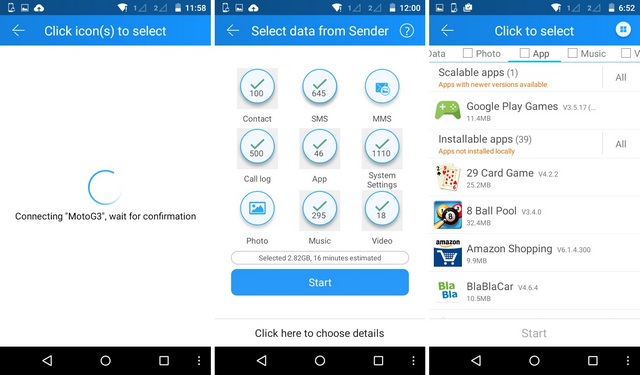
- once the request is granted, the receiver device will have the ability to select the data to migrate. there’s also ability to select certain files or apps. the app also shows you the size of all the data that will be transferred.
note: to move sms texts, cloneit will ask you to change the sms app from default app to cloneit’s app. you can later go to settings and change the default messaging app once you are done using cloneit.
- once you have selected the data you want to import, you can tap the “start” button to start importing the data to the receiver android smartphone.
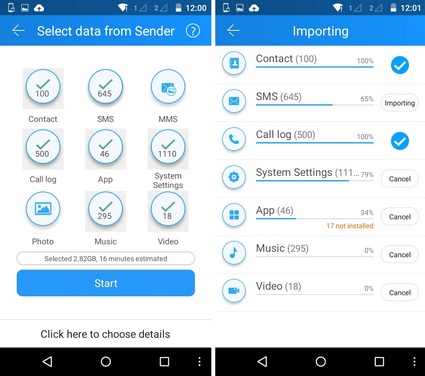
- you can set apps to install automatically by going to settings->accessibility->auto install and turn it on. (this feature is available only on devices running android 4.1 jelly bean or up).
note: since the apk files of the apps are moved, you can also install all the apps manually. you will have to “allow installation of apps from unknown sources” in settings->security.
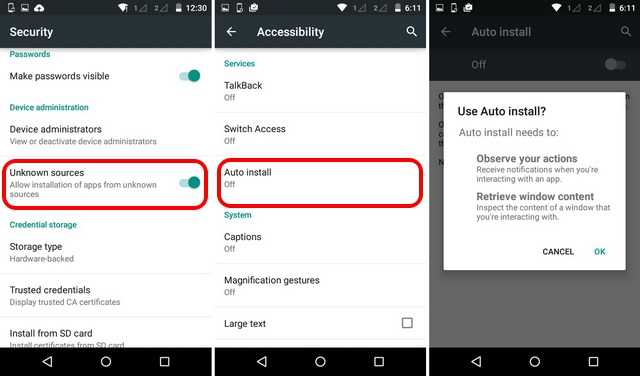
- that’s it! once the transfer is complete, you will find your old system settings (browser bookmarks, wallpapers and calendar details), files, smses, contacts, call logs, photos, videos, apps and music in your new smartphone.
the steps are pretty easy, isn’t it? well, they certainly are! there are certain advantages that cloneit brings that make it a great data transfer tool. the data transfer rate in cloneit is 20 mbps, which is 200 times faster than what we are used to seeing in bluetooth file transfers. along with that, the app does not require an internet connection to work. it also brings additional features like app uninstaller, space cleaner and more.
see also: how to recover deleted files on android
cloneit works but we want more!
cloneit works as it’s supposed to but we would love it if the developers bring even more features like the ability to transfer app data, more system settings etc. while the app easily transfers most of the data, it does face some issues (errors) while transferring some system settings. well, here’s hoping that the developers at lenovo hear us and cloneit gets better and better with updates.
thanks to cloneit, moving data from one android smartphone to another is going to be a piece of cake. give it a try and do let us know in the comments section below if you have any doubts or queries.


Can we delete cloneit app….. After cloning all the data
A nice piece of information and looking fabulous, Honest work and please update some more.
It is a pile of poop and it stinketh!
trying it on a droid turbo2 as sender says clone stopped, and it turns wifi off. not easy if it doesn’t work.
Me too on my s7
Tried to use this on a Galaxy S8+. Same problem “Clone stopped” regardless of what I do.
Too bad, it looked like a good app otherwise.
When you click on old phone sender, it says clone stopped. It turns wifi off. Junk app
Don’t work for me. When you click on old phone sender, it says clone stopped. It turns wifi off. Junk app
Sounds wonderful until you go to the Play Store to install it and it says that it’s not compatible with your tablet.
Didn’t work for me. Moto x 2nd gen as sender moto x pure as receiver. Both have app installed. Open app on sender, everytime I select sender I get “clone stopped”. It shuts off wifi everytime I tap sender. Tried with wifi off (cellular on), same message “clone stopped”. I keep reading how easy to use this app is…apparently I’m missing something?!