
Pumpkins in Minecraft are one of the most common and useful crops in the game. They can be found in most biomes of Minecraft, are easy to grow, and have a variety of uses. But unfortunately, they don’t grow like other crops in Minecraft. Because of that, you need to take extra measures to harvest, collect and use pumpkin in your world. So we are stepping in to make your life easier and teaching you how to make a pumpkin farm in Minecraft. Once you build the pumpkin farm, you can let the farm do its job while you explore your world. The best thing about this farm is that you can use the same design to create a melon farm as well. With that said, let’s dive right in!
Make a Pumpkin Farm in Minecraft (2022)
We will first cover the uses of pumpkins in Minecraft 1.19 to help you make the most out of this farm. But if you are not interested in that, use the table below to skip to the farm building process.
Uses of Pumpkins in Minecraft
Since we are going to build a pumpkin farm, you should know the various ways in which you can use this fruit within Minecraft:
- Helmet: You can use carved pumpkins as a helmet to prevent Endermen from getting hostile even if you are looking at them directly. It is useful while making an Enderman farm in Minecraft.
- Golems: Both Iron Golem and Snow Golem require carved pumpkins to bring them to life.
- Jack o’ Lantern: When combined with a torch, the pumpkins turn into a light block.
- Pumpkin Pie: You can use pumpkins to create pumpkin pies, which are a great food item to restore your hunger bar.
- Trading: Apprentice-level farmer villagers give out emeralds in exchange for pumpkins. This trade is usually expensive, but it can be profitable if you cure a zombie villager before trading.
Uses of Melons in Minecraft
You can use the design of a pumpkin farm in Minecraft to grow melons as well. They both follow the same mechanics. But when it comes to usage, the melons don’t match up to pumpkins. You can either eat them directly or trade them for emeralds. That’s all. That said, it is time to look at the materials you need to make a pumpkin farm.
Items Required to Make a Pumpkin Farm
You need the following items to build a Pumpkin farm in Minecraft:
- One Bucket of Water
- Two Chests
- A Hopper
- Eight Pistons
- Six Observers
- One Hoe
- Six Solid Blocks (any)
- Eight Pieces of Redstone Dust
- Six Pumpkin Seeds (or melon seeds, if preferred)
- Fifty Building Blocks (any)
- Optional: Froglights (or any other light source)
- Optional: Forty-Four Glass Blocks
All of the items you need for a basic pumpkin farm are easy to acquire. But you might have to put in some effort to find the pumpkin seeds. They can be found in villages, dungeons, mineshafts, Woodland Mansions, and by trading with Wandering Traders. Though, most players rely on finding naturally generated pumpkins and breaking them to obtain seeds.
Easily Make a Pumpkin and Melon Farm in Minecraft
The design we are covering here is the easiest pumpkin farm design in the community. It was developed by YouTuber NaMiature and works on both Minecraft Java vs Bedrock editions. You can use the same blueprint to build a melon farm in Minecraft. Just the seeds are different in each case.
Item Collection Area of Pumpkin Farm
Follow the steps below to make a pumpkin or melon farm in Minecraft:
1. First, dig an 8-block long cavity in the ground. It should be in a straight line and only one block deep.


2. Then, at one end of the cavity, dig an L-shaped hole that is two blocks deep.

3. After that, put two chests side-by-side on the extended end of the two-block deep hole. After that, put a hopper on the edge of the chest next to the extended hole. This hopper should directly connect to the chest.

4. Once one edge of the farm is ready, go to the other edge of the 8-block hole. Then, empty a bucket of water at the far edge. The water will flow from that edge to the hopper. Every item that enters this flow will directly reach the hopper and stored in the chests.

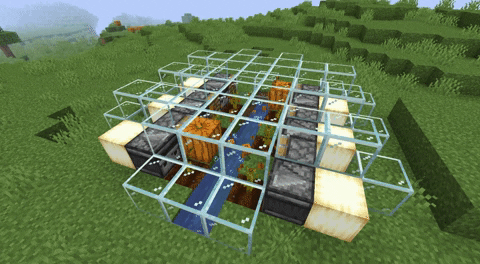
Plantation Area for Pumpkin Farm
Unlike other crops, alongside water, pumpkins also require an additional empty block to grow upon. The block where their seed is planted acts as the stem, and the block adjacent to the stem is where the actual pumpkin fruit grows. Keeping these mechanics in mind, let’s create a plantation area for the pumpkin farm in Minecraft.
1. First, equip a hoe and till the soil blocks alternatively on both sides of the water canal by right-clicking or using your secondary action key. All tilled blocks should have a 1-block gap between each other. Moreover, the tilling should not begin in front of the edge with the source water block. Here’s what your farm design should look like after this step:

2. Then, plant the pumpkin or melon seeds in the tilled spots by right-clicking or using the secondary action key. You can perform this step after finishing the farm as well.

3. Now, put an observer behind each tilled block. Each observer should be facing the tilled block where you have planted the pumpkin seeds.

4. Then, put pistons on either side of the observers. These pistons should be facing the water pathway, as they will push the fully-grown pumpkins into the water flow for collection.

Automate the Pumpkin Farm
With the harvesting and plantation area ready, it’s time to activate the pumpkin farm and automate it. Here’s how to go about it:
1. First, place one solid block behind each observer. You can use any solid block, but we recommend using bright light blocks like froglights so that the farm can work even at night.

2. Now, place a piece of Redstone dust behind every piston on the pumpkin farm in Minecraft.

3. Finally, cover the entire farm with solid blocks to prevent pumpkins from falling outside the water path. If you want to keep an eye on the farm, it’s best to use glass blocks.

How Does the Pumpkin Farm Work
The mechanic behind the functionality of the pumpkin farm is simple. In Minecraft, the observers can detect the growth of stems. So, whenever the stem grows, the observer sends a Redstone signal, which moves the pistons. The pistons can dislocate the pumpkins in front of them, making them drop as an item in the stream of water.

The water takes these pumpkins to the hoppers, which collect them in chests. At the same time, the hopper also collects seeds that are dropped by the pumpkins. Meanwhile, the stem restarts the cycle by growing and spawning another pumpkin.
Frequently Asked Questions
How to grow pumpkins faster in the Minecraft farm?
You can use bonemeal on the pumpkin stems to make its fruit grow faster.
Where can you plant pumpkin seeds?
Pumpkin seeds can only be planted on farmland blocks.
Where does the pumpkin grow?
Pumpkins, as a fruit, only grow on dirt, grass block, farmland, podzol, or coarse dirt that are adjacent to farmland blocks.
How much space do pumpkins need to grow in Minecraft?
You must leave one block of space empty adjacent to the pumpkin seed.
Are pumpkins rarer than diamonds?
As per Minecraft’s spawning rate, pumpkins are rarer than diamonds. But because they generate above the ground and as exposed blocks, they are much easier to find than diamonds.
Make Automatic Minecraft Pumpkin and Melon Farm
Whether you want to make a Halloween-themed Minecraft house or huge storage of food, the pumpkin farm in Minecraft is perfect for you. It is one of the easiest farms to build and fits well into most Minecraft base ideas. Though, one part where this farm lacks is the experience orbs department. Unlike mob-based farms, you can’t collect experience from the pumpkin farm. So, if you are looking to create an XP farm, the Minecraft Sculk farm is the best alternative. It utilizes the new Sculk blocks to create a simple and reliable experience collecting system. With that said, how are you going to utilize the pumpkin farm in Minecraft? Tell us in the comments!


