
Snapchat might be going down the hill in its popularity but there’s no denying the fact that the service has the best camera lenses or face filters of any app, period. Not only do Snapchat filters look good but each filter also reacts uniquely to a user’s facial reaction which makes them fun to use. Till now, Snapchat camera lenses were only available via the Snapchat app on Android and iPhones, however, now you can use the lenses even on your Mac and Windows machines. In this article, we are going to show you how you can use Snapchat’s new camera lens app on your Mac and Windows devices:
Using Snapchat Camera Lenses on Mac and Windows
To use Snapchat’s camera lenses on our desktop (both Mac and Windows), we will take the help of Snapchat’s new Snap Camera app which the company quietly released a few days back. The best part about this Snap Camera app is that it can integrate directly with various services allowing you to use these lenses in many places. For example, currently, you can use Snapchat’s camera lenses while streaming games on Twitch or making video calls with your friends.


Do note that while I am using my 2016 MacBook Pro to showcase this feature, you can use this on any desktop which meets the following hardware requirement:
- Operating System: Windows 10 (64 bit); MacOS 10.11+
- Hardware: Minimum of Intel Core i3 2.5 GHz or AMD Phenom II 2.6 GHz with 4 GB RAM; Intel HD Graphics 4000 / Nvidia GeForce 710 / AMD Radeon HD 6450; screen resolution of 1280×768 or higher.
With that said, let’s see how you can use this feature on your desktop:
Snapchat Camera Lens Step-by-Step Guide
- First, click on the following link to download and install the Snap Camera app for your device. To do this, first, click on the download button marked with yellow color in the picture below.


Using Snap Lenses in Third-Party Apps
While using the Snap Camera Lenses is really good in the app itself, it doesn’t serve any purpose at all. If you really want to make use of these lenses, you will need to integrate Snap Lenses with third-party apps such as OBS, Twitch, or Skype. For example, you can use a Snap Lens while making video calls on Skype or streaming live on Twitch. It’s pretty easy to configure this and I will show you how by using Skype as an example.
- First, launch the Snap Camera app and select the lens that you want to use. We will use the same PUBG lens here. Now, launch the Skype app and open its settings.
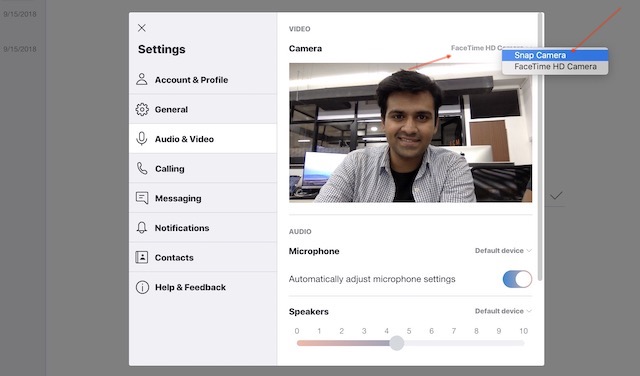
- In the settings panel, click on the Audio and Video section and then click on the drop-down menu at the top right.


SEE ALSO: How to Create a Channel in IGTV
Use Snap Lenses While Video Calling or Streaming Games
As you can see, the Snap Lenses can be quite fun to use once you configure them. I find them especially useful for streaming games as you can use game-specific lenses to enhance your viewers’ experience. Overall, I quite like this app and suggest that you try it out. Do use this tutorial and let us know if you encounter any problems by writing in the comments section below.


