Google has just launched a new payment app called Tez in India. The app allows you to send and receive money directly into your bank accounts without the need of using an online wallet. It also allows you to make merchant payments both offline and online. The app utilises the Unified Payment Interface or UPI to achieve these tasks. If you live in India, by now, you must have heard of UPI before. Basically, it is an initiative of National Payment Corporation of India (NPCI) to bring a safe and secure payment method which works instantly. There are a lot of popular apps on the Play Store which utilise this payment gateway. Some of the most popular ones are PhonePe and NPIC’s own app BHIM.
Apart from these, most of the banks in India have launched their own UPI based apps. Chances are, some of you might already be using a UPI based app. Now, with Tez in the market, the question is, should you switch to it or not? Well, that’s what we will try to answer in this article. First, we will go through the setup process. Once we are done setting up Tez, we will learn how to use this app, and take a look at its main features. By the end of the article, I am sure that you will be able to decide, whether to use Tez or not, for yourself.
Note: Tez is available for both Android and iOS. I am using my Android device (OnePlus 3) for this tutorial, but the process will be similar for both the operating systems.
Set Up Tez on Android or iOS
If you have ever used a UPI based app before, you will know how easy it is to set up such an app. So, let’s just get into the steps.
1. Download and install the Tez app by clicking on the link (Android, iOS), or search for Tez in Play Store / App Store and download from there.
2. Once installed, launch the app and choose your language to begin. Apart from English and Hindi, there are also a couple of state-languages that you can choose from. Once done choosing, hit the “next arrow” which is present on the top right corner of your device.

3. Here, enter your mobile number which is registered with your bank and tap on the next arrow. Now, the app will ask you to grant it certain permissions. Tap on allow for all the permissions.

4. On this page, Google will ask you to choose your email account which will be used in creating your UPI ID. Tap on the down arrow and choose the one which you want to use.

5. Here, you can either choose to unlock the app using your screen lock or you can set a separate PIN. This will be used to unlock the app whenever you launch it. I chose to create a new Google PIN, but you can choose either of the options.

6. Now, we are inside the app. Here, first Google will give you some information regarding the app. You can just skip them by tapping on your screen as we will anyway go through them.

7. Now, the first thing that we need to do is add our bank account. Tap on the “ADD BANK ACCOUNT” button on the top-left corner of your device and select your bank.

Now we will create a UPI PIN which will be used to authenticate the transaction. The setup process will be different for people who have already created a UPI PIN and those who have not. So, we will take a look at both of them separately.
Users Who Have Already Created a UPI PIN
8. After you have selected your bank in step 7, the app will inform you that you have already created a UPI PIN. Just tap on the “ENTER UPI PIN” button at the bottom and enter your PIN to access your account.

Users Who Have Not Created a UPI PIN
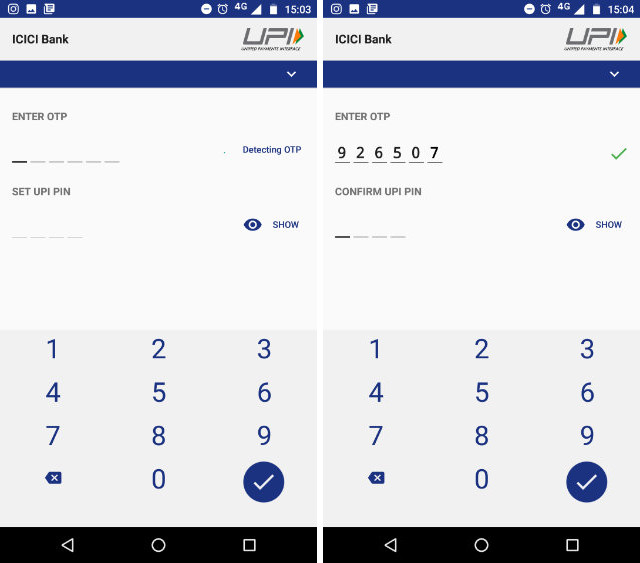
9. After you have selected your bank in step 7, the app will ask you to create your UPI PIN. Tap on the “Proceed” button. On the next page, you will be asked to enter your Debit Card information. Just enter the required information and tap on the next arrow.

10. Your bank will send you an OTP to confirm the addition of your Debit card. Enter the OTP and then enter the PIN that you want to create. Confirm the PIN in the next step and you are done.
How to Use Tez to Send and Receive Money
Now, there are a lot of ways you can send or receive money using Tez. The best part is that apart from including all the usual UPI payment methods, Google has included a very innovative payment method which allows you to send or receive money from a nearby person without revealing each other’s account information or phone number. So let’s check out all the different ways you can send money using Tez.
Using Account Information
1. This is the most conventional method for sending or receiving money. To do that, just tap on the “New” button present at the bottom-left corner of your screen and select account number.

2.Here, add the account information and then tap on “Proceed”. Now, you can add the amount of money that you want to send. You can also add a note to remember why you made these transactions. Now just hit the “okay” button in the bottom right corner.

3. Tap on “Proceed to Pay” and enter your UPI PIN to confirm. The payment will be done. After the payment has been done, this account will be added in your app. From the next time, you can just click on the added information to send the money.

Using UPI ID
1. To send money using the UPI ID, you will need to know the UPI ID for that person. Your UPI ID is generated whenever you register on a UPI supported app like Tez. To see your UPI ID on Tez, just tap on your name at the top right corner. You can share your UPI ID with anyone from whom you want to receive the money.

2. To send money, On the new page, tap on “UPI ID, QR, Phone” option and then select UPI ID.

3. Enter the UPI ID of the person you want to send money to and then hit “verify”. The app will verify the UPI ID. Just hit OK and you will be redirected to the transaction page. Here tap on “Pay” to send money and “Request” to receive money. Once you hit pay, the process will be similar to step 2 and 3 of the previous method.

Using QR Code
1. Tap on 3-dots menu at the top-right corner and tap on “ Scan QR” code. By the way, here you can also tap on the show “QR Code” button and the app will display your own QR code which you can use to receive money. Once you tap on “Scan QR” code option the app will open a scanner to scan the code. After a successful scan, the app will autofill the payment information. Just enter the money and proceed with payment as we did before.

Using Phone Number
1. You can directly send money using just the phone number of the users who are already on Tez. Just tap on the “New” button and select the “Phone” option.

2. Enter the phone number and hit “Verify”. Just like before, proceed with the process and complete the transaction.

Using Cash Mode
This is the game-changing payment method which will want to make you switch from other UPI apps. Using this method, you can send or receive money without sharing any credential. When you use this method, the app will generate and ultra-sonic QR code which can be read by the other phones which is nearby. Let’s see how it works.
1. Tap on the “Tap for Cash Mode” button. Now if you want to send the money, slide the button upwards towards the Pay option. If you want to receive the money slide the button downwards towards the Receive button.

2. Let’s suppose I am the one who is paying and someone else is receiving the money. I will slide towards the Pay button and the receiver will slide towards the “Receive” button.
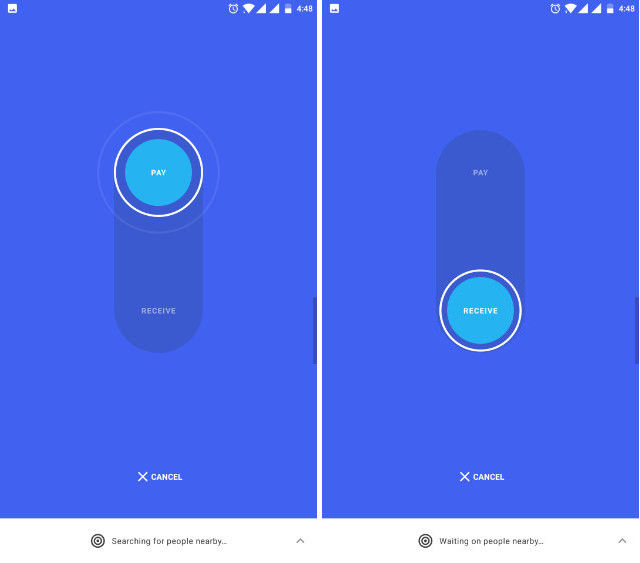
3. In just a few moments, Tez will recognise the receiver and I will be able to send the money in an instant without sharing any credentials with each other.

As you can see, there are a lot of ways you can transfer money using the Tez app. However, the “Cash Mode” is going to be a game changer. I don’t have to share any credentials or scan a QR code. Users can just use the ultrasonic sound to recognise the other person and send the money. This will be very useful if merchants across the country start using the app. You will be able to pay in an instant.
SEE ALSO: How to Setup UPI Payments in Uber (Guide)
Tez: The Best Payment App In India?
On the launch day of Tez, many users complain of several bugs in the app. However, at the time of writing this article, I didn’t have any problem using this app. As more and more people start adopting this app, I believe this can easily become the most favoured and popular UPI base payment app in India. I really love the Cash Mode feature. I think in future, this method will become the default go-to for nearby payments. What do you think? Do you like what you have seen by now? Let us your thoughts in the comment section below. Also, if you install the app, do share your experience with us.