If you have been reading through our Oculus Quest 2 archive, you must already be having tons of fun putting stuff on your headset. Now, while the Oculus store does have plenty of apps and games, it does have its drawbacks including not-so-friendly pricing coupled with lack of access to all apps. Thankfully, there’s an easy way you can sideload all kinds of content on your Oculus Quest 2 without getting into trouble. How do you do that? Well, we’re glad you asked since this dedicated guide will tell you all about it. So keep your Oculus Quest 2 by your side and learn how to sideload content on it.
Learn Sideloading Content on the Oculus Quest 2 (2022)
Since this guide covers the process of sideloading content on your Quest 2, it does have certain requirements you must fulfill before we begin the process. However, if you’re someone already aware of those, use the table below to jump to your needed section.
Is Sideloading on the Oculus Quest 2 Legal?
Before we begin the process of sideloading anything, let’s get the big virtual elephant out of the room. Reading the topic, we know you must be concerned whether you can get banned from using your Quest 2. However, don’t worry as sideloading legal content on your headset is perfectly fine and Facebook allows it accordingly.
Note: Do not sideload illegal content on your Oculus Quest 2. This includes (but is not limited to) things like mods, cracked games and apps, etc. Doing so can result in your Facebook and/or Oculus account getting banned. We don’t condone piracy, and you should only use licensed apps and games on your devices.
How Do I Sideload Content on the Quest 2?
Since the Oculus Quest 2’s architecture basically works like an Android device, anyone can simply Install ADB on their platform and sideload content using commands. However, most users are not familiar with ADB and quite honestly, it’s not worth the hassle in this case.
We will be using third-party software called SideQuest. Working in a very easy way, SideQuest is software that allows Quest 2 users to sideload all types of content on their devices. The app even has a dedicated storefront where you can try apps and games not available on the Oculus Store. As mentioned above, SideQuest is perfectly legal to use and you can sideload content on your Quest 2 without worries. All it requires is a one-time set up which we will be doing accordingly. While SideQuest now has an Android app, we will be using the PC one to make sure all users can easily sideload content.
Things You Should Do Before You Begin
We realize you must be itching to get to the actual process. However, the following points are steps you must undertake before we begin.
1. Download and Install SideQuest on Your PC
Now naturally, we will require the official software for the process itself. So go ahead and download and install SideQuest (Free) on your PC. The installation will also take care of the necessary USB drivers thereby saving you a step. Once done, come back and keep reading.
2. Register as an Oculus Developer
Since we will be sideloading content on our Quest 2, the device will be in developer mode. However, for that to happen you will first need to register yourself as an Oculus Developer. It’s not as difficult as it sounds though. Simply visit the Oculus Dashboard and enter any name in the organization field and just press Accept. However, do make sure you’re logged into the same Facebook/Oculus account you use your Quest 2 with.
3. Enable Developer Mode on the Quest 2
Once you’ve registered yourself as a dev, you need to now enable the actual developer mode on your Quest 2. This can only be done using the Oculus mobile app. If you don’t have it installed, you can easily get the Oculus (Android, iOS, Free) app and pair it easily. Once done, open the Oculus app and follow the steps below:
1. Inside the Oculus app, tap on the ‘Devices‘ tab.
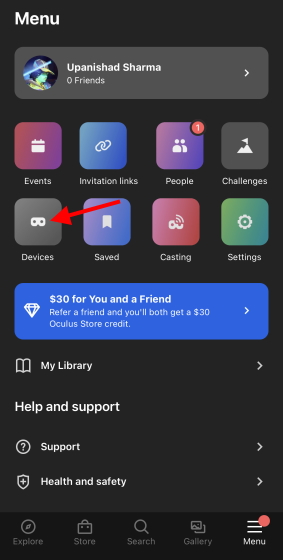
2. Scroll down and under Headset settings, find and tap ‘Developer Mode‘.

3. Simply tap on the toggle to turn the Developer Mode on.

And you’re all done. Let’s move on to the other requirements.
4. Make Sure to Have a USB Cable for Connection
To sideload content on our Oculus Quest 2, we will need to hook it up to a PC for the complete process. Therefore, make sure you have a Type C to USB-A cable handy. However, if your PC does have a Type C input slot, you can use the official cable that comes with the Quest 2.
5. Keep Your Quest 2 Charged
As we always advise you when it comes to this, make sure you fully charge your Oculus Quest 2 headset to ensure that it doesn’t die during the sideloading. We haven’t tested what happens if it does but we’re sure it can’t be anything good.
How to Allow USB Debugging Between Oculus Quest 2 and SideQuest
Enabling USB Debugging on your Quest 2 will allow easy data transfer between the PC and the headset itself. Thankfully, the process to do so is very easy. Simply start up SideQuest on your PC and then follow the steps below:
1. Startup SideQuest on your PC and make sure your Quest 2 is already running.
2. Connect the Quest 2 to your PC using the USB Cable.
3. As soon as you do, you will see an ‘Allow USB Debugging‘ prompt on your headset.

4. Depending on your preference, click on ‘Allow’ or ‘Always Allow’, and you’re done.
Once done, you will see the Quest 2’s details inside the SideQuest app along with a green dot signifying success. If you chose the Always allow option, this was a one-time step and one you won’t need to do again. However, there are times when Quest 2 updates turn off the developer mode again. In case that does happen, simply follow the relevant section above to get it up and running.

How to Sideload Content to Quest 2
Now that all the formalities are done, let’s begin sideloading content onto our Oculus Quest 2. We will be showing you how to sideload content from the SideQuest store.
Sideload Content from the SideQuest Store
The SideQuest store offers a plethora of content including numerous apps and games. Depending on the developer, the source file for the app in question might be in SideQuest or you might be redirected to another website. We will be using the former to show you just how easy it is. Follow the steps below to sideload an app from SideQuest into your Oculus Quest.
1. Open SideQuest and click on the Games tab in the middle.

2. Click on a game you wish to sideload onto your Quest.

3. Click on the download app button on the right side and wait for it to begin.

And that’s it! The APK file will begin downloading and installing by itself. You can check the progress of the task by clicking on the hamburger menu on the top right. If you see a button that is leading you to Itch or the official Oculus store, chances are you clicked on a paid app and will need to buy it first. Once done, simply unplug your Quest 2 and start up the game using the method we will show you down below.
Sideloading .APK File onto the Oculus Quest 2
Note: Do not sideload cracked .APK versions of games or apps as that will lead to a permanent Facebook and Oculus account ban.
If you don’t like the SideQuest store but do have a legitimate .APK file of a game or an app, you’ll be happy to know you can sideload that too. SideQuest provides full dock and installation functionality for .APK files. Follow the steps below to begin:
1. Connect your Oculus Quest 2 to the PC and open SideQuest.
2. Click the folder icon with a downward arrow attached to it from the top right of the app.

3. SideQuest will now ask you to locate the .APK file from the window provided. Find and click on the .APK file and then press the Open button.
Within a second, SideQuest will begin loading and installing your chosen content. As before, you can check on its progress from the app itself and play it once done.
How to Sideload Content to Oculus Quest 2 Wirelessly
If you’re looking for a completely wireless way to sideload content to your Quest 2, it is possible. However, do be aware that it will require an initial wired connection between your Quest 2 and your PC so keep your cable nearby. Now follow the steps below to sideload content on your Quest 2 wirelessly.
Note: Make sure the Oculus Quest 2 and your PC are on the same Wi-Fi network.
1. Open the SideQuest app on your PC and log in to your account if not done already.
2. Connect your Oculus Quest 2 and your PC together using the provided cable. If your PC doesn’t have a Type-C port then you’ll need to use a converter.
3. Once connected, put on your headset and allow access to your Quest 2’s data. However, do make sure to not enable Oculus Link for now.

4. Once done, you will see your Quest 2 has been connected to your PC. You can confirm the same by looking out for the green dot just like before.

5. On the SideQuest app on your PC, find and click the wireless icon to open up its settings.
6. Click the Connect button to begin the wireless connection.

7. Provided both your devices are on the same wireless network, your Quest 2 will successfully connect to SideQuest wirelessly too. You can now remove the cable connecting both devices. The green dot will still remain.
8. Now go to https://sidequestvr.com/login on your Quest 2 and log in to the same account as the PC app.
9. Browse the game store and pick one that displays the sideloading button.
10. As on the PC app, tap the button using your Quest 2’s controllers and you’ll see a message saying ‘Sending to SideQuest’.
11. Take off your headset and check the tasks tab on the SideQuest PC app by clicking on the hamburger menu with a tickmark next to it. You’ll see your selected APK file sideloading on your Quest 2 wirelessly. Once done, you will be able to play the game on your headset by following the next section.
How to Launch Sideloaded Content on the Quest 2
Since sideloaded content is not provided by Oculus or well, now Meta, you will not find it just sitting beside your regular apps. Accessing sideloaded apps and games requires one extra step. However, it’s nothing difficult. Follow the steps below to do so:
1. Put on your headset and bring up the Quest 2’s Universal Menu. If you can’t find it, then press the Oculus button on the right controller to do so.

2. Tap and select the App Drawer by clicking on the Apps icon. Here you will see all your official apps.

3. Tap the menu on the top right to open up a list. Scroll all the way down and select ‘Unknown Sources‘ to find all your sideloaded content.

4. Here you will see all your sideloaded apps. Pick the one you want to play and select it once using your controller’s trigger. It will launch immediately.

And it’s easy as that. You will need to follow the above steps any time you want to launch any sideloaded content on your Quest 2. Also, don’t be worried about the notice you read in that section. Provided you have sideloaded only legitimate apps and games, you should not run into any problems. If by chance you do think you installed something fishy, simply select the ellipsis icon next to the app and tap Uninstall to remove it immediately.
What Content Are You Sideloading onto Your Quest 2?
Well, now that you know how you can sideload content on your Oculus Quest 2, you can go ahead and start installing all the legal apps and games from sources other than the Oculus store. If you’re a newbie who has stumbled here, perhaps try learning how to set up and use the Oculus Quest 2 before you begin sideloading anything. So, which apps are you planning on installing? Let us know in the comments.


 Ajith Kumar

