During the cleanup drive, you got rid of all the storage-hogging and useless files on your Mac. But among them were a few important files that you didn’t mean to delete. Later, upon realizing that those files are gone and no longer available in the respective folders, you have now begun to curse yourself, regretting the action. And now, you badly want to recover the deleted files on your Mac. Well, if that scenario sounds familiar then you have come to the right place. In this article, we are going to explain 6 different methods that can help you recover deleted files on Mac with ease.
How to Recover Deleted Files on Mac with Ease
Take a breath, mate. There is nothing so unusual about it. I can assure you that retrieving the accidentally deleted data on macOS is not a big deal. In fact, if you haven’t yet emptied the Trash, those items will be safe there. And you can bring them back to life with a simple drag and drop gesture. But what if you have wiped out the entire Trash? Well, even in this situation, you have multiple ways and means to get back your data. Whatever is the case with you, let me show you how you can retrieve those deleted items on your macOS device!
1. Recover Deleted Files from Trash on Mac
The files that you put in the Trash stay there until you permanently delete them from there. However, even if you don’t delete the items, they stay in the Trash for just 30 days. After that, they are automatically deleted. Supposing you haven’t cleaned up your items permanently or it has not been thirty days since your last cleanup, follow the quick steps to recover your files.
1. Launch Trash on your Mac.
2. Now, find the item you want to cover and then right-click on it.
3. Next, select Put Back. That’s it! Finder will now automatically place the item in its previous folder.

Alternately, you can just drag the respective file and drop it at the desired place. Besides, you can use the Command-Z in the Finder to undo the Move to Trash command.
2. Make Sure to Check the Other Trash Can
Wondering what this other Trash can is? Well, let me tell you that each external storage device (i.e USB flash drive or external hard drive) that you use with your Mac gets separate trash can so that you can handle the files with a bit more convenience. However, this other trash (.Trashes) is slightly under the wraps for security reasons (and a ton of others).
To view hidden files in Finder, use the SHIFT+CMD+. keyboard shortcut on your Mac running macOS Sierra or later. Even if your Mac is running the older OS X versions, you can still enable hidden files in Finder using Terminal command.
- Open the “Terminal” app on your Mac and then paste the below given commands. Make sure to hit enter after each line.
defaults write com.apple.finder AppleShowAllFiles

TRUE killall Finder
2. You can now view your files in.Trashes” folder and retrieve the ones that are important to you. Once your work is done, I would recommend you hide this folder again for security purposes simply by replacing “TRUE” with “FALSE” on the first line.
defaults write com.apple.finder AppleShowAllFiles

FALSE killall Finder
3. Restore Items Backed Up with Time Machine
From what I have experienced over the years, I can say that it really pays to keep the backup of everything that matters to you so that even if something goes wrong, you will continue to be on the safer side of the spectrum. And this is where Time Machine has a role to play. So, if you have used this super handy macOS feature, you can comfortably get back all of your lost items on your Mac.
- To get going, fire up Time Machine on your Mac. The quickest way to get it done is by using Spotlight.

2. Now, you can use the arrows and timeline to browse all the backups.
3. Once you have found the items you would like to retrieve, click Restore and you are ready to go!
4. Restore Past Versions of Documents on Mac
One thing worth noting is that you can also open Time Machine within apps on your macOS device and browse through different document versions. macOS automatically saves a new version generally every hour. However, when you make changes to your files, it saves them more frequently. Note that his feature was introduced with macOS Mojave so if you are on older versions, you won’t be able to use this feature.
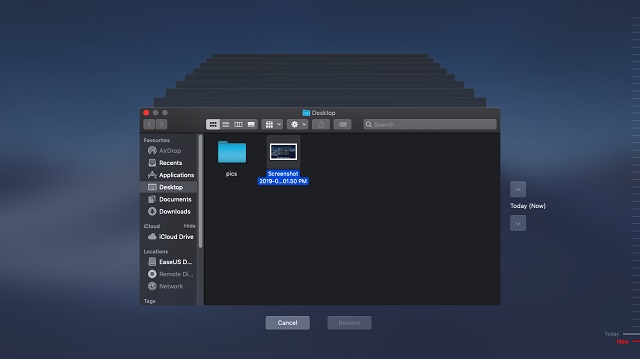
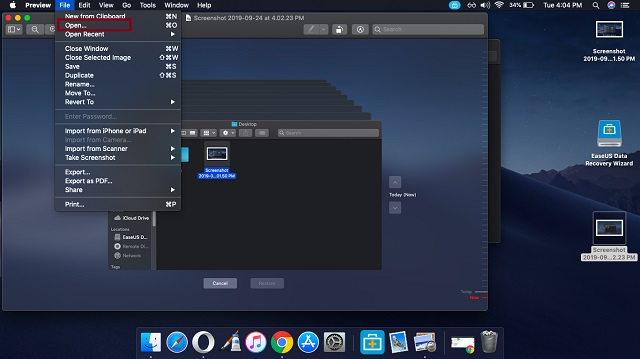
- Open a document on your Mac. Make sure to open the folder of the files you deleted.
2. Now, select File and click on Revert To.

3. Next, click on Browse All Versions. Now, you can click tick marks along the timeline to scan through different versions.

4. When you have found the version you wish to restore, click Restore. If you want to duplicate this version in a new document, simply press and hold the Option key and select Restore a Copy.

5. Recover Older Versions of Documents in iCloud
iCloud to your rescue! Yeah, if you have turned iCloud Drive on your Mac, you don’t need to worry about losing your files as you will be able to recover older versions of documents in iCloud with ease.
- To get started, launch the app you had used to create the document on your Mac.
2. Now, click on File and choose Open.
3. Next, click iCloud Drive located in the Favorites section of the Finder sidebar. Now, browse through the older versions of your files and restore them with ease.

6. Recover Permanently Deleted Files Using EaseUS Data Recovery Software on Mac
Just in case, you have cleaned up the entire Trash along with the important items, an efficient data recovery software can get the job done for you. In this test, I’m going to use EaseUS Data Recovery Software as it’s a bit more reliable and also offers a free trial. Do note that the freemium version of this tool is limited and will let you only scan and preview the lost data. If you want to recover your items, you will need to get the pro version $69.95/$99.90.
- Download EaseUS Data Recovery Software on your Mac and launch it.
2. Now, choose the location where the files were deleted. After that, click on the Scan button.
 3. Next, the data recovery software will perform a deep scan to retrieve the deleted files. You can view the scan results in the left pane. Then, select the files you wish to get back and click on Recover Now. Now, wait for some time until the process is complete.
Note: You may be asked to allow the macOS to load the extension. Click on Allow to continue.
Would you like to explore more efficient data recovery tools for Mac? Just in case, you aren’t pleased with EaseUS or want to take a peek at some other alternatives, here are a couple of notable options.
Other Apps to Recover Data on Mac
1. Recoverit
When it comes to retrieving data fast and securely, Wondershare’s Recoverit is up to the mark. Just like EaseUS, the software performs an in-depth scan on your Mac and shows the deleted files. Then, you can browse through the items and restore the ones that you want. The one notable feature of Recoverit is that it can restore the data even if your macOS device is repeatedly crashing. Moreover, Recoverit sports a more intuitive interface than its counterpart. As for pricing, it’s on the expensive side of the spectrum as the basic plan starts at $79.94/year/PC. But given the high efficiency, Recoverit is worth serious consideration.

Pricing: $79.94/year/pc
2. Data Rescue
Another Mac data recovery software that has caught my eyes is “Data Rescue”. Whether you want to retrieve your deleted photos, videos or any sensitive file, you can count on this software to deliver the goods. The app has a modern-looking interface and works a litter faster than both the tools mentioned above in scanning and showing the deleted files. In terms of ease of use, it’s on par – if not ahead. Just like EaseUS, it also offers a demo version so that you can try out the software before buying the full version. As far as pricing is concerned, Data Rescue’s standard version comes at $99 (5 drives/unlimited recoveries).

Pricing: $99.94 (5 drives/unlimited recoveries)
That’s pretty much it!
Retrieve Deleted Files with Ease on Mac…
So, that’s how you can get back all the accidentally deleted items on your macOS device. If the permanent deletion hasn’t been done, retrieving files is quite simple and hardly takes a few seconds to get everything back to life. Even if you have emptied the Trash, a Time Machine or iCloud Drive backup makes retrieving items quite simple. Finally, if everything fails, there are always recovery software. So check it out and let us know if you have any questions by writing in the comments section below.