
If you are a Discord user, you must have seen multiple Discord bots on popular servers. Whether it is a music bot or a server moderation bot, there is a bot for almost everything. But in case you are interested to create a Discord bot yourself, follow our guide to make a simple Discord bot in 2022 and beyond.
Create a Discord Bot (2022)
Prerequisites to Make a Discord Bot
- Node.js

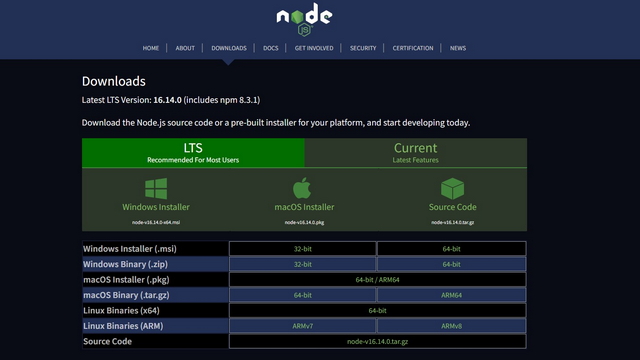
We were initially planning to use the popular Discord.py Python bot for this guide. However, considering the future of the library, we have decided to use the discord.js Node library instead. Hence, make sure you have installed Node.js on your PC. You can download the latest version of Node.js from the official website (visit). You can run the following commands to make sure that you’ve properly installed Node.js and npm on your PC:
node -v
npm -v
- Code editor
To efficiently view, write, and modify code, you can use any of these best text editors for coding. If we were to pick one, we would go with Microsoft’s Visual Studio Code (download), which also has a variety of VSCode themes.
Set Up Discord Bot Account and Add to Discord Server
1. Visit Discord’s developer portal and sign in with your Discord account. Once you are there, click on the “New Application” button at the top-right corner to get started.


2. Enter a name for your application and click on “Create”. Do note that the application name doesn’t necessarily have to be the same as the bot’s name. You can choose to change the bot’s name later.

3. Now, switch to the “Bot” section from the left sidebar and click on “Add Bot”.


4. When the pop-up appears, click “Yes, do it!” to proceed further.

5. Discord has now created your bot. You can now choose to change the bot’s name and icon from the “Bot” section. Before that, click on the “Copy” button below “Token” to copy the bot’s token. The bot’s token is required later. Do keep in mind that you should not share your bot’s token with anyone as it grants them access to your bot.

6. Now, expand the “OAuth2” tab from the left sidebar and switch to the “URL Generator” section. Here, choose “bot” as the scope and allow appropriate permissions for the bot. For this demonstration, we are giving admin permissions to the bot.

7. Scroll down and click on the “Copy” button to copy the bot’s URL.

8. Visit the copied URL from your browser to add the bot to your Discord server. All you have to do is choose the server from the “Add to Server” list and click “Continue” to add the bot.

Create and Host Discord Bot Locally on Your PC
Now that you have added the bot to your Discord server, it’s time to configure the bot. Just follow the steps below to locally host a Discord bot on your PC.
1. Create a new folder anywhere on your PC. You should then create two files in this folder — .env, bot.js. In the .env file, paste the bot’s token you copied earlier in the following format:
DISCORD_TOKEN= Paste your token here without quotes
2. Up next, add the following code to your bot.js file. With this code, the bot will reply “pong” whenever a user sends “ping”.
require('dotenv').config();
const Discord = require("discord.js");
const client = new Discord.Client({intents: ["GUILDS", "GUILD_MESSAGES"]});
client.on("ready", () => {
  console.log(`Logged in as ${client.user.tag}!`)
})
client.on("message", msg => {
  if (msg.content === "ping") {
    msg.reply("pong");
  }
})
client.login(process.env.DISCORD_TOKEN);

4. Now, install the Discord.js library using the following command:
npm install --save discord.js dotenv

5. Up next, you should create a package.json file using the command “npm init -y”.

6. You can finally use the command “node bot.js” to run your Discord bot.

7. As you can see below, the bot works as intended and has replied to my test message.


Create and Host Discord Bot in the Cloud
If you would rather host your Discord bot online, we recommend using Replit. For those who don’t know, Replit is an online IDE, where you can run and host over 50 programming languages. In addition, the process to set up Replit is fairly straightforward too. So let’s get right into it.
1. You should first sign up for a new Replit account. You could use your email address or continue with your Google, GitHub, or Facebook accounts.

2. Click on the “Create” button at the top-left corner to create a new project.

3. From the pop-up that appears, choose Node.js template, name your project, and click on “Create Repl”.

4. Look for a lock symbol in the left sidebar and paste the bot’s token you previously copied. You should paste the token in the “value” field and set the token name in the “key” field. Click “Add new secret” to confirm the token and add it to your Node.js code.

5. Paste the following code and press the green “Run” button at the top to run the project. You can now use your bot even after shutting down your PC.

const mySecret = process.env[`TOKEN`]
const Discord = require("discord.js");
const client = new Discord.Client({intents: ["GUILDS", "GUILD_MESSAGES"]});
client.on("ready", () => {
  console.log(`Logged in as ${client.user.tag}!`)
})
client.on("message", msg => {
  if (msg.content === "ping") {
    msg.reply("pong");
  }
})
client.login(process.env.TOKEN);
6. You can come back to the Replit project and click on the “Stop” button to stop the bot. And there you have it. You can modify the bot’s code to add or remove the features you need.

Frequently Asked Questions
Q: Can I create a Discord bot for free?
Yes, you can create a Discord bot for free and host it locally on your PC or in the cloud.
Q: How to make a Discord bot without coding?
If you have to create a Discord bot without coding, you will have to look for sample Discord bot projects others have done and modify the bot based on your needs. If that proves to be a hassle, you can always use one of the available best Discord bots to improve your server’s capabilities.
Q: Can I use Discord.py for creating my Discord bot?
The developer of the popular Discord Python library “discord.py” is not happy with Discord’s mandatory transition to slash commands for verified bots from April 2022 and has decided to deprecate the library. The library is no longer under development, and the GitHub page of Discord.py is now in read-only mode. While unverified bots are not affected at the moment, that could potentially change in the future.
Create Your Own Discord Bot
So, that’s how you can create a bot on Discord. While we have shown a simple bot that responds to a text, the possibilities of customizing a bot’s capabilities are endless. If you want inspiration or ideas for your new Discord bot, go through our article on the best Discord bots and try implementing the features you like the most.


