Apple’s latest iteration to its desktop operating system was announced at WWDC earlier this month. Named ‘macOS Mojave,’ the update brings with it a bevy of new features including some long-awaited things like the dark mode, and other features and cosmetic upgrades that are pretty nice. So, if you’re wondering how to get these features on a Windows 10 PC, well we’ve got your back.
Get macOS Mojave Features on Windows 10
Getting macOS Mojave features on Windows 10 is a relatively simple task, partly because a lot of these features are built into Windows, and partly because most of the apps you’ll need to get these features are easily available and free. So here’s how you can get each of the macOS Mojave features on Windows 10.
1. Dark Mode
The dark mode is easily the most requested feature of all time. While earlier versions of macOS featured a dark mode that was utterly useless, this time Apple has shipped a dark mode that’s worthy of the name and looks beautiful.


To get the dark mode on Windows, all you have to do is tweak a few settings.
- In Settings, go to Personalization.


- Here, head over to ‘Colors.’

- Scroll down and change the ‘Default app mode’ to ‘Dark.’


This will change all the app windows and stuff to shades of black and grey. However, things like the taskbar, and the Start Menu still remain as they were. However, if you scroll back up, you’ll find an option to pick color manually. Just select the darkest color you can find here, and the Start Menu and taskbar will both turn dark as well.

2. Dynamic Wallpaper
Yet another addition to macOS Mojave came in the form of Dynamic Wallpapers. These are basically wallpapers that change according to the time of the day. So the Mojave desert wallpaper that’s the default on macOS Mojave changes the lighting conditions of the photo from day time to afternoon to the evening and finally at night. It looks stunning.

Getting that exact feature on Windows 10 is currently not possible, but you can get something that comes pretty close.
- Download the macOS Mojave wallpapers from this link.
- Make a folder and make two copies of each of the wallpapers inside the folder.


- Head over to Personalization settings, and from the ‘Background’ dropdown, choose ‘Slideshow.‘

- Choose the folder you just made with the wallpapers, and set ‘change picture’ to ‘6 hours.’

- Now, turn of shuffle, and enable ‘allow slideshow on battery power.’

What you’ve basically done is set the daytime and night-time wallpapers from macOS Mojave to automatically change every 12 hours giving off the illusion that it’s a dynamic wallpaper. Pretty neat, isn’t it?
3. Stacks
Stacks have become one of my favorite features in macOS Mojave because my desktop is almost always a cluttered mess. Stacks solve all of that. Basically, if I enable Stacks, all my files automatically get sorted into stacks on the wallpaper according to the file-type. All the images become one stack, all the documents become another stack, and all the PDFs become yet another stack. Stacks are a lot like folders, but much better. Simply click on a Stack to expand it and show all its files right there; click again to collapse.

It’s nice, and fortunately you can get a similar functionality on Windows as well.
- First you’ll have to download ‘Fences’ (30 day trial, $10)
- Install the app, and as soon as you’ve done all the set-up formalities such as creating a free account, Fences will automatically sort your desktop into neat folder-like things.


These don’t exactly look like Stacks, but they bring the same advantages of giving your desktop a look that’s much cleaner than usual. While Fences is a paid app, you get a free 30 day trial after which you’ll have to pay $10 to buy the full version.
4. Quick Look
Quick Look is an awesome feature that I love using on my Mac. It allows me to quickly peek into a file, scrub through a video, check out the contents of a PDF, and all without opening the files in dedicated apps.

To get the same functionality on Windows, all you need is a free app.
- From the Microsoft Store, download the app called ‘QuickLook.’ (Free)


- Once you’ve done that, you’re ready to go. Simply select an image, file, or audio file, and press ‘Space’ to open it up in Quick Look.


Believe me, Quick Look is one feature that will get you addicted to using it. It’s really very useful. Plus, the Quicklook app on Microsoft Store is completely free, so there’s no harm in trying.
5. Screenshot Tool
The macOS Mojave update also brings an updated and improved screenshot tool. Where users made use of keyboard shortcuts to take screenshots on the Mac, Apple has now included a handy screenshot HUD (which comes with screen recording as well) right there. Plus, when you take a screenshot, you can click on the preview image that pops up and get handy editing shortcuts right there.
If you want a similar feature on Windows, you’ll have to use an app called Tiny Take (free). You simply have to install the app on your Windows 10 PC and that’s it. Tiny Take brings a number of handy keyboard shortcuts to take screenshots, to record the screen, and to even record a video from the webcam.


Tiny Take also does this thing where after you take a screenshot it directly takes you into a handy editing app where you can perform some basic editing including things like annotation, cropping, and more.
If, however, you don’t want to install a third-party app, the latest builds of Windows 10 also include a keyboard shortcut ‘Windows + Shift + S’ to bring up a screenshot tool with a couple of basic options that should be enough for most people.
6. Finder Features
Apple also added a couple of new features to the Finder app in macOS Mojave. This included things like a new ‘Gallery View,’ the ability to see complete metadata in the sidebar, and quick actions. As it turns out, these features are sort-of there in Windows anyway.


For Gallery View, all you need to do is:
- Head over to the ‘View’ tab in Explorer.
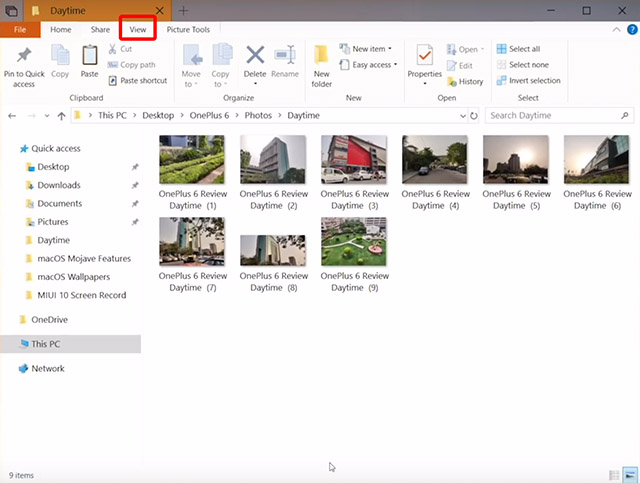
- Here, enable the ‘Preview Pane’ to get a Gallery View like view in Explorer.

Similarly, if you want to enable the side-bar to view metadata, you can simply enable the ‘Details Pane’ from the ‘View’ options in Explorer.


The Quick Actions on macOS Mojave are a little harder to get, but Windows comes with contextual buttons as well. In a folder with images, you’ll get a ‘Picture tools’ inside Explorer with actions like rotate, set as background and more.


SEE ALSO: 10 Best New macOS Mojave Features You Should Know
Use Dark Mode, Quick Look and More on Windows 10
Well, that was basically how you can get macOS Mojave features on your Windows 10 PC. Obviously, getting all of the macOS Mojave features isn’t possible, but the features we’ve discussed in this article are some of the most sought after and talked about ones in the latest iteration of macOS. The best part about this is that you can get everything from macOS Mojave in Windows 10 using just built-in features or free apps. Stacks is the only thing you’ll need a paid app for.
So, are you going to use these macOS Mojave features on your Windows computer, and did you know about some of these features being present in Windows 10 already? Let us know in the comments down below.