Earlier this year, tipster Albacore spotted the presence of desktop background stickers on Windows 11. While they are still not available by default, you can manually enable the feature as long as you’re on Windows 11 22H2. Although Windows 11 22H2 has not started rolling out yet, Microsoft has confirmed that Windows 11 22H2 has reached the Released to Manufacturing (RTM) stage with build 22621. If you’re on Windows 11 build 22621 or newer, here’s how you can try out desktop stickers right now.
Enable and Use Desktop Stickers on Windows 11 (2022)
How to Enable Desktop Stickers on Windows 11
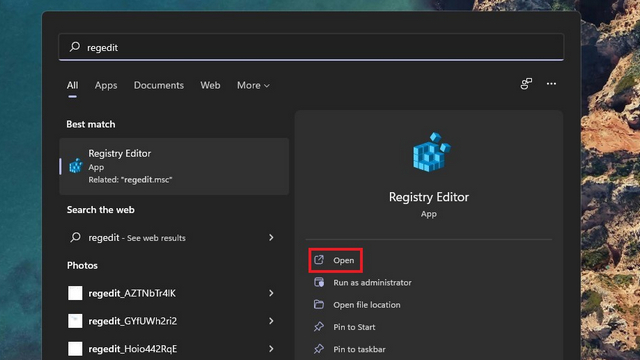
1. Press the Start key on your keyboard and type “regedit” in the Start Menu search box. When the search result appears, click “Open” in the right pane to access the Registry Editor.
2. Paste the following address into the Registry Editor’s address bar and right-click on the “device” directory. Now, choose New -> Key to create a new Registry key.
HKEY_LOCAL_MACHINE\SOFTWARE\Microsoft\PolicyManager\current\device

3. Name the key “Stickers” and double-click it.

4. Next, right-click anywhere in the right pane and choose New-> DWORD (32-bit) Value.

5. Name the value “EnableStickers” and double-click on it.

6. Now, set the value data to “1” and click “OK”. Restart your PC, and you will see the option to place stickers on the wallpaper of your Windows 11 computer.

Add or Remove Stickers to Windows 11 Desktop
1. Right-click anywhere on the wallpaper of your Windows 11 PC and choose the “Add or edit stickers” option. Another way of accessing the stickers interface is through Settings -> Personalization -> Background -> Choose stickers for your wallpaper.

2. You will now see the sticker picker interface. Scroll through the list or use the search box to pick a sticker that interests you. It’s worth mentioning that you can’t create stickers out of custom images at this moment.

3. As soon as you pick a sticker, you will notice that it is placed at the top-left corner of the screen. You can now click the sticker to move it around or resize it.

4. If you want to delete a sticker, click on it from the sticker editor interface and click the trash icon. Finally, click the “X” button at the top to exit the sticker editor.

Try Stickers on Your Windows 11 PC
So that’s how you can use desktop stickers on Windows 11. While some would argue that it’s merely a gimmick, I think it’s a neat feature to add a personal touch to your Windows 11 PC’s desktop. Let us know if you liked this cute little feature in the comments. Meanwhile, if you are interested in exploring more such features, do not forget to go through our list of the best upcoming Windows 11 features.