High CPU usage is not a new issue on Windows computers as it has, for a long time, affected both Windows 10 and 7 users. Just recently, we covered how to fix high CPU usage after the KB4512941 update on Windows 10. And now users are complaining about a process called msmpeng.exe causing a high spike in CPU usage. The interesting part about this process is that it’s not a virus, but a system process handled by the native antivirus itself. So to understand the problem better, let’s go ahead and learn how to disable msmpeng.exe process which will eventually reduce the high CPU usage on Windows computers.
Disable Msmpeng.exe and Reduce High CPU Usage
Before moving to the guide, let me clarify that Msmpeng.exe is not a virus. In fact, it’s an Antimalware Service Executable process that is run by the native antivirus, Windows Defender (now called Windows Security). Many users have pinned down the issue to a database file called mpenginedb.db which is used by Windows Defender for storing hash values. Due to some false identifiers, Windows Security keeps scanning all the data on the disk and rehashes them in the database file. As a result, the CPU usage spikes from 50% to 100%. So, we will have to delete the mpenginedb.db file to fix this issue.
Delete Mpengine.db File
1. Since Mpengine.db is a system file related to the antivirus, we can’t delete it normally. We will have to temporarily disable the antivirus and then only we can delete the file. So open Windows Security and go to “Virus and threat protection”. Here, click on “Manage Settings”.

2. After that, disable all the toggles under this section.

3. Now, press and hold the “Shift” button and restart your computer. It will boot to the Advanced Recovery Window.

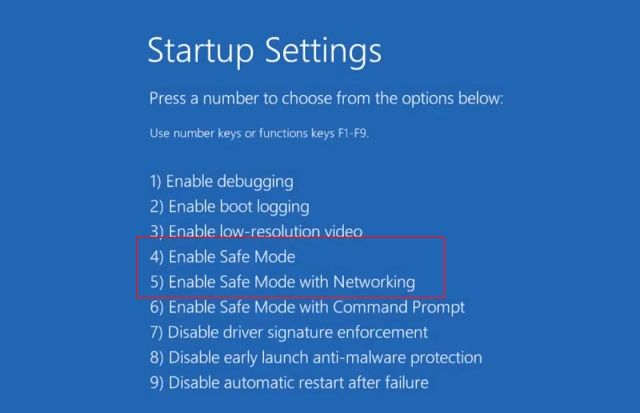
4. Here, choose Troubleshoot -> Advanced Options -> Startup Settings -> Restart. After that, press the “4” number key to boot into Safe Mode.
5. Once you are in the Safe Mode, search for “registry” in the Windows Search box. After that, click on “Run as administrator” in the right pane.

6. Copy the below address and paste it in the Registry address bar and hit enter. You will be instantly taken to the Windows Defender folder.
HKEY_LOCAL_MACHINE\SOFTWARE\Policies\Microsoft\Windows Defender

7. Right-click on “Windows Defender” and select New -> DWORD (32-bit) value. Name the file “DisableAntiSpyware” and click on the “Ok” button.

8. Now double-click on the file and change the value to 1. After that, click on the “Ok” button and restart your computer.

9. This time, search for “Powershell” and open it as an Administrator.

10. After that, copy the command below and paste it on your PowerShell window. Following that, hit enter. This will delete the mpengine.db file from your PC.
Remove-Item 'C:\ProgramData\Microsoft\Windows Defender\Scans\mpenginedb.db'

11. Now open the Registry again and delete the “DisableAntiSpyware” file. After that, restart your computer and Windows Security will start working again. And this time, you won’t see Msmpeng.exe causing any CPU spike. In case, you are still facing the same issue then either reinstall Windows or use a third-party antivirus, preferably Malwarebytes (Free, Pro version at $47.30/year).
Disable Msmpeng.exe on Your Windows PC
So that is how you can delete the mpengine.db file to bring down the high CPU usage. As I already said, the issue is with Windows Defender which scans the whole disk because of a false-positive result. While the process is a bit complex, you can definitely do it if you follow the guide step by step. Anyway, that is all from us. If you found the article helpful, do let us know in the comment section below. Also, if the issue still persists, try reinstalling Windows 10 from scratch.