Dust is the mortal enemy of all electronic devices, and our keyboards are no different. They are always atop our desks, uncovered and unprotected, waiting for the dust to sneak inside through every crevice and gap between the keycaps. With time, dust accumulation can jam switches and keys, leading to malfunction, missed keystrokes, and a reduced overall lifespan of our precious (and pricey) mechanical keyboards. We can’t have that now, can we? Thus, it’s crucial to regularly clean your mechanical keyboard. In this guide, we will show you the best methods to clean a mechanical keyboard and keep it functioning as new.
Simple/ Preventive Cleaning Methods
Doing a quick wipe-down regularly is a great way to keep dust and grime away from your mechanical keyboard and keep it looking fresh. After all, aesthetics are one of the reasons you invest in a mechanical keyboard in the first place, right? Letting your keyboard gather dust defeats the entire purpose.
Step 1: Disconnect or Unplug Your Keyboard
Before beginning the cleaning process, disconnect your mechanical keyboard from your PC. If your mechanical keyboard is wired, carefully unplug its wire from your computer’s USB port. Doing so will ensure your PC doesn’t register any accidental key presses. I learned this the hard way. Attempting to clean my mechanical keyboard while it was plugged in was nothing short of a nightmare. I glanced back up to my monitor only to discover my browser in full-screen mode with a sentence typed in gibberish in the search bar, the toggle keys turned on, my microphone disabled, and a bunch of issues that took me a good few minutes to diagnose and resolve.
Lesson — always unplug your keyboard before cleaning it.
Step 2: Dusting Off & Removing Debris
Use a rubber air pump to blow air on and in between the keys to dislodge dust, crumbs, or debris. Do not use compressed air from a can to clean your mechanical keyboard. Due to its cold temperature, it can lead to condensation, which could cause corrosion if your keyboard has a metal surface. Also, you might end up blowing dust into the switches of your mechanical keyboard – the exact opposite of what you set out to achieve in the first place.
Alternatively, you can use a brush to loosen the debris between the keycaps. I highly recommend picking up a Hagibis 5-in-1 Cleaning Kit, which we also recommended on YouTube Shorts in the past. It has an excellent cleaning brush that works wonders for cleaning keyboards. Plus, it’s super satisfying to glide it between the keys.
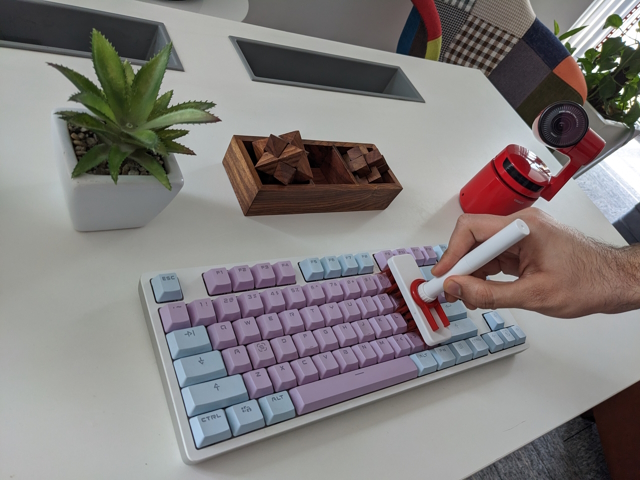
Buy the Hagibis 5-in-1 Multi-Function Computer Cleaning Kit on Amazon ($12.99). Now, you may turn your keyboard upside down and gently shake it (or give it a few good taps on the back) to remove any loose debris that may have settled underneath the keycaps.
Step 3: Wiping it Down

Use a damp microfiber cloth to wipe your keyboard. Follow it up with a dry microfiber cloth, and viola, you’re done! Don’t forget to clean the WASD and other regularly used keys to get rid of gamer gunk.
Deep Cleaning Mechanical Keyboard
Sometimes, you gotta deep clean your mechanical keyboard, which is a more intensive and time-consuming process. However, it’s worth every second of your time. So, let’s get into it.
Step 1: Disconnect or Unplug Your Keyboard
Whether performing a basic cleaning or going all in, always remember to disconnect/ unplug your keyboard from your PC to prevent any accidental keystrokes.
Step 2: Remove the Keycaps
First, I would recommend clicking a photograph of your keyboard. It will come in handy when you’re reassembling the keyboard. Trust me on this.

Next, use a keycap puller to remove all the keycaps from the keyboard. Most mechanical keyboards ship with a keycap puller within the box. However, if yours didn’t come with one, you can buy a cheap keycap puller on Amazon. I recommend a wired puller like this one, as plastic keycap pullers can scratch the keycaps if you’re not careful.
The longer/ bigger keys like the Backspace, Right Shift, Left Shift, Space Bar, and Enter might be a little trickier to remove as they are also supported by stabilizers, but take your time, and you will do just fine. You might want to pop off one side of these longer keycaps first and then the other.
Step 3: Wash the Keycaps

Place your keycaps in a decently-large bowl or container. Fill the container with warm water, add some dish soap, and gently stir this concoction with your hands till you see foam forming. Leave these keycaps to soak for a few hours while you clean the top panel of your mechanical keyboard.

Once they have spent a decent amount of time in the bath, take them out of the container, rinse them thoroughly, and lay them out stem-side-up (upside down) on a towel to dry. While your keycaps enjoy their spa day, you can move on to the rest of the board.
Step 4: Clean Between the Lines
With the keycaps off, you may see a massive amount of dirt and grime buildup on your mechanical keyboard staring directly into your soul. It’s an overwhelming feeling (and not a good one). Let’s get rid of it, shall we?

Using a brush is a great way to dislodge and remove debris from the top plate. It allows you to get to hard-to-reach corners and in between the switches for easier cleaning. You can also use a damp microfiber cloth to wipe the top plate.
For stubborn stains, you will need something with a bit more pizzazz (not to be confused with pizzas). Grab some Q-tips and a bottle of Isopropyl Alcohol. Wet the ends of the Q-tips with the Isopropyl Alcohol, and start cleaning the rows between the switches. It may take some time, but the result will be a shiny, good-as-new top plate.
Step 5: Clean the Base
Use a microfiber cloth (lightly) dipped in soapy water to clean the rest of your board. Ensure the microfiber cloth is damp and not wet to avoid water getting into your mechanical keyboard. Give it a good scrubbing, and you will be right as rain.
Step 6: Putting it Back Together
Once everything is clean and dry, you can start the reassembly. Remember the photograph I asked you to click earlier (before taking off the keycaps)? You can refer to that to figure out which keycaps go where on your keyboard. Pop them on one by one, and you’re all set!

Super Deep Cleaning
Life isn’t perfect, and sometimes, accidents happen. You are enjoying a glass of cola or iced coffee on a hot summer evening and BAM! You have just spilled the entire thing onto your keyboard. It’s a mess and a half, and cleaning it will require extra effort. Simply unplugging your keyboard and chucking it outside to dry won’t help, as sugary drinks tend to leave behind a sticky residue. Not only it is gross to touch, but it can also jam the switches or cause a short circuit.
Cleaning a mechanical keyboard you have spilled a drink onto can be a little trickier, as you will need to take it apart and carefully remove all the sticky residue. However, it’s doable. Just ensure you take your time and follow the instructions. Here we go!
Step 1: Unplug the Keyboard
If you have spilled something onto your mechanical keyboard, disconnect it from your PC immediately! Do not try to press any keys, as it can cause a short circuit and damage the USB input, leaving your keyboard as a mere paperweight.
Step 2: Take off the Keycaps
As we explained above, use a wired keycap puller to remove all the keycaps from your mechanical keyboard. Be gentle and take your time.
Step 3: Wash the Keycaps
Place your keycaps in a container with warm water and some dish soap. Stir with your hands and let them soak for a few hours. Rinse them thoroughly and lay them out face-down on a towel to dry. The process remains the same as described in the deep cleaning section above.
Step 4: Remove the Stains
Wipe your mechanical keyboard with a damp microfiber cloth to remove the stains and sticky residue. Use Q-tips for hard-to-reach places like the corners and between the switches. You may use Isopropyl Alcohol instead of soapy water for cleaning this time around as it does a better job of removing stubborn stains and grime.
Step 5: Going in Too Deep
If you have spilled a drink onto your keyboard, there is a good chance it has also seeped into the case, in which case (no pun intended) you will need to disassemble your mechanical keyboard to clean it thoroughly.
Please Note: Taking your mechanical keyboard apart will void its warranty. Only attempt this if you are comfortable working with electronics and know what you’re getting into. Otherwise, seek help from someone more experienced or consult a professional. If your keyboard is under warranty, send it to the manufacturer for repair.
If you have decided to take on the disassembly adventure, kudos to you, good sir/ ma’am! However, I must advise you to tread carefully and at your own risk.
The disassembly process may vary depending on your keyboard’s make and model. For best results, consult the keyboard’s manual or watch/ read a disassembly guide for your keyboard.
But the basic process is — remove the keycaps, unscrew any and all the screws you see (some might be hidden under stickers or beneath the rubber feet of your keyboard), and gently lift the top plate. Be gentle during the process, and do not pull on anything with excessive force.

When lifting the top plate/ PCB (printed circuit board) out of the case, you may notice a small wire going into a header in your keyboard’s PCB. Carefully dislodge the wire from its connector, then pull the top plate apart from the rest of the board. The keyboard we used for the demonstration purpose didn’t have that, but most keyboards do.
You may also notice some screws on the back of the PCB that attach the PCB to the top plate. Unscrew them to separate the two layers.
With all the components separated, inspect each one for signs of sticky residue and stains. Use a microfiber cloth or Q-tips lightly dipped in Isopropyl Alcohol to clean each surface of a mechanical keyboard. Isopropyl Alcohol is a fantastic cleaning agent for electronics, as we have seen in our guide to apply or change thermal paste on the CPU. It kills bacteria, evaporates quickly, and doesn’t leave any oil traces behind, thus eliminating the chance of corrosion or liquid damage.
Step 6: Reassemble the Keyboard
Once your keyboard is squeaky clean, it’s time to put everything back together, which is considerably easier than taking it apart. Just follow the disassembly process in reverse.
- Screw the PCB back onto the top plate
- Connect the USB/battery cable to its designated header on the bottom of the PCB
- Place the top plate back into the case and screw it in, and finally
- Reinstall the keycaps. That’s all, folks!
There are more ways than one to go about cleaning your mechanical keyboard. But it’s essential for keeping your board looking fresh and extending its lifespan. Plus, it’s kinda therapeutic as well. While you don’t need to deep clean your mechanical keyboard every other week, you should do it once in 6 months for good measure. Follow these steps to correctly and safely clean your mechanical keyboard. Or, if you have some other (and better ways) of cleaning, do let us know in the comments down below!


 Abubakar Mohammed


