One of the best features of Windows 11 is that it makes your overall PC experience safe and secure by default. However, to enjoy enhanced protection, you need to have a TPM (Trusted Platform Module) security chip on your PC. If you have no idea about TPM chips, follow our in-depth explainer on what exactly is TPM and why it is essential for Windows 11. In this guide, we will specifically focus on how to check if your Windows PC has a TPM chip and enable it. There are high chances that your computer already comes with this TPM security module. So without wasting any time, let’s jump to the tutorial.
Check and Enable the TPM Chip on Your Windows PC (2021)
If you are facing the This PC Can’t run Windows 11 issue along with a TPM error after running the Windows 11 compatibility test, go through our guide and check whether your PC comes with a TPM chip or not. We will also explain how to enable the TPM chip on Windows 10 in this article.
How to Check If Your PC Has TPM Chip for Windows 11
Before you upgrade to Windows 11 from Windows 10, I would suggest you check for TPM support on your Windows 10 PC. This way, you will be sure that after enrolling in the Dev channel of the Windows Insider program, you will receive the first Windows 11 preview build. Also, if you are running a 4th-gen Intel CPU (2014) or AMD Ryzen 2500 (2017) and above processor, then in all likelihood, your PC comes with a TPM security chip. Here is how you can confirm it.
-
Method 1: Using TPM Manager
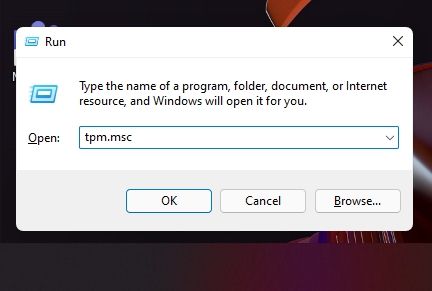
1. Press the Windows keyboard shortcut “Windows + R” to open the Run window on your PC. Here, type tpm.msc and hit enter.

2. A new window will open up. Now, under “Status“, check if the TPM chip is available or not. If available, the status will read — “The TPM is ready for use.” Right below, you can also find the TPM version.
-
Method 2: Using Device Manager
Another way to check if your PC supports the TPM security chip is through the Device Manager. It’s a simple two-step process, so follow the instructions below:
1. Press the “Windows + X” shortcut and open “Device Manager“.
Here, expand the “Security devices” menu, and you will find TPM along with the version information. For instance – My HP laptop has a TPM 2.0 module, but your PC might include the TPM 1.2 module, which is also compatible with the upcoming Windows 11 update.
Method 3: Using Windows Security
Finally, there is one more way to check the presence of the TPM module on a Windows PC.
1. Open “Windows Security” using the Windows Search bar and move to the “Device Security” tab.
2. Next, click on “Security processor” details, and you will find all the information regarding the TPM chip on your computer. You will also see if your PC supports TPM 1.2 or TPM 2.0 right here.
How to Enable the TPM Chip on Your Windows PC
Some laptops don’t allow you to enable the TPM chip unless you set a “Supervisor” or “Administrator” password in the BIOS settings. So you first need to set the password, then only will you be able to enable the TPM chip. Needless to say, you need to remember the password, else you won’t be able to access the BIOS and make firmware-level changes in the future. With that said, let’s take a look at the steps to enable the TPM module on your PC:
1. First, you need to boot into the BIOS or UEFI interface of your PC. You can do this by pressing the boot key continuously while your computer starts up.
Note: For HP laptops, it’s the “Esc” or “F10” key. As for other laptops and desktops, you need to search for the boot key for your computer from the internet. Moreover, if you are using a custom-built desktop, the boot key depends on the motherboard manufacturer. It would be one of these – F12, F9, F10, etc.
2. Once you are in the BIOS/ UEFI interface, look for the “TPM” or Trusted Platform Technology option under the “Security” tab. It’s also labeled as PTT (Platform Trust Technology) on some Intel-based machines. On AMD machines, you might find the “PSP”, “fTPM”, or “PTP” option in the BIOS menu.
Note: If you don’t find TPM located under Security settings in the BIOS interface on your PC, look around and jump into the Advanced Settings. However, make sure it’s enabled or available. There might be TPM State as well, so go ahead and enable it.
3. Now, press “F10” and hit enter to save and exit. F10 is generally reserved for “Save and exit”, but the key may differ for your computer. We suggest you check it on the BIOS/ UEFI footnote.
Turn On the TPM Chip to Install Windows 11 on Your PC
So these are the ways you can check if your PC has the TPM module or not, and in case it’s not found, you can enable it from the BIOS/ UEFI menu. I strongly recommend enabling TPM not just to make your PC compatible with Windows 11 but to provide an isolated, hardware-based authentication system. This will protect all your passwords and personal information on your PC. If you want to take a look at a list of Windows 11-compatible processors that come with the TPM chip, go through our linked article. Anyway, that is all from us. If you have any questions, comment down below and let us know.