Ever since Microsoft announced the new system requirements for Windows 11, users have been looking for a workaround to circumvent the restrictions. In fact, Microsoft has itself relaxed the rules to some extent. If you have TPM 1.2, you can bypass TPM 2.0 and CPU check with Microsoft’s official registry hack. Not to mention, there are several other methods to bypass the Windows 11 CPU, TPM, Secure Boot, RAM, and online account requirements. So in this tutorial, we bring an in-depth tutorial to skip all the minimum system requirements and install Windows 11 on unsupported systems. On that note, let’s jump to the tutorial.
Bypass Windows 11 CPU, TPM, Secure Boot, and RAM Requirements (2022)
We have mentioned all the steps to bypass Windows 11’s minimum system requirements in this article. You can use Rufus to clean install Windows 11 while removing all the restrictions. You can also apply Windows Update even on incompatible PCs. Finally, we have included the official workaround by Microsoft as well. You can expand the table below and move to any section you want.
Bypass All Windows 11 System Requirements With Rufus
Rufus is a free and open-source formatting utility used for creating a bootable USB drive for Windows 11 and Linux operating systems. It’s an excellent tool that also lets you bypass all the system requirements of Windows 11. The latest version of Rufus allows you to bypass TPM, Secure Boot, the 4GB RAM limit, and even the online account requirement recently introduced in Windows 11 Pro and Home.
On that note, let’s go ahead and learn how to skip all minimum system requirements of Windows 11.
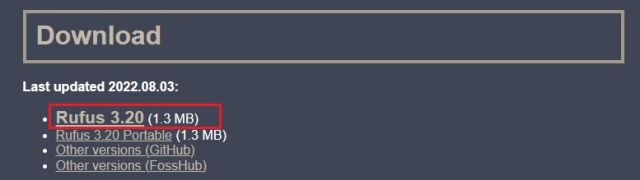
1. First, go ahead and download the latest version of Rufus (3.18 or later, Free) from the link here.
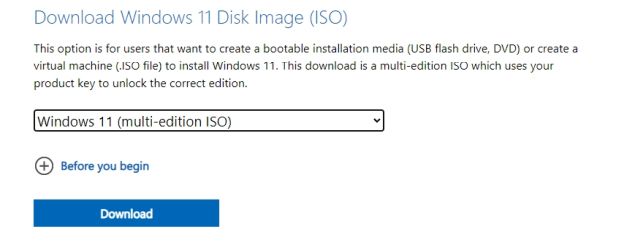
2. Next, download the official Windows 11 ISO from Microsoft’s website (visit) for free. Follow our linked guide for detailed instructions.
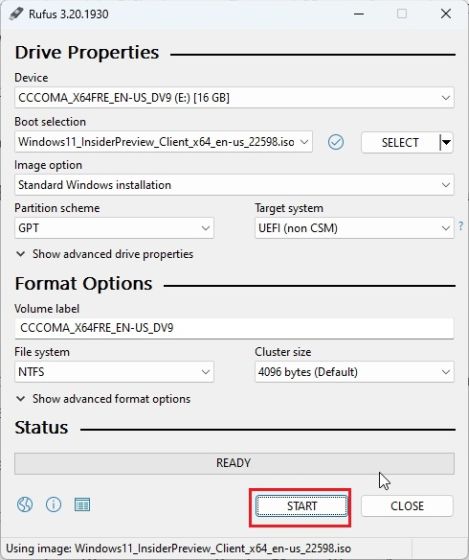
3. After that, plug a USB drive into your PC and run Rufus. It will automatically detect the USB stick. Now, click on “Select” to load the Windows 11 ISO image.
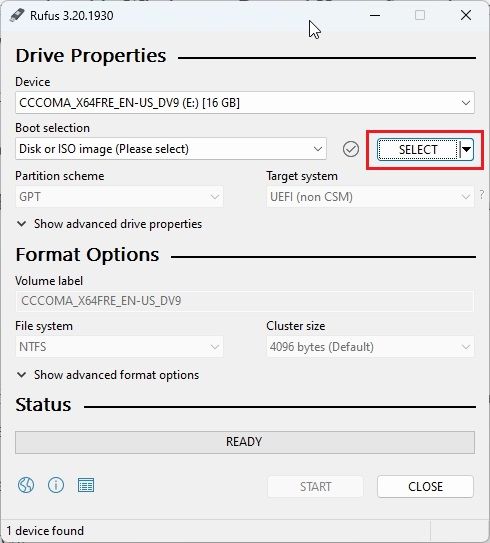
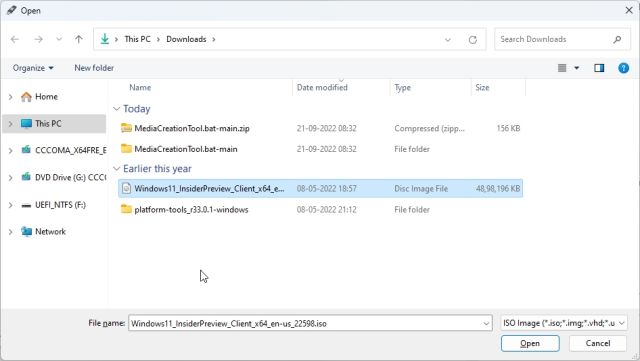
4. Here, select the Windows 11 ISO image that you recently downloaded.
5. After that, click on “Start” to create the Windows 11 bootable USB drive.
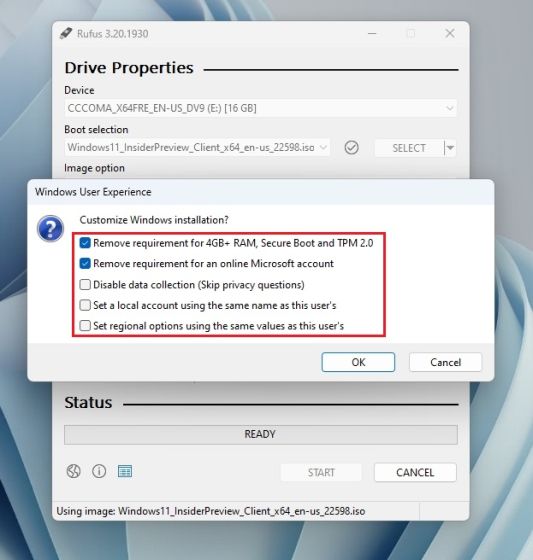
6. A pop-up will instantly appear on the screen once you click on Start. Here, you can disable all Windows 11 requirements, including TPM, 4GB RAM, Secure Boot, and online Microsoft account. In addition, you can also disable data collection and other such things. Finally, click on “OK“, and the bootable flash drive will be ready in a few minutes.
Note: Rufus does not bypass the CPU requirement, for which we have mentioned additional steps below.
7. Now, plug the USB drive on your target machine and clean install Windows 11, just like you generally do. You will not face any errors. If you have an unsupported CPU, move to the next step.
Additional Steps to Bypass Windows 11’s CPU Requirement
1. For users who do not have a Windows 11 supported CPU and are getting the “This PC can’t run Windows 11” error, worry not. Just press “Shift + F10” to open the Command Prompt window. Here, type regedit and hit Enter.
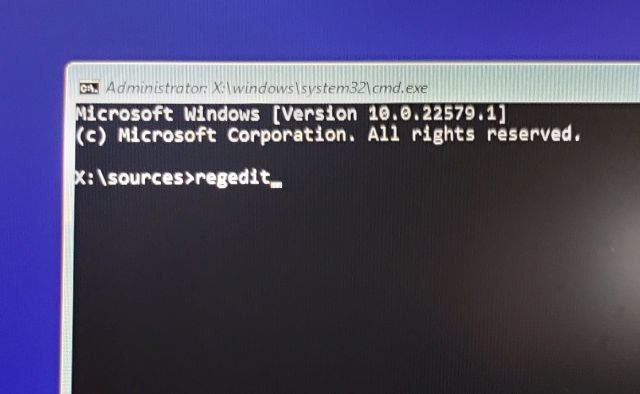
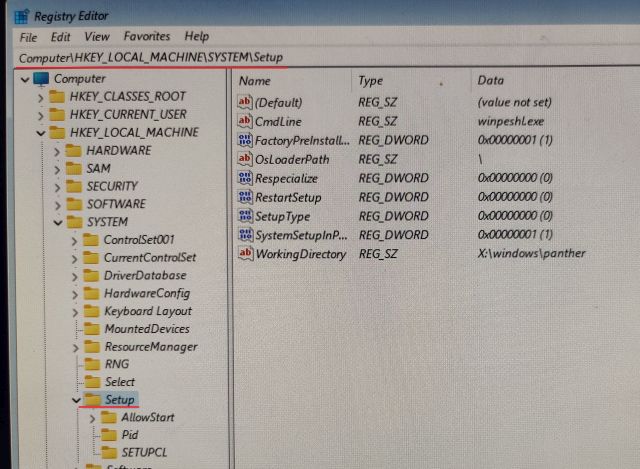
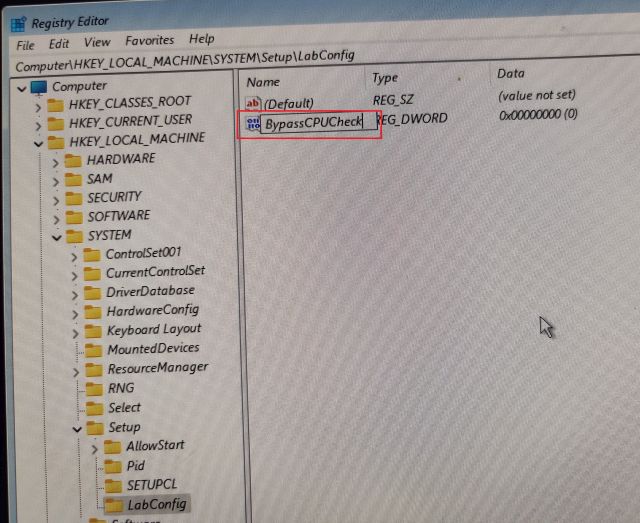
2. This will open the Registry Editor. Now, navigate to the below path.
HKEY_LOCAL_MACHINE\SYSTEM\Setup
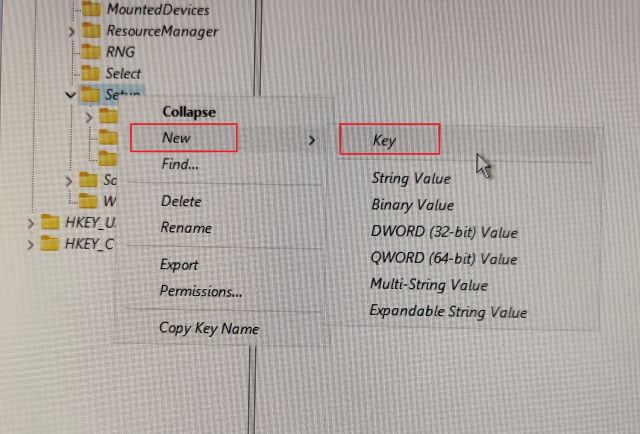
3. Here, right-click on “Setup” and choose New -> Key.
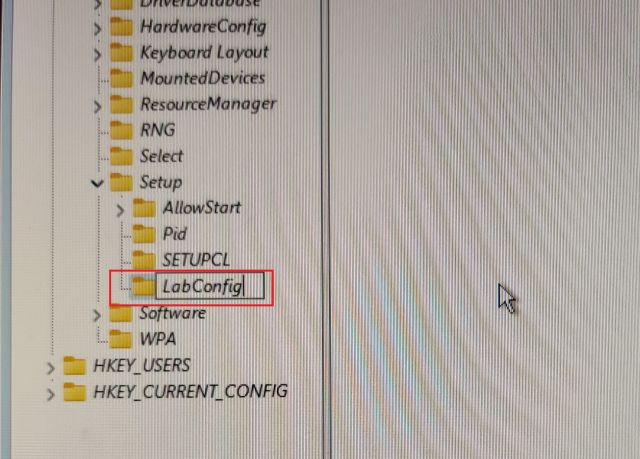
4. After that, rename it to “LabConfig” and hit Enter.
Note: If LabConfig is already present under Setup, move to step 5 right away.
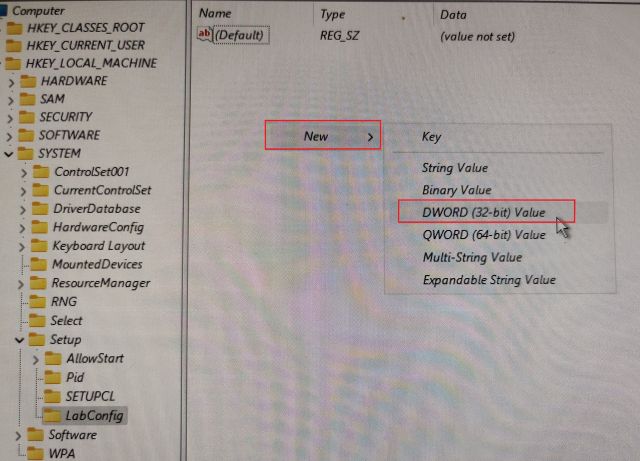
5. Once the LabConfig key is created, select it and right-click in the empty space on the left pane. Here, choose New -> DWORD (32-bit) Value.
6. Rename it BypassCPUCheck and hit Enter.
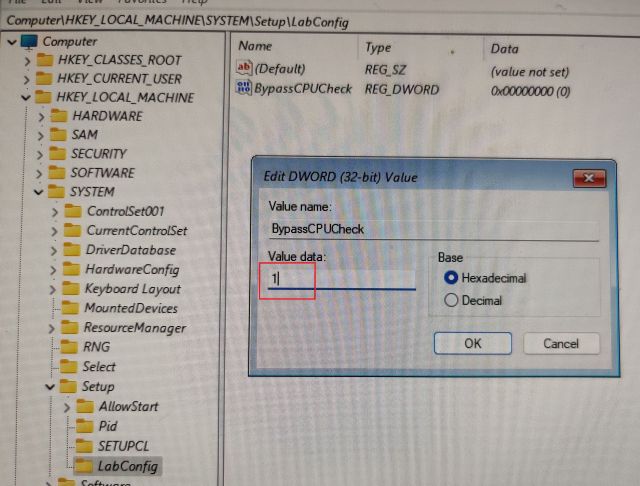
7. Now, double-click on it and change the Value data to 1. Click on “OK” to close the Registry Editor and Command Prompt window.
8. After that, click on the back button in the top-left corner.
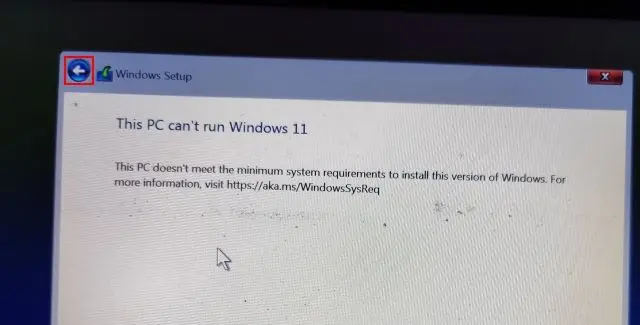
9. Now, click on “Next”, and you won’t encounter the error this time around. So this is how you can bypass the CPU check on Windows 11.
How to Bypass TPM Check During Windows 11 Updates
While users have managed to install Windows 11 on ineligible PCs, the official Windows Updates fail to install due to system requirement checks during dynamic updates. Well, that’s expected since Microsoft has said before that it can’t guarantee future updates on incompatible PCs.
So if Windows Updates are not getting installed on your Windows 11 PC due to some missing requirements, well, this method will help you resolve the issue. A developer named AveYo has developed a script that automatically bypasses the setup requirements by using a Product Server trick. Here is how it works.
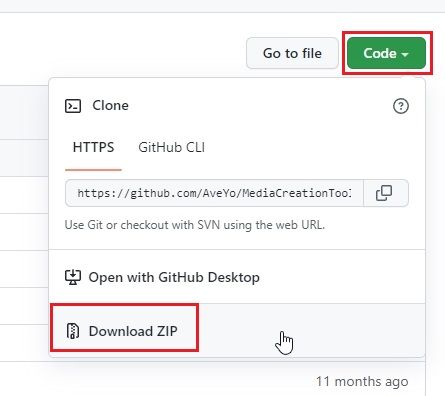
1. Go ahead and open the GitHub page of the script. Here, click on Code -> Download ZIP on top-right corner.
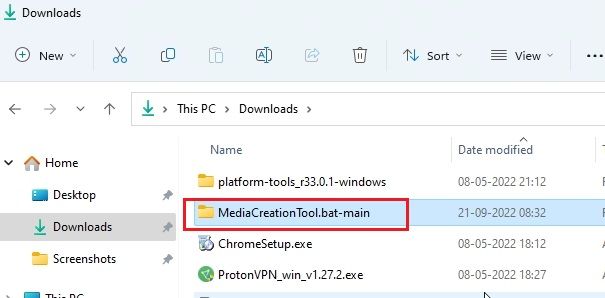
2. Next, extract the ZIP file on your Windows 11 PC and open the folder.
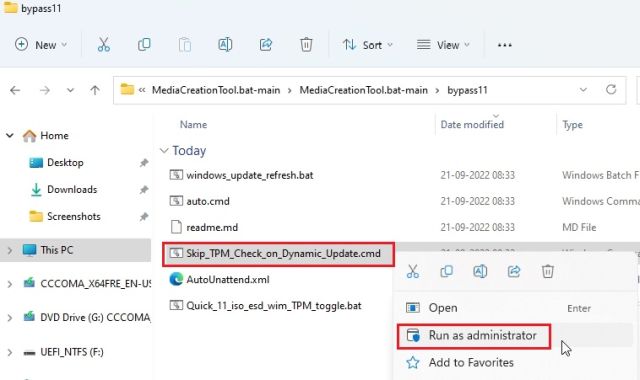
3. Now, move to the “bypass11” folder and right-click on “Skip_TPM_Check_on_Dynamic_Update.cmd“. Here, select “Run as administrator” from the context menu. If you get a security prompt, click on More Info -> Run anyway.
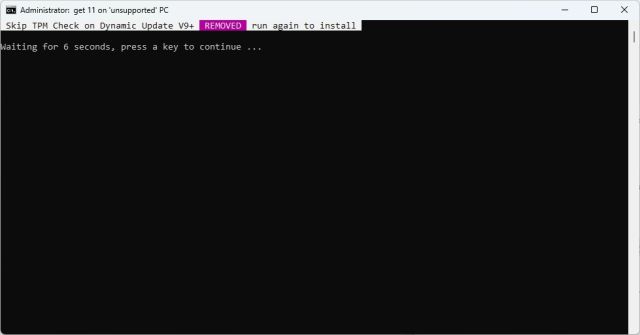
4. A Command Prompt window will open up, informing you that the bypass has been applied.
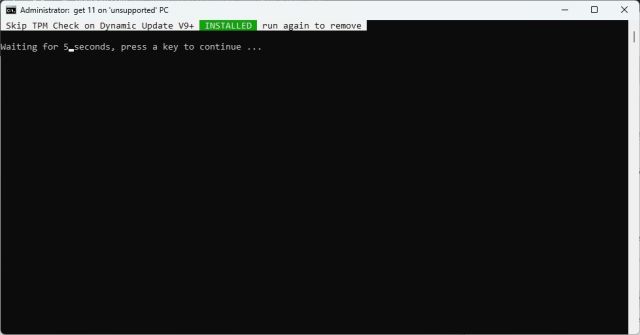
5. Now, go ahead and check for updates on your Windows 11 PC, and you will be able to install them without any issues. Before installation, the setup wizard might prompt you to accept the risk before installing updates on your incompatible PC. Accept it, and you are good to go. In case it does not work, restart the PC and try again.

6. If you want to remove the bypass patch from your system, run the same script again, and it will be removed instantly.
Bypass Windows 11 CPU and TPM Requirements (Microsoft Official Method)
Other than third-party tricks, Microsoft has also detailed instructions on how to bypass CPU and TPM requirements while upgrading from Windows 10 to Windows 11. Having said that, you at least need a TPM 1.2 chip for this method to work. Here is how to go about it.
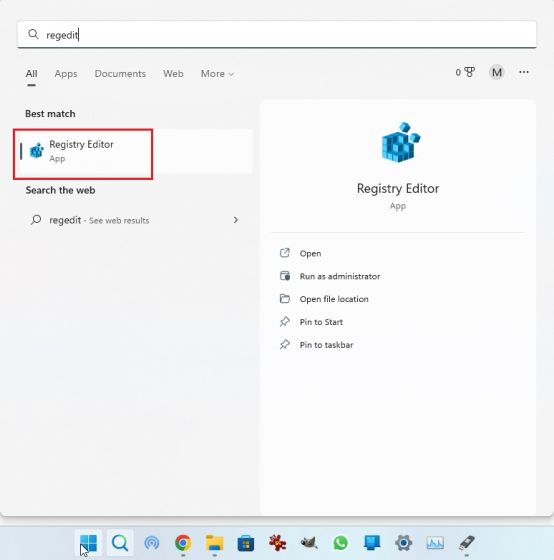
1. Press the Windows key and type “regedit“. Now, open the Registry Editor.
2. Here, paste the below path into the address bar of the Registry Editor and hit Enter. This will directly take you to the following path.
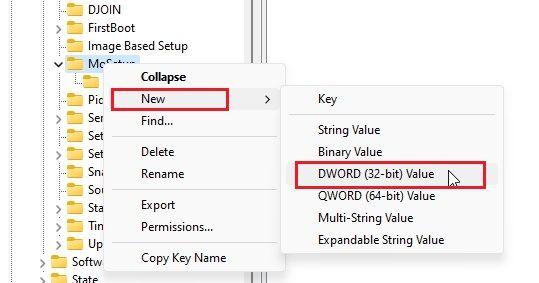
Computer\HKEY_LOCAL_MACHINE\SYSTEM\Setup\MoSetup

3. Next, right-click on “MoSetup” in the left sidebar and choose New -> DWORD (32-bit) Value.
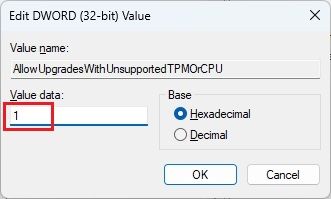
4. Rename it AllowUpgradesWithUnsupportedTPMOrCPU and hit Enter.
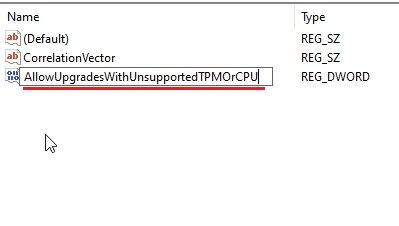
5. Now, double-click on the new key to open it. Here, enter 1 in the value data field and click “OK”.
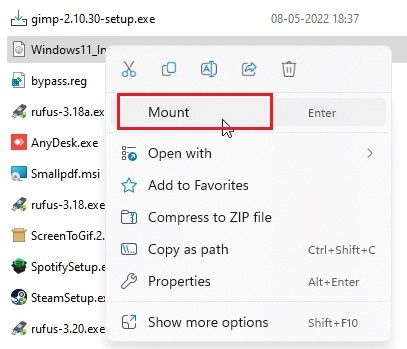
6. You can now close the Registry Editor and restart your PC to apply the changes. If you have already downloaded the Windows 11 ISO image, right-click on it and choose “Mount”.
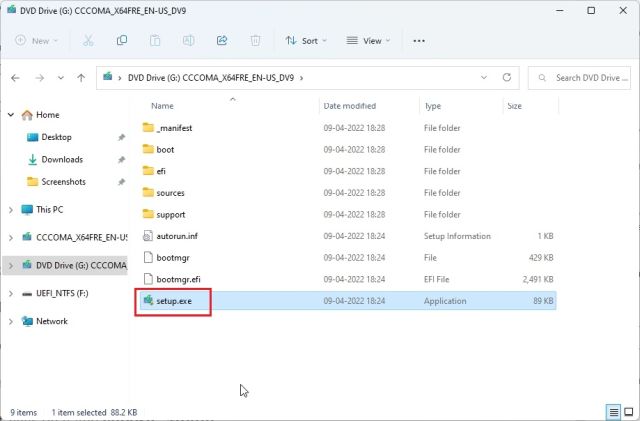
8. The Windows 11 ISO image will be mounted as an external disk. Next, open File Explorer and move to the mounted drive. Here, double-click on “setup.exe” to start the upgrade process.
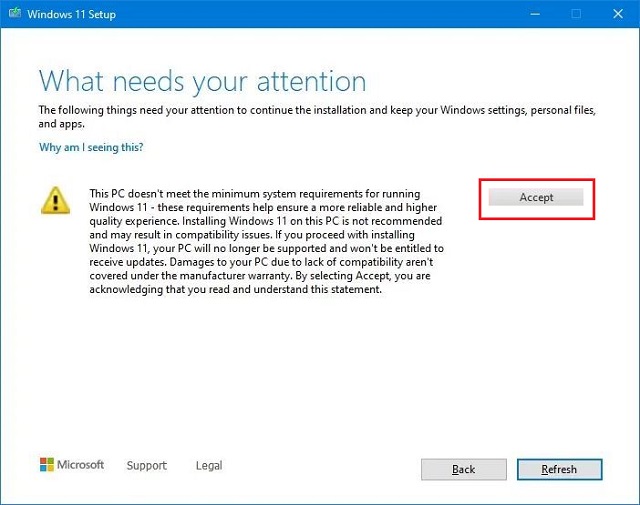
9. Click on the “Next” button and accept the warning that you are going to run Windows 11 on an incompatible PC. That’s it. You can now officially upgrade to Windows 11, bypassing the CPU and TPM checks.
Remove Windows 11 System Restrictions on Unsupported PCs
So these are the three easy ways to skip the minimum system requirements from Windows 11. With the first method, you can clean install Windows 11 and the second method lets you apply future updates on your Windows 11 PC. The third method enables you to upgrade from Windows 10 to Windows 11 on incompatible PCs. Anyway, that is all from us. If you want to enable or disable Fast Startup on Windows 11, follow our linked article. And to install Android apps on Windows 11, we have a dedicated guide for that. Finally, if you have any questions, let us know in the comment section below.