While DSLR cameras are still the top choice for professional photographers, your iPhone and most Android devices are more than capable of capturing good-looking shots with a bokeh effect like a pro. Times when you want to put the entire spotlight on the subject while keeping attention away from the background, the blur effect in portrait photos plays a major role. Though most modern iPhones include powerful camera hardware and software to help you click amazing portrait pictures, you can blur a photo on older iPhone models as well. So, if you are set to amp up your photography game and make subjects stand out, check out the 5 best ways to blur the background of a photo on your iPhone.
5 Ways to Blur a Photo on Your iPhone (2022)
1. Blur Background on Your iPhone Using Portrait Mode
To blur a picture on your iPhone, you don’t need to look anywhere else, but the Portrait mode built right into the stock camera app. For the uninitiated, the Portrait mode enables the camera to create a depth-of-field effect, thereby allowing you to take photos with a sharp focus on the subject and a blurred background.
The following iPhone models support Portrait mode:
- iPhone 13, iPhone 13 mini, iPhone 13 Pro, and iPhone 13 Pro Max
- iPhone 12, iPhone 12 mini, iPhone 12 Pro, and iPhone 12 Pro Max,
- iPhone SE and iPhone SE 3
- iPhone 11, iPhone 11 Pro, and iPhone 11 Pro Max
- iPhone XR, iPhone XS, and iPhone XS Max
- iPhone X and iPhone 8 Plus
- iPhone 7 Plus
1. To get started, launch the Camera app on your iPhone and swipe right to left to choose “Portrait” mode at the bottom.
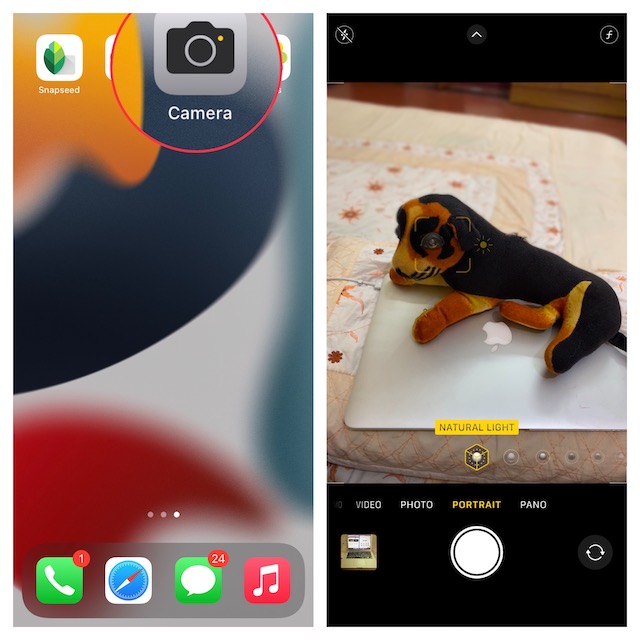
2. Now, align your shot, making sure the subject is between two and eight feet away from the camera. Note that the name of the portrait lighting effect, such as Natural Light, will turn yellow when the subject is accurately aligned. Next, tap on the Shutter button, and you have successfully captured a portrait photo with background blur on your iPhone.

Here are a few things you should remember when clicking a portrait photo on your iPhone:
- To help you capture better portrait shots, the camera app alerts you when you are too close, too far away, or if the area is too dark.
- The iPhone Pro models (11 Pro and later) offer multiple zoom options for portrait mode such as 1x or 2x. You can tap the 1x or 2x icon to switch between the options. iPhone 13 Pro series allows you to switch between 1x and 3x magnification, though. There’s no 2x zoom option on the latest iPhone 13 Pro and 13 Pro Max variants.
- The iPhone XR and iPhone SE 2 must detect a person’s face to capture a portrait mode photo. They do not work on inanimate objects.
2. Change Background Blur in Portrait Photos on iPhone
On iPhones, you can change the background blur even after you have captured a portrait shot. So, whether you want your portrait shots to look even more appealing or use a different lighting effect, the Photos app can let you edit your photos with ease.
1. First, open the Photos app on your iPhone and head to the portrait photo you wish to edit. After that, tap “Edit” in the upper-right corner of the screen.

2. Now, tap on the f/number icon at the top-left and use the “Depth control” slider that appears below your photo to adjust the blur strength. While a low number strengthens the blur effect, a high number decreases the background blur effect on iPhone.

3. Portrait Lighting, on the other hand, allows you to add different studio lighting effects (supported on iPhone 8 Plus, iPhone X, and later) to your portrait pictures. Tap the “Portrait Lighting” icon (looks like a hexagon) at the top left corner of the screen and then choose the desired lighting effect.

- Natural Light: As the name suggests, it allows you to use natural light effects for your portrait photos. Choose it if you don’t want the camera to modify the lighting effect and present you with a genuine photo.

- Studio Light: It lets you brighten up your subject’s face.

- Contour Light: Use it to add shadows for more defined facial features.

- Stage Light: It turns the background completely black while keeping the entire focus on the subject.

- Stage Light Mono: Though it is basically the same as Stage Light, it adds a black and white effect to your portrait photos.

- High-Key Mono: It creates a black and white photo with a white background, perfect for government documents and IDs.

4. Once you have ideally adjusted the portrait blur effect, tap the “Done” button at the bottom-right corner of the screen to save all these changes. Later, if you ever want to revert the changes, navigate to the image -> Edit -> Revert -> Revert to Original.
Note:
- It’s worth pointing out that only the latest iPhone models support Depth Control. Currently, iPhone SE 2 and 3, iPhone XR, iPhone XS/ XS Max, iPhone 11, iPhone 11 Pro, iPhone 11 Pro Max, iPhone 12 mini, iPhone 12, iPhone 12 Pro, iPhone 12 Pro Max, iPhone 13 mini, iPhone 13, iPhone 13 Pro, and iPhone 13 Pro Max support Depth Control.
- Bear in mind that the rear camera on the iPhone XR only supports Natural Light, Studio Light, and Contour Light portrait modes.
3. Blur Background By Getting Closer to Your Subject
What if you don’t have a modern iPhone, but still wish to blur a photo on your iPhone? Bother not, there is an old yet effective tip that can help you blur the background of an image on your iPhone.
Just get closer to your subject to blur the background. Yeah, you read that right! When you shoot with the camera close to the subject, the built-in camera creates a shallow depth of field. For the unfamiliar, a shallow depth of field allows only a tiny portion of an image to be in focus and blurs the rest of the image. In a nutshell, the closer you take the iPhone camera to your subject, the shallower the depth of field becomes. We suggest you pick up one of the best tripods for the iPhone to reduce jitters and click more stable photos/ videos.
However, bear in mind that if you take the camera too close to the subject, the camera will completely fail to focus. The subject will look completely blurred. Therefore, make sure to keep an eye on the subject ensuring that it is in sharp focus while getting close to the subject. Be sure to keep your foreground subject sharp and the background blurred. Fortunately, it’s pretty easy to set your iPhone camera focus.
- Open the Camera app and tap on the spot where you want to focus on the subject. Now, a yellow box will show up on the screen to indicate the focus point.

- Just in case, the background doesn’t look blurred, get a bit closer and tap to set focus again.
Note:
- Apple has introduced Macro mode on iPhone 13 Pro and 13 Pro Max to let you capture ultra close-up shots. What makes it a worthy addition is the ability to take photos and videos of subjects that are as close as 2cm to your iPhone’s camera lens.
- You can use this camera mode to capture shots of textures, flowers, insects, or for that matter anything small or at close distance with enhanced focus and rich details.
- To use macro photography, open the Camera app, ensure that the Photo mode is active, and then line up the shot with your subject. Then, move in closer to your subject, which can be as close as 2cm away from the lens. You need to enable the new “Macro Control” option to click close-up photos. Once the lens has focused on the subject, hit the shutter button to snap the shot.
4. Use a Third-Party App to Blur Photo Background on iPhone
There are several third-party apps that can let you blur the background of a photo on an iPhone. However, Focos is one of the most popular and efficient apps, thanks to its ability to produce pro-grade bokeh effects. You can use it to turn any image into a portrait mode style image with adjustable depth of field. The app is available for free and requires iOS 11.2 or later.
1. Launch the Focos app on your iPhone. After that, tap on the photo icon and select the image you want to edit. Then, use the blur effect slider to adjust the background blur of the iPhone photo.

2. When you are happy with the results, tap the export button at the top-right and save or share your photo, as per your needs.

5. Use Blurred Vignette Effect to Bring Your Subjects in Focus
Although the blurred vignette effect can’t let you achieve the same result as the above-explained methods, it is something you should try out to see if you like it. Wondering how the vignette effect works? Well, instead of blurring the entire background of a photo, it creates a blurred vignette around the edges of the screen. As a result, the blurred edges direct your focus towards the subject.
And Snapseed by Google (Free) has long been considered a reliable tool for this purpose. No wonder it’s widely regarded as one of the best photo editing apps for iPhone and iPad. Let’s look at how it works:
1. Launch the Snapseed app on your iPhone and tap the “plus” icon to bring up your photo library. Now, you can either open an image from your device, snap an image, or open the last image. Alternatively, you can scroll through your photo library to choose the image you would like to edit.

2. Next, move to the “Tools” tab at the bottom and select the “Lens Blur” tool.

3. Next up, you should see a couple of white circles on your image. While the portion inside the inner circle will be in the sharp focus, the portion outside will be blurred out. Your image will transition from sharp to blur in the areas between the two circles. Depending on your needs, you can drag the circle to a preferred area or even resize it by pinching with your fingers.

- If you want to adjust the blur strength, swipe up or down and choose “Blur Strength“. After that, swipe left or right to fine-tune the strength of the blur.

- You also have the option to adjust the “Transition” and “Vignette Strength” in the same way. While Transition allows you to adjust how the focused area transitions to blur, the Vignette Strength lets you control how dark the edges of the image appear.
4. Once you have perfectly edited your image, hit the checkmark at the bottom-right corner of the screen.

5. Now, tap “Export” and choose the Save a Copy, Save, or Export option in the menu, and you are done!

Blur the Background of Photos on Your iPhone
So yeah, these are the most effective ways to blur the background in photos on iOS. With the portrait mode now available on most modern iPhones, it’s the best method to get a natural background blur in pictures. Also, you have some capable third-party apps like Snapseed and Focos on the App Store to make the most out of, even on older iPhone models. That said, what’s your preferred method for clicking portrait photos with a blurred background on your iPhone. And if you wish to further boost your photography skills, I would recommend exploring our roundup of the best night mode apps and tips to get the most out of Apple ProRaw.