If you recently moved to Windows 10 using the Windows 10 Media Creation Tool and the camera does not seem to work on the latest build, worry not. In this tutorial, we bring you three different methods to fix the camera issue on Windows 10. For users who are facing errors such as “can’t start your camera” (0xA00F429F) or “We can’t find your camera” on their Windows 10 PC, we have included the steps you can follow to resolve the issues immediately. Now on that note, let’s go ahead and find out how to fix the “camera not working” issue on Windows 10.
Camera Not Working on Windows 10? Find the Solution Right Here! (Updated May 2021)
If the camera is not working on your Windows 10 laptop, you can find all the possible solutions to this issue right here. Just expand the table below and move to whichever section you want.
Change Camera Privacy Settings
1. First off, press the Windows key and type “camera privacy” in the Search bar. Now, open “Camera Privacy settings“.

2. Alternatively, you can go to “Settings -> Privacy -> Camera” on your Windows 10 computer.

3. Once you are on the Camera settings page, make sure the toggle for “Allow access to the camera on this device” is turned on. I would suggest turning off the toggle once and turning it on again if your camera is not working.

4. Next, scroll down and ensure that the “Allow apps to access your camera” toggle is enabled. Repeat the same process, turn it off and re-enable again.

5. Now, scroll down to find a list of apps that can access the camera. Look for the app where the camera is not working and turn on the toggle if it isn’t already. We suggest turning the toggle off and on again.

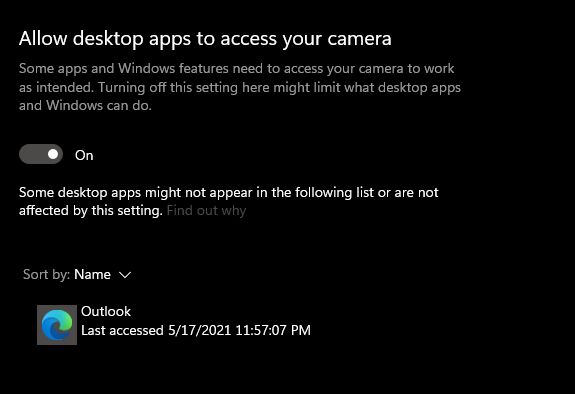
6. Finally, turn on the toggle for “Allow desktop apps to access your camera“. This is for all the programs built on the traditional Win32 framework. It includes Microsoft Edge, Chrome, Outlook, Microsoft Teams, and more.
7. Now, go ahead and open the “Camera” app to find that your Camera woes have been fixed and the app has started working on Windows 10.

Re-install the Camera Driver
1. If you still can’t start the camera on Windows 10, you will have to re-install the driver. Use the Windows keyboard shortcut “Win key + X” or right-click on the Start Menu icon to open the Quick Menu. Here, click on “Device Manager”.

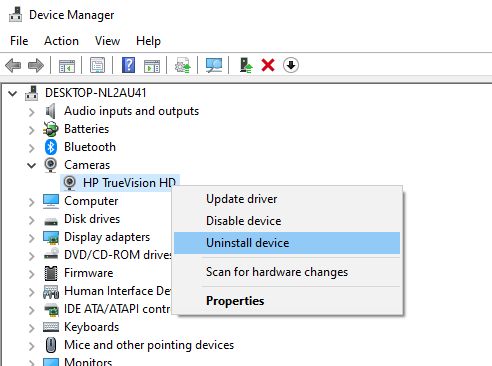
2. In the Device Manager window, expand the “Cameras” menu and right-click on your Windows 10 laptop’s camera hardware. For me, it’s the HP TrueVision HD camera. Now, click on “Uninstall device”.
3. After uninstalling the driver, click on “Action” and choose the “Scan for hardware changes” option.

4. This will look for the webcam again and install the camera driver automatically. You can also restart your Windows 10 PC and it will automatically update the driver.

5. Now, you should check whether the camera on your Windows 10 PC is working or not. If the problem persists, right-click on the webcam hardware and select “Update driver“.

6. Windows 10 will start looking for the latest driver on the internet and will install it on your PC. Reboot your PC once the driver installation is complete, and the can’t start your camera error “0xA00F429F” should be fixed by now.

7. If the automatic driver update didn’t work for you, I would highly recommend you download the driver directly from the manufacturer’s website. Sometimes, Windows 10 updates the wrong drivers, and that results in webcam issues. Note down the camera name from Device Manager and look for it on the internet. You can also follow our guide on how to manually update drivers on Windows 10.
8. If that also didn’t work out for you, we suggest you take the help of third-party apps. We have curated the best free tools to download and install correct drivers on Windows 10.
Reset the Camera App
1. If you are getting the “We can’t find your camera” error, you need to reset the app to fix the issue. Press the Windows key and type “camera” in the search bar. Now, click on “App Settings“.

2. It will directly take you to the App Settings page of the Camera app. Here, scroll down and click on “Reset”.

3. After a while, relaunch the camera app and you should not face any issues this time around.
Facing “We Can’t Find Your Camera” Issue? Here Is the Fix!
So these are the top three ways you can solve the “camera not working” issue on your Windows 10 computer. We have also added other methods to help you fix the can’t start your camera “0xA00F429F” error while using the webcam on your PC. If you followed the step-by-step guide above, your camera should be working again. Anyway, that is all from us. If you are having microphone issues on Windows 10, go through our linked guide. And if you have any questions, comment them down below and let us know.