ADB or the Android Debug Bridge is a command line utility that enables you to control your Android device from your computer; allowing you to transfer files back and forth, install applications, record your device screen and a lot more. On some phones, you can also use ADB to root the device and we all know the benefits of rooting.
Well, we have handpicked some of the most awesome and useful ADB but before we tell you that, here’s how to connect your Android device to your computer using ADB:
How to Connect Your Android Device Using ADB
Connecting an Android device using ADB is a very straightforward process. You can follow the steps outlined below to connect your Android device to your computer using ADB:
1. Connect your Android device to the computer using a USB cable.
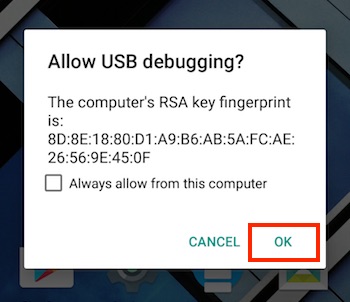
2. On your device, you will see a prompt to “Allow USB Debugging“, tap on “Ok“. Your device will now be connected to the computer with USB Debugging enabled.

Note: You will first have to enable USB Debugging in Settings->Developer Options.
3. Now, you can launch terminal or command prompt and type
adb devices

This will display your device on the screen, as a confirmation that the device is connected to the computer and ADB can be used on the device. There’s also a way to use ADB wirelessly from your Android device and you can check out our detailed article on the same. Well, once you have set up ADB, you’re set to try out all the things that ADB can let you do on your Android Device.
1. Install APK from Computer
Installing an APK from your computer is pretty easy once you have ADB connected.
The syntax for the command you need is:
adb install <path to apk on your computer>
For illustration purposes we used the Apple Music APK that we had saved in our “User” folder. The command used is given below:
adb install ~/applemusic.apk

In case you don’t know “~” is a shorthand for the user directory. The full path can also be used as follows:
adb install /Users/akshaygangwar/applemusic.apk
2. Push and Pull Files
Push and Pull are useful commands to transfer files back and forth between your computer and the Android device that has been connected with ADB.
Push is used to “push” a file from the computer to the Android device.
Pull is the exact opposite. It lets you “pull” a file from your device to the computer.
The syntax for both the commands is given below:
adb push <path to file on computer> <location where you want to save file>
adb pull <path to file on device> <location where you want to save file>
We pulled the Apple Music APK from the device and pushed a random PNG image to the device.
Command for push:
adb push ~/path4172.png /sdcard/receivedimage.png

Command for pull:
adb pull /storage/79F6-1D04/backups/apps/AppleMusic_0.9.4.apk ~/applemusic.apk

3. Mount System With Read/Write Permissions (Requires root)
If you have tinkered with Android devices in the past, you probably have heard of build.prop and other such system files that reside in folders such as /system and the likes. These directories can’t be altered by a non-root user. If, however, your device is rooted, then you can easily access these directories from ADB.
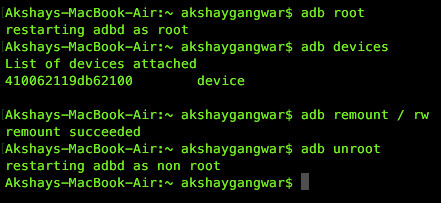
All you need to do is run “adb root” in the Terminal/Command Prompt, which launches ADB as a root service and allows it to access system folders. However, by default the /system folder is mounted as “read-only”, for security purposes. If you need to alter the contents of this folder, it is necessary to mount it with “read and write” permissions.
Turns out, ADB can easily do this with just two commands:
adb root
adb remount / rw
The “adb remount / rw” command unmounts the root directory (/) and remounts it with read/write permissions.
Note: I would recommend running adb unroot after you’ve done the tasks that require adb running as root. Otherwise, mistakes can be potentially catastrophic. Also, do not run the rm -rf command, ever.

4. Access a CLI on Your Phone
Every OS has a command line interface (CLI). Android, being based on Linux has a very rich command set available to users. ADB allows you to access this CLI directly from your computer using:
adb shell
The “adb shell” command exposes even more commands that can be used to traverse through the file system on your phone and do a whole lot of fun stuff.

5. Record Screen
You can also record the screen of your Android device using ADB. No need for third-party applications anymore! There is a caveat, though. ADB can only record the screen for a maximum period of 3 minutes. So… “maybe” a need for third-party apps. Anyway, this is how you can record your screen using ADB:
adb shell screenrecord <path/filename.mp4>
By default, screenrecord will automatically stop recording only after exhausting the 3 minute time limit. If you need to stop recording before that, simply press “Control + C”. We recorded our screen for about 10 seconds, stopping it with Control + C, and saved it with the name “screenrecording.mp4”.

6. Capture Screenshots
ADB also allows you to capture screenshots of your device with a simple and intuitive command called “screencap”. The syntax is similar to screenrecord:
adb shell screencap <path/filename.png>
Unlike taking screenshots using the device’s hardware keys, screencap does not send a notification on the status bar of your device but the file simply gets saved at the path provided in the command. We took a screenshot and saved it in sdcard with the name 1.png, the command is given below:
adb shell screencap /sdcard/1.png
![]()
7. Change DPI of Your Screen
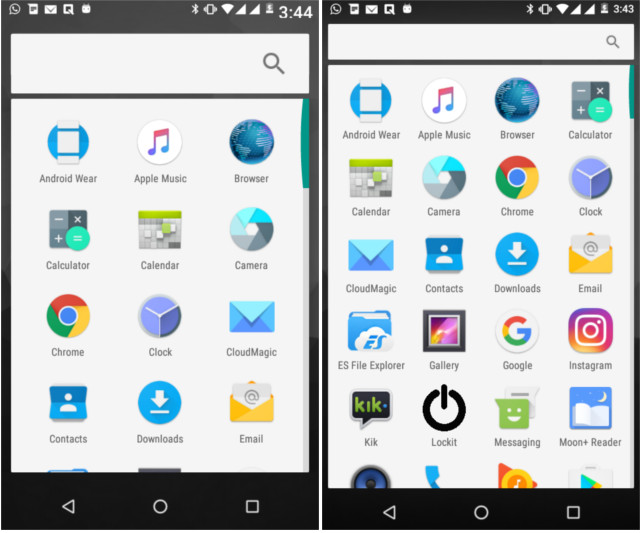
The upcoming Android N update will allow users to adjust a device’s DPI settings by default. However, if you want more control over DPI, you can use ADB.
build.prop editors will tell you that you can edit a line “ro.sf.lcd_density=xx” and replace the xx values with whatever DPI you want, reboot the device and done! However, ADB once again provides an easier way to edit this value and have it take effect without restarting the device. Cool, right?
The command to achieve this is:
adb shell wm density xx
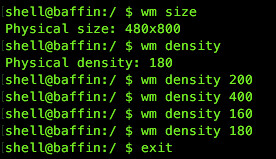
Simply put any value in place of xx and see your device change its DPI value without any reboot.
Different screen sizes and resolutions mean that no particular value of DPI will fit for every device. Don’t be disheartened though, a small amount of playing around with the values is all you need to figure out the best fit. It is also a good idea to find out what your current DPI setting is; and this can be achieved with the following command:
adb shell wm density

This command will return the current screen density (or DPI) value of your device. In case you mess up the values while you tinker, simply revert back to this value and your device will be good as before.

8. Reboot Device Into Bootloader, Recovery or Sideload
Note: if you don’t know what these words mean, these commands are not for you; feel free to skip ahead or read on anyway.
If you flash Custom ROMs as often as we do, chances are you’re tired of powering off your device and then pressing a whole variety of hardware keys simply to be able to boot into the bootloader, recovery or sideload on your device. ADB can let you do any of these with simple commands. Amazing, right?
The commands that will allow you to do this are:
adb reboot bootloader
adb reboot recovery
adb reboot sideload
9. Access the Logcat
The logcat is a tool that allows you to view system messages and traces when the device encounters an error. Logcats are useful especially when developing or testing an app, or when you encounter a bug and need to provide system information to the developers.
The command to access the logcat is:
adb logcat
This will continuously print a lot of information on your screen that might make no sense to you at all, if you don’t know what you’re looking at. Press “Control+C” at anytime to exit the logcat.
SEE ALSO: How to Force ‘Doze Mode’ on Android 6.0 Marshmallow
All Set To Explore cool ADB commands?
Now that we have armed you with enough ADB knowledge to get you going, go forth and explore everything that ADB can let you do. If you need to find more commands and the various flags that can be used to customize them, simply open Terminal/Command Prompt and type “adb” and a list of commands will be resulted, complete with short explanations about what each of them does.
Do you know of any more interesting ADB commands that everyone should know? Let us know in the comments section below.


