
Of late, Microsoft has been getting a lot of flak for adding unnecessary background services, running active telemetry to track your activity, needless bloatware added to the system, and much more. Many critics have even called out Microsoft and compared Windows to the likes of spyware. The truth is, after the release of Windows 10, Microsoft has been increasingly collecting more user data. And with Windows 11, things are not taking the right turn. So if you are worried about your privacy on Windows 11, follow our tutorial to safeguard your privacy on Microsoft’s latest desktop OS. We have mentioned key settings that you should turn off to protect your privacy on Windows 11.
How to Protect Your Privacy on Windows 11 (2022)
We have added 10 different ways to safeguard your privacy on Windows 11. Towards the end, we have also included a third-party program to make Windows 11 a privacy-friendly OS. On that note, let’s dive and check out the privacy settings you should change right away.
1. Change General Privacy Settings
1. First, press the Windows 11 keyboard shortcut “Windows + I” to open the Settings app. Now, move to “Privacy & security” from the left sidebar and click on “General” under “Windows permissions” in the right pane.

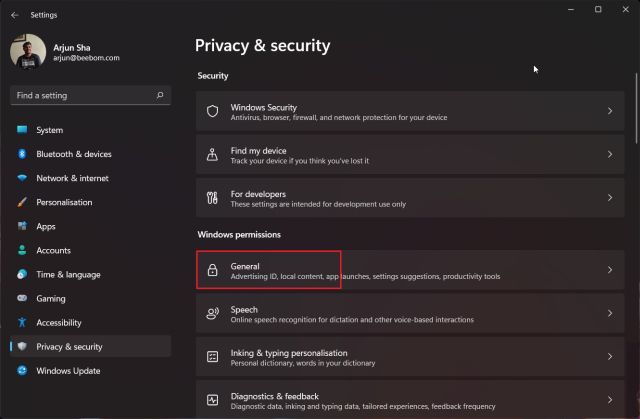
2. Here, disable all the toggles. This will prevent Microsoft from tracking your app launches, learning about your interests, and showing personalized ads. It will also block websites from accessing your default language.

2. Turn Off Online Speech Recognition
If you don’t want to use Windows 11’s new features like Voice Typing and Voice Access that use Microsoft’s online speech recognition, you can very well turn it off. This will stop Microsoft from sending your voice data to the cloud, thus, preserving your privacy. Here is how to do that.
1. Move to the “Privacy & security” settings and click on “Speech“.

2. Here, turn off the “Online speech recognition” toggle. That’s it.

3. Disable Sending of Diagnostic Data
To keep Windows 11 secure and up to date, Microsoft sends a limited amount of diagnostic data, which is required by default. However, there is another set of optional diagnostic data, which lets Microsoft access your browsing history, how you use an app or a feature, and more. If you don’t want to send the optional diagnostic data to the Redmond giant, follow the steps below.
1. Navigate to the “Privacy & security” menu and move to the “Diagnostics & feedback” settings section.

2. Here, expand the “Diagnostic data” section and disable the “Send optional diagnostic data” toggle.


3. Apart from that, I will also suggest disabling all three toggles right below. This will stop Windows 11 from using your diagnostic data to display personalized tips and recommendations. Also, it will prevent Windows 11 from sending your inking and typing diagnostic data to Microsoft.


4. Disable Activity History
In 2018, Microsoft had introduced the Timeline feature on Windows 10 that kept track of all your activity on the PC. It was later renamed Activity History. In Windows 11, it does not show the timeline of your tasks and activities, however, Microsoft still stores all your activities, which is pretty surprising. If you want to protect your privacy on Windows 11 and stop Microsoft from keeping track of all your activities, follow the steps below and disable this feature.
1. Go to the “Privacy & security” menu in Windows Settings and click on “Activity history” in the right pane.

2. Here, disable the “Store my activity history on this device” checkbox. After that, click on “Clear” to delete all your activity history sent to the cloud.

5. Change Location Permission
If you don’t want apps to access your location on Windows 11, you can block access with a single click. That said, disabling location services altogether on Windows 11 will also prevent you from finding your device in case of theft. To avoid it, I suggest allowing location permission to only select apps that truly need it. Here is how to manage the location permission and protect your privacy on Windows 11 from invasive apps.
1. In the “Privacy & security” menu, scroll down and click on “Location” under the “App permissions” section.

2. Next, grant the location permission to apps that really need it and remove the permission to other unwanted apps. By the way, you can altogether turn off location services on Windows 11 by disabling the toggle at the top.

6. Change Camera and Mic Permissions in Windows 11
Among the many permissions, the camera and mic are the most sensitive ones, and you must make changes on your Windows 11 PC to stop nefarious apps from accessing your camera and microphone in the background. This will hugely protect your privacy on Windows 11. Here is how to do that.
1. Under the “Privacy & security” menu, scroll down and open the “Camera” permission settings.

2. If you want to disable the webcam/ camera on your Windows 11 PC, turn off the “Camera access” toggle. In case you want to grant the camera permission to select apps, make sure to review the list of apps and disable access to unnecessary ones.

3. Similarly, open the “Microphone” permission setting and review the list. Disable the “Microphone access” permission for apps that don’t need it.

7. Enable Encrypted DNS
Another way to protect your privacy on Windows 11 is to encrypt the web traffic on your computer. Encrypted DNS (aka DNS-over-HTTPS) is becoming a common standard to encrypt DNS queries. Whenever you try to open a website or an app tries to connect to its server, the computer talks to a DNS server to look up the domain name. This exchange has largely remained unencrypted and could be a major source of leakage. If you are serious about your privacy, you should definitely turn on Encrypted DNS on Windows 11.

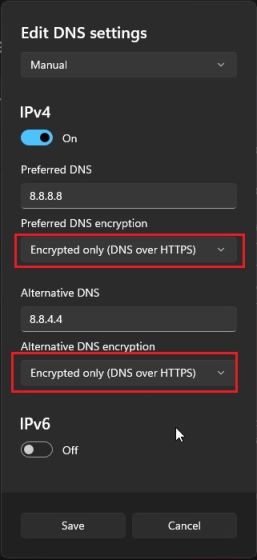
We have already written a detailed tutorial on how to turn on DNS over HTTPS on Windows 11, so read our guide and apply the necessary changes. It will go a long way in protecting your internet activity not just on home networks, but also on public networks.
8. Move to a Local Account
By now, you already know that Microsoft is pushing users to opt for the online Microsoft account instead of a local account on Windows 11. And going by the recent news, Microsoft aims to bring the online account requirement to Windows 11 Pro users too. All of these changes are being done to collect more user data, build a monetizable profile of users, and target customers with personalized ads. Basically, the online account requirement allows Microsoft to track your usage and build an online profile tied to your Microsoft account.


So the first thing you should do to preserve your privacy on Windows 11 is to switch to a local account. We have a detailed tutorial on how to switch from a Microsoft account to a local account on Windows 11, so follow the instructions mentioned in the linked article. This will stop Microsoft from building an online profile tied to your on-device activity.
9. Delete Your Microsoft Cloud Data
No matter what you do on your Windows 11 PC, Microsoft keeps track of all your activity and sends the data back to its server. Microsoft says the data is used to improve its services and products, personalize your online experience, and deliver better recommendations. The data is meant to understand your behavior and serve you targeted ads. I
f you want to delete all your cloud data, including location activity, browsing history (collected from Edge or Windows Search), apps and service activity, media activity, and performance data, follow the steps below.
1. First, open this link to open Microsoft’s privacy dashboard. Now, sign in with the Microsoft account linked to your Windows 11 PC.


2. Next, expand the “Location activity” section and delete the data right away. For example, I have the location services turned off on my Windows 11 computer, so there is no cloud data. However, under Browsing history, it has stored all the websites that I have visited using Edge. You can click on “Clear all browsing activity” to delete all of your browsing data.


3. Similarly, expand the “Search history” section, and you will find all the search queries that you have made from Bing Search, Windows Search, Cortana, etc. To delete all your search data, click on “Clear all search history“.


4. After that, click on “App and service activity” and click on “Clear all app and service activity“. This will remove all your app and service-related activities from Microsoft’s cloud.


5. Perform a similar action for “Media activity” and “App and service performance data“. This will delete all your personal data from Microsoft’s cloud server and will protect your identity from targeted ad profiling.


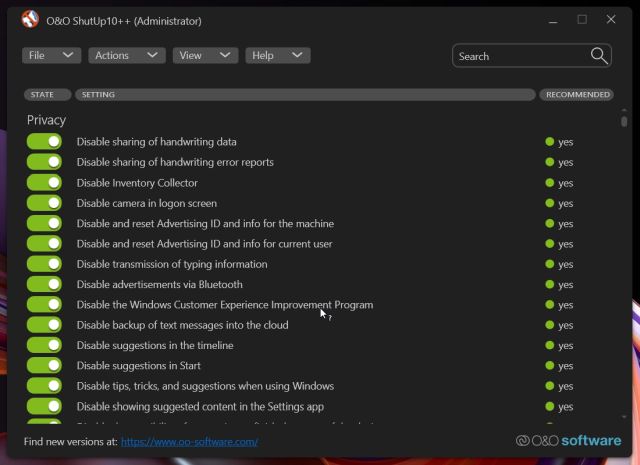
10. Protect Your Privacy on Windows 11 with ShutUp10++
Finally, we have O&O’s ShutUp10++ program that lets you disable all kinds of telemetry, background app access, data collection, suggestions, and more in just a few clicks. ShutUp10++ is an antispy tool made by a German company called O&O. It’s a free tool that offers recommended settings to have the best privacy on Windows 11. You don’t need to open Windows 11 Settings and can make privacy-friendly changes yourself.
This program does all of that seamlessly and changes major configurations through Registry and Group Policy, which are not available in Windows Settings. Plus, to be on the safer side, ShutUp10++ also creates a system restore point in case anything goes south. To learn how to use ShutUp10++ to protect privacy on Windows 11, follow the instructions below.
1. Go ahead and download ShutUp10++ from here. After that, run it.
2. Next, click on “Actions” in the top bar and choose “Apply only recommended settings“. For now, I am suggesting recommended settings only. If you understand how Windows works, you can manually change the settings below or choose the “Recommended and somewhat recommended settings” option.


3. It will prompt you to create a system restore point. Click on “Yes“.

4. Now, all the privacy settings will be applied instantly. Now, close the app and restart your computer. This time, your Windows 11 PC will boot with all the privacy-friendly changes. No need to tinker with Windows Settings or anything.
5. In case you want to revert the changes, open the program again and choose “Undo all changes” from the “Actions” menu. Now, restart your PC, and you will be back to the original state.

Turn Off these Windows 11 Privacy Settings Right Now
So this is how you can easily safeguard your privacy on Windows 11. I would suggest you go through all the Windows 11 privacy settings that should be turned off and then use ShutUp10++ to make other recommended changes. Anyway, that is all from us. Plus, if you are looking to speed up your Windows 11 PC, go through our exhaustive article. And if you want to try out a clean and lightweight version of Windows 10 called Tiny10, follow our linked tutorial. You could also try out a redesigned version of Windows 11 called Rectify 11 on your computer and get access to a more consistent UI experience. Finally, if you have any questions, let us know in the comments section below.


