If I have to pick one of the best new features in Windows 11, I would certainly choose the voice typing experience in Windows 11. It’s just so seamless, accurate and the voice recognition is surprisingly good. It seems Microsoft has done a ton of improvements to its online Microsoft Speech Services. So if you want to enable and use voice typing in Windows 11, follow our simple guide below. You can even get this Windows 11 feature on Windows 10 by following the last method. On that note, let’s dive in.
Enable and Use Voice Typing in Windows 11 (2021)
Here, we have mentioned two ways to use voice typing in Windows 11. The first one is the built-in voice typing tool, while the other one is the built-in dictation tool in Office apps on your Windows 11 PC. Moreover, I have also mentioned how to use voice typing in Windows 10 and some helpful dictation commands.
How to Use Windows 11’s Built-in Voice Typing Tool
The native voice typing tool in Windows 11 is a system-wide utility and works in all apps and environments, be it a browser, Notepad, or an Office app. If you see a text field, just summon the voice typing toolbar, and you are ready to go. That said, keep in mind, you will need an active internet connection for voice typing to work.
1. The easiest way to enable voice typing is using a Windows 11 keyboard shortcut. Press “Windows key + H” simultaneously to open the voice typing prompt immediately.
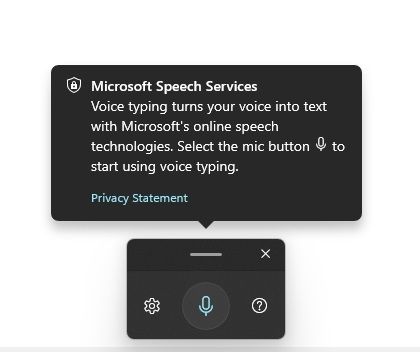
2. Next, click on the “mic” button and start speaking. Using the online Microsoft Speech Services, your dictation will be converted from speech to text in no time. I was surprised to see that Windows 11’s voice typing experience was usable and accurate. You can see the voice typing feature in action here:
3. The best part about voice typing in Windows 11 is that it comes with support for “Auto punctuation“, and again, it works really well. By the way, it’s not enabled by default. You need to click on the “Settings” icon and turn on the “Auto punctuation” toggle.

4. In case your dictation is not being picked properly, you can navigate to “Settings -> Time and Language -> Speech”. Here, select the appropriate “Speech Language” from the drop-down menu based on your region or accent.

Enable Voice Typing Launcher in Windows 11
You can also turn on the “Voice typing launcher” so that the voice typing overlay appears whenever you click on a text field. No matter which app or window you are in, simply click on the “mic” button and start voice typing instantly.
1. To enable this feature, click on the “Settings” icon in the voice typing overlay. Then, turn on the “Voice typing launcher” toggle.

2. For example, I am on Google Review’s page on Chrome and the Voice typing launcher automatically comes up when I click on the text entry field.
3. Now, I can click on the “mic” button and add my review with utmost ease. Quite helpful, right? You can do this on any webpage, text field in programs, web form, etc.
Use Voice Typing in Office Apps on Windows 11
In case you are unaware, besides the built-in voice typing, Office apps also come with a “Dictate” option, and it works very much the same. In fact, it also has support for Auto punctuation and works on Windows 10 too. Those who use the free Office portal on the web can also take advantage of Microsoft Speech Services without any limitation. On a side note, you can find the differences between Office Web and Desktop apps from our detailed article. Keep in mind, the Transcribe feature on Word is different from voice typing, and it’s only available to paid users. To learn how the voice typing feature works in Microsoft Office apps, follow the steps below:
1. To use voice typing within Office apps on your Windows 11 PC, open one of these apps – Word or PowerPoint. On the top-right corner, you will find a “Dictate” option. The same step is applicable for Office on the web as well.
2. Click on “Dictate”, and you can straight away speak to convert your speech to text in real-time. Just hit the “mic” button and start talking.

3. And similar to Windows 11’s built-in voice typing, you can click on the “Settings” icon and enable “Auto punctuation”. You can also customize your preferred spoken language and enabe the profanity filter while working on office documents or school projects.

Use Voice Typing in Windows 10
While Windows 11 has a much smarter voice typing utility, Windows 10 also comes with a native Dictation Tool. You can use the same “Windows + H” keyboard shortcut, and the dictation pop-up will appear at the top of the screen.
The difference between dictation tools on Windows 10 and voice typing in Windows 11 is the lack of auto punctuation on the former. You need to use dictation commands to add punctuations, letters, symbols, etc., in Windows 11. Here is how to go about it.
1. First off, open Settings and move to Privacy -> Speech, and turn on “Online speech recognition“.

2. Now, press the “Windows + H” shortcut, and you will be able to dictate your speech. Here, you won’t find auto punctuation. Instead, you need to use the dictation commands I have mentioned below to add punctuations, symbols, and special characters.

Dictation and Punctuation Commands for Enhanced Voice Typing
Currently, only English (US) supports advanced dictation commands, but the following languages support basic symbols, texts, numbers, etc.
- English (US – Advanced Dictation Commands)
- Simplified Chinese
- English (Australia, Canada, India, United Kingdom)
- French (France, Canada)
- German (Germany)
- Italian (Italy)
- Portuguese (Brazil)
- Spanish (Mexico, Spain)
Here are the dictation commands you can use while voice typing on your Windows 10 or Windows 11 computer:
| To do this | Say this |
|---|---|
| Clear a selection | Clear selection; unselect that |
| Delete the most recent dictation result or currently selected text | Delete that; strike that |
| Delete a unit of text, such as the current word | Delete word |
| Move the cursor to the first character after a specified word or phrase | Go after that; move after word; go to the end of paragraph; move to the end of that |
| Move the cursor to the end of a unit of text | Go after word; move after word; go to the end of that; move to the end of paragraph |
| Move the cursor backward by a unit of text | Move back to the previous word; go up to the previous paragraph |
| Move the cursor to the first character before a specified word or phrase | Go to the start of the word |
| Move the cursor to the start of a text unit | Go before that; move to the start of that |
| Move the cursor forward to the next unit of text | Move forward to the nextword; go down to the nextparagraph |
| Moves the cursor to the end of a text unit | Move to the end of the word; go to the end of the paragraph |
| Enter one of the following keys: Tab, Enter, End, Home, Page up, Page down, Backspace, Delete | Tap Enter; press Backspace |
| Select a specific word or phrase | Select word |
| Select the most recent dictation result | Select that |
| Select a unit of text | Select the nextthree words; select the previous two paragraphs |
| Turn spelling mode on and off | Start spelling; stop spelling |
If you want to dictate letters, numbers, punctuation, and symbols, you need to follow the below commands. For example, if you want to add an uppercase letter, you simply need to say “uppercase” before the letter.
| To insert this | Say this |
|---|---|
| @ | at symbol; at sign |
| # | Pound symbol; pound sign; number symbol; number sign; hash symbol; hash sign; hashtag symbol; hashtag sign; sharp symbol; sharp sign |
| $ | Dollar symbol; dollar sign; dollars symbol; dollars sign |
| % | Percent symbol; percent sign |
| ^ | Caret |
| & | And symbol; and sign; ampersand symbol; ampersand sign |
| * | Asterisk; times; star |
| ( | Open paren; left paren; open parenthesis; left paren |
| ) | Close paren; right paren; close parenthesis; right parenthesis |
| _ | Underscore |
| - | Hyphen; dash; minus sign |
| ~ | Tilde |
| \ | Backslash; whack |
| / | Forward slash; divided by |
| , | Comma |
| . | Period; dot; decimal; point |
| ; | Semicolon |
| ' | Apostrophe; open single quote; begin single quote; close single quote; close single quote; end single quote |
| = | Equal symbol; equal sign; equals symbol; equal sign |
| (space) | Space |
| | | Pipe |
| : | Colon |
| ? | Question mark; question symbol |
| [ | Open bracket; open square bracket; left bracket; left square bracket |
| ] | Close bracket; close square bracket; right bracket; right square bracket |
| { | Open curly brace; open curly bracket; left curly brace; left curly bracket |
| } | Close curly brace; close curly bracket; right curly brace; right curly bracket |
| + | Plus symbol; plus sign |
| < | Open angle bracket; open less than; left angle bracket; left less than |
| > | Close angle bracket; close greater than; right angle bracket; right greater than |
| " | Open quotes; begin quotes; close quotes; end quotes; open double quotes; begin double quotes; close double quotes; end double quotes |
Smart Voice Typing with Auto Punctuation in Windows 11
So that is how you can enable and use voice typing in Windows 11. I use Gboard’s voice typing every day on my Android phone, and I must say, Microsoft has greatly improved the voice typing experience in Windows 11. It’s fast, accurate, and the auto punctuation works for the most part. I am excited about Windows 11 and what other new features it will bring before the final release. As for now, you can learn how to take screenshots on Windows 11 or customize the Windows 11 Start Menu or check Screen on time in Windows 11. Anyway, that is all from us. If you have any questions, comment down below and let us know.